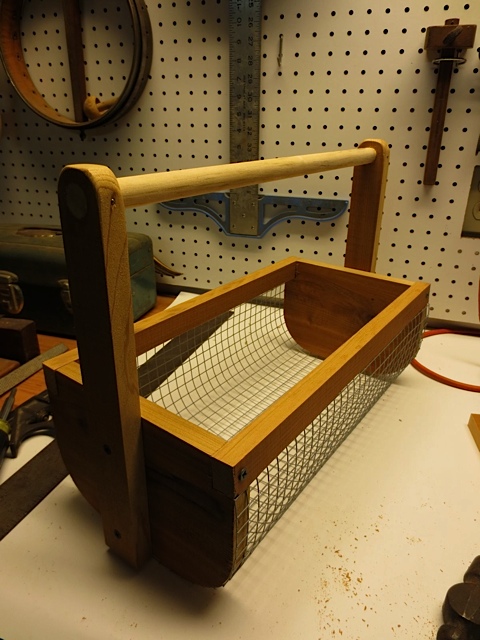
First of all you may be wondering what a “hod” is! According to dictionary.com com a hod is a portable trough for carrying mortar, bricks etc., fixed crosswise on top of a pole and carried on the shoulder. I found these directions on runnerduck.com and thought it would be a perfect solution for carrying in vegetables from the garden. My husband took one look at the directions and decided to make a few modifications. Now I have my own custom made Veggie Hod! Here’s what you need from the original directions:
- 1 x 6 inch cedar 3 feet long
- ½ inch wire mesh 16 by 16 inches
- ¾ inch dowel
- Carpenters glue
- Nails
- Staples
We had some leftover ¾ inch cedar siding that was perfect for the project.

Cut the ends 5 ½” by 8”.

Radius the two bottom corners using a 1 quart paint can as a guide.

Using a band saw or jig saw (shown) cut the corner radius.

Cut the two side rails 1 by ¾ by 16 inches.

Veggie Hod wood parts list cut from ¾ inch cedar: 2 ends 5 ½ x 8″, 2 side rails 1 x ¾ x 16″, 2 handles 1 ½ x 12″, and a 3/4 inch dowel 17 ½ inches long.

Cut a ¾ x 1 inch notch in each top corner of the end pieces for the side rails.

End pieces rough cut and ready for sanding.

Cut the mesh 16 by 16 inches. Cut the wire very close to the cross wires to eliminate sharp, pointy wires. Bend one edge of the mesh 90 degrees, ½ inch in from the edge.

Staple that ½ inch edge to the bottom of one of the sides.

Align the side in one of the end notches and wrap the mesh around to mark your bend point for the other side. When you have this mark bend the mesh 90 degrees and staple to the other sidepiece.

Fasten the side rails to the end pieces with 1 ½ inch screws.


Drill ¾ holes at top end of handle. Draw out half-round for cut to finish.

Handle ends shaped and finished.

Attach handles to the center of each end piece with two 1 ¼ inch screws.

Slide the dowel into the handles and mark any excess dowel length and trim off. Dab some wood glue into the handle holes and insert dowel. Tap a 1 inch brad through the handle into the dowel to secure.

I can’t wait to use my Veggie Hod, it will be perfect for gathering the harvest from the garden, I’ll even be able to give the vegetables a quick wash before coming into the house.

Since my husband made four of these I’m thinking of a winter giveaway, good idea?

The hardest part would seem to be shaping the ends of the handles. Any trick to that?
LikeLike
Barbara,
My husband used dowels to create the handles!
LikeLike
I love this. I wish I had the equipment to make it. Because I totally would love to. You should think about cutting out the supplies and selling as a kit for people who don’t have the equipment but would love to make it. Like me.
LikeLike
Priscilla,
I’ll have to suggest this idea to my husband!
LikeLike
Any concern on what kind of mesh to use? The wire mesh from my local hardware atore came with all kinds of warnings about chemicals on it? Do these wash off?
LikeLike
Srg,
We used a piece of mesh leftover from another project.I rinse the vegetables with the hose when they are in the hod and never thought about a problem with chemicals! I don’t store any veggies in the hd so they are only in the hod while I’m picking them.
LikeLike
You could use PVC coated wire mesh. I painted my Galv. wire mesh with Milk Paint from JoAnns.
LikeLike
Bob,
that is an excellent suggestion to use PVC coated mesh! Thanks for sharing.
LikeLike
Thank you for posting the step-by-step directions. I just built one to gather tomatoes and okra from our okra. I was a bit concerned about the hardware cloth sagging in thw middle when full of vegetables so I added two 3/4″ × 3/4″ strips on the bottom to act as a flat surfacw for sitting on a table without rolling. I stapled the hardware cloth to these runners which gave it a bit more stability.
I am going to make another one but only 8″ in length to use to gather eggs from our chicken coop. We dont need anything huge since we only have 5 chickens but this length should work nicely.
Rather than buy a dowel I decided to just turn one from cedar on my lathe.
LikeLike
Gerald,
I’m glad the directions were helpful, I love the additions you made and making one a smaller size for eggs is wonderful! Would love to see a picture!
LikeLike
A Canadian innovation is to use an old hockey stick to cut down for a handle.😂
LikeLike
Thank you so much for these instructions!! My son’s Elementary is getting their school garden back up and running and I’m planning on making some if these for them.
LikeLike
Elise,
What a fun school project to have a school garden! I wish all schools did that!
LikeLike