Sausage Pinwheels with Gravy

This Sausage Pinwheels with Gravy recipe originally came from Taste Of Home. I think it’s actually a breakfast recipe but we love breakfast for dinner and we’ve always had it for dinner. It’s a light and tasty supper and if you have leftovers they are great heated up the next day.

Sausage Pinwheels with Gravy

Ingredients:

2 ¼ cups flour, divided
2 tsp baking powder
1 ¼ tsp snipped chives, divided
1 ¼ tsp dried parsley, divided
¾ tsp tarragon, divided
½ tsp seasoned salt
½ tsp sugar
¼ tsp baking soda
2 Tbsp plus 2 tsp cold butter, divided
¾ cup buttermilk
12 ounces reduced fat bulk pork sausage
2 cups fat free half and half
2 tsp chicken bouillon granules
¼ tsp pepper
Dash crushed red pepper flakes

Directions:

In a bowl, combine 2 cups flour, baking powder, ¾ tsp chives, ¾ tsp parsley, ½ tsp tarragon, seasoned salt, sugar and baking soda. Cut in 2 Tbsp butter until the mixture resembles coarse crumbs. Stir in the buttermilk. On a floured surface, roll or pat dough into a 14 x 10” rectangle.

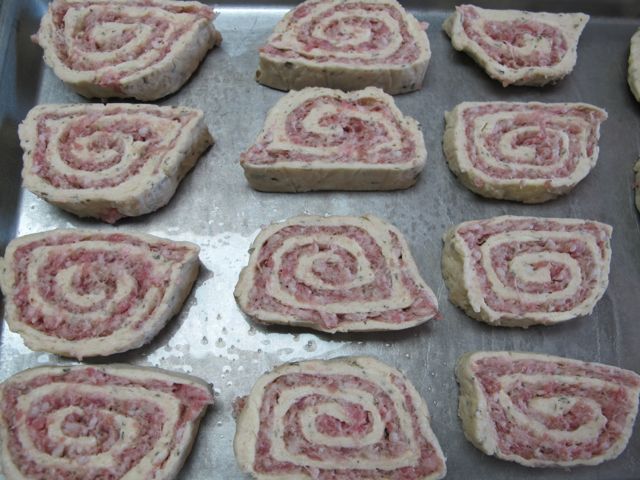
Between two sheets of waxed paper, roll or pat the sausage into a 14 x 8” rectangle. Carefully lay the sausage on top of the buttermilk-flour rectangle. Remove all waxed paper and starting with the long side covered with sausage, roll up jellyroll style; pinch seam to seal. Wrap in waxed paper and chill for at east an hour.

Removed waxed paper; cut roll into 1-inch slices. Place cut side down in a 13 x 9 x 2 inch baking pan coated with cooking spray.

Pinwheels ready for the oven.

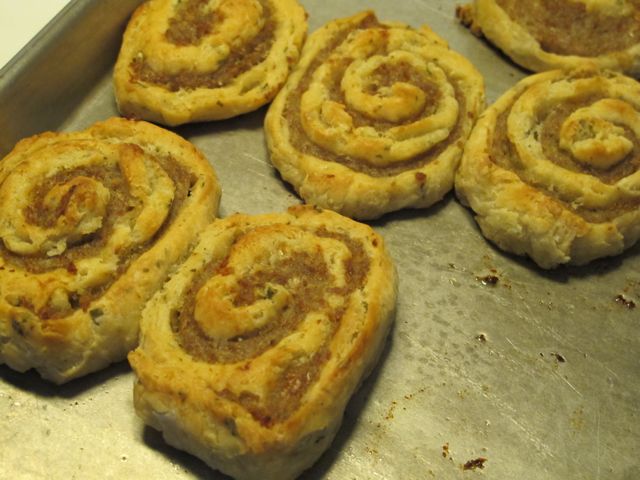
Bake at 400 degree for 30-35 minutes or until golden brown.

Pinwheels are golden brown

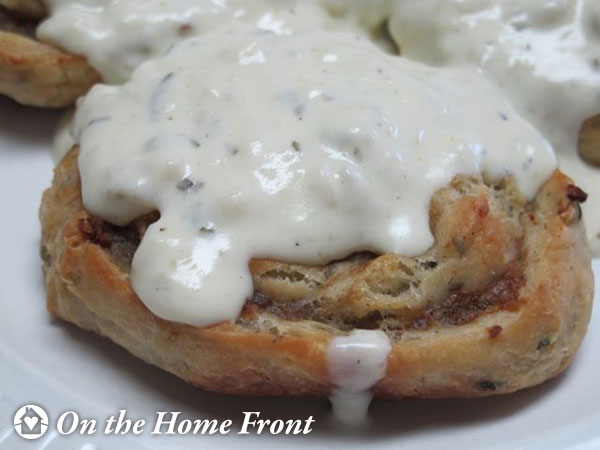
For gravy, place remaining flour in a saucepan. Gradually stir in half and half, bouillon, pepper, pepper flakes and remaining chives, parsley and tarragon until smooth. Bring to a boil over medium-low heat; cook and stir for 1-2 minutes or until thickened. Removed from the heat and stir in remaining butter. Serve immediately with pinwheels. Serves 6-7

Sausage Pinwheels with Gravy

Prudent Pantry: Got Rhubarb?

Yesterday I picked what I think will be the last of the rhubarb harvest. Rhubarb enjoys cooler weather and we have definitely moved into the hot days of summer. I have a rather large pile of rhubarb sitting on my counter and the question is what to do with it?

Last rhubarb harvest.

I will freeze some to use later. Freezing rhubarb is so easy. You just slice it up and place it into freezer bags to use at some later point.

Rhubarb for the freezer.

However I don’t want a freezer full of rhubarb so I will make my famous Rhubarbeque Sauce, which we all just love! The formal name for this sauce is actually Victoria Sauce or as we call it Rhubarbeque Sauce! It is a wonderful sauce that is perfect on grilled chicken or pork. It’s very easy to make and the recipe makes exactly four pints so you aren’t overwhelmed. I usually double the recipe and make eight pints. We enjoy it throughout the year.

This recipe can be processed in a water bath canner for storage in your pantry or frozen for storing in your freezer. Follow your manufacturer’s directions for using your water bath.

Rhubarbeque Sauce

2 quarts chopped rhubarb
1 ½ cups raisins
½ cup chopped onion
3 ½ cups brown sugar
½ cup vinegar
1 tsp allspice
1 tsp cinnamon
1 tsp ginger
1 tsp salt

Combine rhubarb, raisins, onion, sugar, and vinegar in a large saucepot.

Combine all ingredients except spices in a saucepan.

Cook until thick, about 25 minutes. As the mixture thickens, stir frequently to prevent sticking. Add spices; cook 5 minutes longer. Ladle the hot sauce into hot jars, leaving ¼ inch headspace.

Ladle sauce into hot jars.

Adjust two-piece caps. Process 15 minutes in a boiling water canner.

Yield: 4 pints

canning, rhubarb, prudent pantry
Rhubarbeque Sauce

Linked to: FrugallySustainable, FoodieFriendsFriday, SmallFootprintFriday, FreedomFridays, FromTheFarmBlogHop, LittleHouseInTheSuburbs, FarmGirlFriday, BackyardFarmingConnection, TheCreativeHomeAcreHop, TheChickenChick, HomemakerOnADime, TheGatheringSpot, TheBackyardFarmingConnection, TuesdayGreens, AHumbleBumble, EcoKidsTuesday, HealthyRootsHappySouls, BackToTheBasics, AnOregonCottage

My Garden: Guinea Fowl Update

It seems like just a few days ago that we picked up our baby guinea fowl (keets).

Guinea Keets
Keets

We kept them in a box in our garage for a few weeks, then moved them into a very large box with our six baby chicks and finally last week we moved them all into the barn. There they have a nice large area to enjoy. They are all very curious!

Babies in the barn!
Baby chicks (and shy keets) in the barn!

Looking at the guineas you can see they are at that awkward stage, no longer are they the cute little fuzzy chicks but they aren’t quite adults yet. Fun to see them acting like adults!

Young Guinea Fowl
Young Guinea Fowl

They are all getting along very well and although the keets aren’t quite as friendly as the chickens, they do recognize my voice and come to get a treat of millet. Can you spot the keets amidst the baby chicks?

Can you spot the baby guinea?

My husband made a little roost for them, which they have discovered and at night you can find  them all next to each other!

Keets rousting together.
Keets roosting together.

Today we are going to fashion a little yard for them so they can enjoy the outdoors. Eventually they will be moved to our chicken coop with our seven older birds. I don’t look forward to that time as there is always a period where they determine the pecking order! We usually move the younger birds in at night but there is still a period of adjustment to go through.

My next obstacle once the birds are all together is to figure out how to let the guineas free range while keeping the chickens in their yard! Any suggestions?

The keets are growing up!

Linked to: SideWalkShoes, ASouthernDaydreamer, Back2TheBasics, WildcraftingWednesday

Frugal Tips: Time to Make Vanilla Extract

Time to make some vanilla extract! Making Vanilla Extract at home is so easy!  Once you’ve combined the vodka and vanilla beans you have to let it sit for 4-6 months before it is ready. If you make a batch now it will be ready to give as gifts at Christmas time. To start your batch you will need the following:

A large jar (a gallon or less, depending on how much extract you plan to make)
Vodka (the inexpensive stuff is fine)
Vanilla Beans (which I order through Olive Nation)

vanilla extract, vanilla beans
Vanilla Beans

Kitchen Shears

Begin by cutting though each bean lengthwise, leaving about an inch at the top of each bean so they stay together.

homemade vanilla extract
Cut vanilla bean.

Place all your beans into your jar.

Fill the jar with vodka.

homemade vanilla extract, frugal tip
Homemade Vanilla Extract in the works.

Put the lid on and store in a dark place for 4-6 months. Occasionally check the jar and give it a shake.

Once the time period has passes, strain out the vanilla beans using a coffee filter lined colander. Bottle the extract in dark amber bottles and you’re ready to give it as gifts and start cooking with it yourself!

For 1 gallon of vodka use 80 vanilla beans.
For ½ gallon of vodka (1.75l) use 40 beans.
For 1 quart of vodka use 20 vanilla beans.

Linked to: Feeding Big, KatheWithAnE, HearthAndsoulHop, TuesdaysWithATwist, TheBackyardFarmingConection, AHumbleBumble, EcoKidsTuesday, HealthyRootsHappySouls, CornerstoneConfessions, TheNYMelroseFamily, KellytheKitchenKop, WeAreThatFamily, FreshFoodsWednesday, WhatchaWhippedUp, TheThriftyHome, MostlyHomemadeMom, WildcraftingWednesday, RaisingArrows, KatherinesCorner, 7Alive, ALifeInBalance, Saving4Six, ServingJoyfully, HomemakersChallenge, BloomDesigns, TheT2Women, SimplyNaturalSaturdays, TheWonderingBrain, NourishingJoy, OurDelightfulHome, NaptimeCreations


Chicken Orzo Salad- Delicious

This is one of those recipes that has been passed around between my mother and my mother-in-law and enjoyed by all. I think it is one of those perfect spring or summer salads. Chicken Orzo Salad is easy to make and delicious! I’ve even made it without the grapes as we didn’t have any in the house and instead I added a bit of leftover corn! Not only was it colorful but it was still delicious!

I hope you enjoy it as much as we do! You can mix up this salad in the morning and put it in the refrigerator to chill.

Chicken Orzo Salad

Ingredients:

Dressing:
3 Tbsp oil
4 tsp orange juice
2 tsp salt (I only used 1 tsp)
¾ cup mayonnaise
4 tsp red wine vinegar

Salad:
12 oz orzo pasta
1 cup cashews
1 cup celery, chopped
3 small cans mandarin oranges
1 cup grapes, sliced in half
4 cups of cooked chicken, diced

Directions:

Combine the oil, orange juice, salt, mayonnaise and vinegar in a small bowl. Mix well and set aside.

Combine dressing and orzo.
Bring a pot of water to boil and cook the orzo according to the package directions. Drain the orzo and place in a large bowl.

Toss the orzo with the dressing. Add the remaining ingredients, refrigerate the Orzo Salad until chilled. Serve on lettuce.

Chicken Orzo Salad

Glazed Pork Chops

It’s that wonderful time of the month when I participate in the Surprise Recipe Swap. This month I was paired up with Jamine at momstestkitchen.com. I enjoyed reading about Jaime on her blog, she summed up her reason for cooking in one sentence, “girl meets boy, I guess girl has to learn to cook”! Jamine and her husband have been married for a couple of years and have the most adorable daughter.  She started her blog to keep track of all the recipes she’s collected. I was overwhelmed by the number of recipes on her blog, and it was really hard to pick just one! However I had defrosted some pork chops and decided to make her recipe for Glazed Pork Chops. Was I ever glad I did, they were moist and delicious and my husband and son ate every single bite! Definitely adding this recipe to my recipe box!

The best thing about this recipe is that I had everything I needed on hand. No special trips to the store just a quick and easy dinner. Thank you Jamine!

Glazed Pork Chops
Glazed Pork Chops

Ingredients:

4 boneless pork sirloin chops
¾ cup packed brown sugar
3 tablespoons Dijon mustard
4 tablespoons soy sauce
1 tablespoon spicy brown mustard
1 tablespoon vegetable oil
salt & pepper for seasoning

Directions:

In a small bowl, combine the brown sugar, both mustards and soy sauce.

Season the pork chops with salt & pepper and then place in a gallon size Ziploc bag or a shallow dish.  Add the marinade to the pork chops, cover or seal and chill 30 minutes to 1 hour.

Preheat a large skillet over medium-high heat, lightly oil the skillet.

Remove the pork from the marinade, reserving the marinade.

Pan sear the pork in the skillet until cooked through, about 5 minutes on each side.

In a small saucepan, bring the reserved marinade to a boil and cook, stirring occasionally, until heated through, about 2 minutes.  Pour over the pork chops before serving.

Glazed Pork Chops - Enjoy!

Prudent Pantry: Bucket Storage

Many of your have seen pictures of my pantry.

prudent living,
A well stocked pantry.

We do not live close to the store and as a result I like to keep a well-stocked pantry. I purchase oatmeal, sugar and wheat berries from the local co-op and store them in large white buckets in my pantry.

Food
Food Stored in white buckets
(Photo credit: Tim Patterson)

There is a lot of misinformation out there about plastic buckets. Much of the controversy rages over whether a bucket is food grade or not. Plastic containers usually have a number in a small triangle on the bottom, often a #2. This number doesn’t mean that it’s food grade but rather tells what kind of plastic the bucket is made of. A #2 means that it is made from HDPE plastic. Most of these buckets are food grade but there are times when they are not.

Food grade white bucket.

Sometimes the bucket has a dye added to the plastic that is not food grade. This alone will prevent the FDA from approving it as food grade. Sometimes the bucket manufacturer uses recycled HDPE, these buckets are also not food grade. When something is put in the bucket that is a nonfood type produce such as paint or chemicals then this also makes them so they are no longer food grade.

How do you find buckets that are safe for you to use for the foods you want to store yourself? If you are buying new buckets ask the company who is selling them. If you are getting used buckets, use only buckets you know have already been used to store food and haven’t been used for anything else. You can find these buckets at bakeries, ice cream manufacturers, large restaurant or kitchens or food processing plants.

bakery!
Ask for buckets at your local bakery.(Photo credit: roboppy)

You want to make sure your lids are airtight. You may have to purchase new lids if the lids that come with the used buckets are damaged in any way.

Bucket lid
Bucket lid

One of the best sources I’ve found for buckets on the east coast is a company called Uline located in New Haven, CT.

Linked to: HomemakersChallenge, CommonSenseHomesteading, HomesteadBarnHop

Enhanced by Zemanta

My Garden – Beneficial Bugs

Not all insects are harmful to your garden! One of the best ways to control peats in the garden is to encourage their natural enemies. Here are a few of the most common beneficial insects.

Ladybugs
There are more than 400 species of lady beetles found in North America. Most ladybugs feed on aphids and other soft bodies insects. They are attracted to flower nectar and pollen, which they eat before they can reproduce.

Description: Coccinellidae is a family of beet...
(Photo credit: Wikipedia)

Lacewings
Pale green or brown lacewing adults feed mainly on flower nectar. The larvae, however, are voracious predators that feed on aphids, thrips, scales, moth eggs, small caterpillars and mites.

Lacewing
(Photo credit: 0olong)

Hover flies
These insects as adults look very much like small bees. They are also attracted to flowers to feed on nectar and pollen. The larvae however feed on aphids and are able to get into tight places where other good bugs can’t go. The adults also pollinate strawberries and raspberries, producing larger fruits and higher yields.

Avalanche Lily & Hover Fly
(Photo credit: Mount Rainier NPS)

Ground Beetles
These large, long-legged, shiny blue-black or brown beetles that hide under rocks and logs during the day, are very fast moving when disturbed. They feed on slugs, snails, cutworms, root maggots, and Colorado potato beetle larvae. Attract them by providing perennial ground covers, stones or logs.

Woodland Ground Beetle
Woodland Ground Beetle (Photo credit: cotinis)

Parasitic Wasps
There are hundreds of species of wasps, including many that are very tiny. These mini wasps often attack the eggs of pests, are one of the most important insect groups that provide control of garden pests. You can attract them to your garden by growing pollen and nectar plants.

Parasitic Wasps
Parasitic Wasps (Photo credit: Mathesont)

Spiders
Spiders feed on insects and are very important in preventing pest outbreaks. The spiders you find in your garden do not move indoors and are usually not poisonous. Permanent perennial plantings and straw mulches will provide shelter and increase the spider populations in vegetable gardens. Next time you see a spider in the garden just remember how many insects it is eating!

underside of a garden spider
underside of a garden spider (Photo credit: Wikipedia)

Just as it is important to recognize the harmful pests in your garden and learn how to repeal them naturally it is also important to recognize the beneficial insects and encourage them to take up residence in your garden.

I just hope our Guinea Fowl can tell the difference between good and bad bugs!

Linked to: SidewalkShoes, SouthernDayDreamer, WildcraftingWednesday, ThisChickCooks, TootsieTime, SmallFootprintFamily, FarmBlogHop, LittleHouseInTheSuburbs, SimplyNaturalSaturdays, TheCreativeHomeAcreHop, TheChickenChick, AnOregonCottage

Enhanced by Zemanta

Rhubarb Strawberry Crisp

As you know I have an abundance of rhubarb in my garden. I have been using the rhubarb in all sorts of recipes. The recent creation was a Rhubarb Strawberry Crisp. I have made crisps in the past but never a crisp using rhubarb.

Rhubarb Patch

Other desserts I made recently using rhubarb were a Rhubarb Cake, a simple and tasty dessert.

Rhubarb Cake

The Rhubarb Strawberry Crisp was the next dessert and was it her good. Although my strawberries are not ripe yet it was possible to find local berries in the Farmers Market. The measurements of the rhubarb and strawberries are adjustable, I added about a cup more of each because I wanted to use up what was on hand.

Rhubarb Strawberry Crisp

Ingredients:

4 cups of rhubarb, diced
3 cups of strawberries, sliced
1 cup of melted butter
1 cup brown sugar
1 cup granulated sugar
1 cup oats
1 cup flour
2 tsp cinnamon
¼ tsp nutmeg
½ tsp salt

Directions:

Combine the strawberries and rhubarb in a large bowl. Spread into a 9×12 baking dish.

Rhubarb and Strawberries

In another large bowl mix together the remaining ingredients. Crumble the mixture over the rhubarb and strawberries.

Ready for the oven.

Bake at 375 for 40-45 minutes or until bubbly and the top is brown and crisp. Serve warm. Delicious with ice cream!

Rhubarb Strawberry Crisp

Rhubarb is delicious in many different ways. Hopefully you will enjoy this crisp as much as we do! The nice thing is that this recipe is very flexible and  the amounts can be doubled or even cut back if you want to make a smaller dessert.

Prudent Pantry: 10 Uses for Baking Soda

Did you know you can use this common kitchen staple to clean, deodorize, soothe and more? There are two places you will usually find baking soda in a home, in the refrigerator to absorb unpleasant odors and in your cupboard as a baking staple.

However there are other ways that you can put baking soda to work in your home.

There are many ways to use baking soda!

1. Fire Control: keep baking soda close to the stove in case of a grease fire. Water encourages grease fires to spread. Instead smother it with baking soda. Heated baking soda release carbon dioxide, eating the oxygen fires need for fuel.

2. Flower Freshener: Keep cut flowers alive longer by adding a teaspoon of baking soda to the water in the vase.

Use baking soda in your fresh cut flowers!

3. Sting Soother: stung by a bee or wasp? Because of its alkaline properties, baking soda can help neutralize formic acid in bee stings. Mix baking soda with a little water to create a paste and apply to the sting. Instant relief!

English: a yellow jacket wasp
Baking soda gives instant relief from stings!

4. Hairbrush Cleaner: remove natural oil buildup from hairbrushes and combs by soaking them in a solution of 1-teaspoon baking soda combined with water.

5. Laundry Booster: Add ½ cup baking soda to the wash cycle to enhance the effectiveness of detergent, absorb odors and help remove stains from clothing.

Give a boost to your laundry with baking soda.

6. Caked On Food: Easily remove caked on food from pots and pans by soaking them in baking soda. Just sprinkle a liberal amount on tough spots, ad water, let soak for 30 minutes to an hour, then scrub off. For extra power add a few drops of white vinegar to the mix.

7. Silverware Sparkler: To clean silverware line a large glass baking dish with foil, then add the silverware, making sure each piece touches foil.

Place silver on aluminum foil.

Evenly distribute ½ cup baking soda over the silverware, then completely immerse in boiling water.

Cover silver with baking soda.

Let soak for five minutes, rinse and dry.

Clean silver!
Clean silver!

8. Odor Absorber: besides keeping a box of baking soda in your refrigerator sprinkle some at the bottom of your trashcan liners. For carpet odors, sprinkle baking soda over your carpet and let sit for 30 minutes to overnight, then vacuum.

9. Homemade Play Clay: combine 2 cups od baking soda, 1 cup corn starch and 1 ¼ cups cold water in a pan and cook over low heat until the mixture reaches the consistency of mashed potatoes. Remove from the pan and let cook on a plate. Provides hours of fun!

Make play clay with baking soda.

10. Foot Soak: dissolve 3 Tbsp of baking soda in a basin of warm water and soak your feet. Gently scrub with a paste of baking soda.

For more helpful hints check out the Arm & Hammer website. They have numerous used for baking soda.

Linked to: ServingJoyfully, LambertsLately, AGlimpseInside, CommonSenseHomesteading


Enhanced by Zemanta
Design a site like this with WordPress.com
Get started