My Garden: Time to Transplant Seedlings

The tomato, pepper and eggplant seeds that I recently planted are doing well and some were in need of transplanting already! I like to transplant the seedlings after they’ve grown two or more true leaves (the cotyledons don’t count). This can be anywhere from two to six weeks after germination.

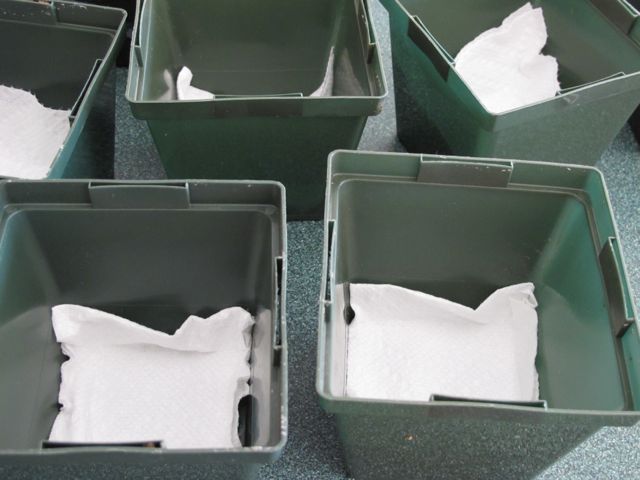
Before I start I make sure I have everything ready; my new pots and some potting soil. I put a piece of paper towel or newspaper in the bottom of my pots to keep the dirt from coming out the bottom. By the time I transplant again (either into bigger pots or into the garden) this paper will have dissolved.

Pots ready for seedlings.

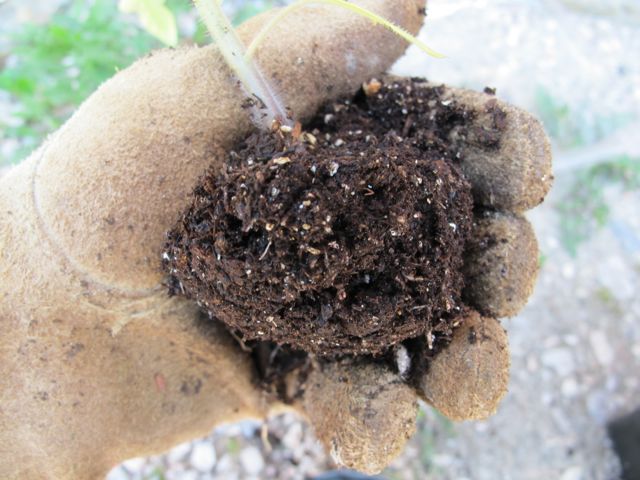
Freeing a seedling from its neighbors in a pot can be daunting if you haven’t done it before. One precaution is to always grasp a plant by a leaf not the stem. The plant can survive loss or injury to a leaf but if you break the stem it is fatal! I use a spoon and start at the edge of the pot and carefully lift the seedling. I try to choose the strongest seedlings rather than transplant every single one. I am often tempted to transplant them all as they look strong and healthy, but then I end up with way too many plants for my garden. Choose the sturdiest, most uniform plants and regretfully discard the others.

Use caution when separating your seedlings.

Set the seedling deeper than it was in the germination pot, placing the cotyledons just above the soil surface. Some plants, like tomatoes, will form roots along the section of the stem that is buried when you transplant deeper. Once every seedling has been transplanted make sure they are all labeled and given a drink of water. Then place them back under the grow lights.

Tomatoes look happier in their larger pots!

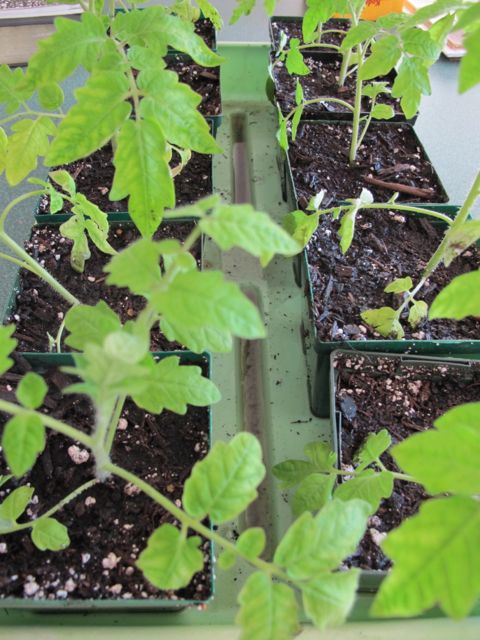
This is the time of year that my kitchen really gets crowded as I usually run out of room under my two grown lights. We have wonderful south facing windows so I will alternate my seedlings so they all spend a little time in front of the widows. It won’t be long before I can move everyone outside into the garden!

Linked to: FrugalDaysSustainableWays, SidewalkShoes, ASouthernDaydreamer, WildcraftingWednesday, TheWelcomingHouse, HomemakersChallenge, SimpleLivesThursday, TootsieTime, LittleHouseInTheSuburbs, SmallFootprintFriday, FarmBlogHop

Enhanced by Zemanta

Frugal Tips: May Bargains

Mother’s Day sales provide reduced-priced presents for women before and after the big day. Look for deals on jewelry, fragrances, and gift items such as jewelry boxes.

Jewelry
May is a good time to find deals on jewelry.

Mattresses and box springs are highly promoted from late May to early fall. This is when retailers gain significant support from the mattress manufacturers in the form of advertising and special offers.

A pillowtop mattress (U.S. size "queen")
If you need a new mattress between May and early fall is the time to buy one.

Memorial Day weekend is the traditional signal for big-ticket items like major appliances to go on sale.

Appliances

As the weather gets nicer there will be more garage and rummage sales to check out. One of the private schools in our area, Mid Vermont Christian School, holds a huge tag sale Memorial Day weekend. The gymnasium is full of donations from the school’s families and the bargains are everywhere! There are no prices on anything instead they just ask for a donation, whatever you think is appropriate. If you live near Quechee, Vermont be sure to check it out Friday May 24th and Saturday May 25th!

MVCS has a great tag sale 5/24-25 for those of you who are local!
MVCS has a great tag sale May 24-25 for those of you who are local!

Linked to: WeAreThatFamily, EarningMyCape, TheThriftyHome

Enhanced by Zemanta

Chicken Masala – Quick and Tasty

The majority of the time I cook from scratch. However, some of my recipes use some pre-made ingredients. Like my chicken masala recipe. For those nights when I don’t have a lot of time and want to have a quick dinner on the table I use curry sauce from a jar! Never fear I make a few additions and the end result is very much like a dinner made from scratch and just as tasty.

Chicken Masala and Vegetables

Ingredients:

1 pound of boneless chicken –cut into chunks, raw or can use leftover chicken
1 cup Zucchini – sliced
1 cup Carrots – peeled and sliced
Jar of Masala Sauce

Directions:

Take a large pan and sauté the chicken chunks until done. Remove from pan and set aside.

Take sliced carrots and sauté in the same pan.

Saute carrots in a large pan.

When the carrots are almost done add the zucchini and continue cooking until vegetables are crisp tender.

Add zucchini and continue to sauté vegetables.

Add the chicken to the pan and pour in the jar of sauce.

Tikka Masala Sauce

Use enough sauce to your liking. Heat the mixture through and serve immediately. Excellent served on rice.

Although I usually cook from scratch I am not at all opposed to making a shortcut now and then. This recipe is perfect for those days when you are rushed and just need to get a delicious dinner on the table quickly.

Chicken Marsala

Prudent Pantry: So Many Sweeteners

If you are like me you want to stock your pantry with items that are nutritious and healthy for your family. In regards to sweeteners what do you use? I grew up with plain ordinary white sugar, which I realize is not the healthiest choice. I did a search on Wikipedia to see just how many sweeteners there were and I found a list containing 120 different sweeteners. I didn’t even recognize many of them. How do you decide what to stock in your pantry? I decided to look at just a few without talking about artificial sweeteners.

Agave nectar
Maple Syrup
Corn syrup
Honey
Powdered Sugar
White Sugar
Brown Sugar
Sucanet
Raw Cane Sugar
Turbinado Raw Cane Sugar

Over the next few weeks I will take a look at some of these various sweeteners.

Agave Nectar
Agave Nectar is best recognized as the plant from which tequila is made.

Blue Agave (Agave tequilana)

It is comparable in taste to honey according to some people. I have never tried it. I did read one post on Foodrenegade.com that stated that agave nectar is not a “natural sweetener” plus it has more concentrated fructose in it that high fructose corn syrup!

Apparently native Mexican peoples do make a sort of sweetener out of the agave plant, called miel de agave and it’s made by boiling the agave sap for a couple of hours. Similar to how maple syrup is made.

Agave Nectar (syrup)

In a recent article now posted on the Weston A. Price foundation’s website, Ramiel Nagel and Sally Fallon Morell write

“ Agave “nectar” is not made from the sap of the yucca or agave plant but from the starch of the giant pineapple-like, root bulb. The principal constituent of the agave root is starch, similar to the starch in corn or rice, and a complex carbohydrate called inulin, which is made up of chains of fructose molecules. Technically a highly indigestible fiber, inulin, which does not taste sweet, comprises about half of the carbohydrate content of agave.

The process by which agave glucose and inulin are converted into “nectar” is similar to the process by which cornstarch is converted into HFCS. The agave starch is subject to an enzymatic and chemical process that converts the starch into a fructose-rich syrup—anywhere from 70 percent fructose and higher according to the agave nectar chemical profiles posted on agave nectar websites.”

If you are trying to stay away from highly refined products I would stay away from Agave nectar. Or make sure what you are buyng is made the authentic way!

Vermont Sugar House
Vermont Sugar House

Maple Syrup
Living in the state of Vermont maple syrup is near and dear to my heart. We have neighbors who run their own sugarhouse and collect the maple sap off the mountain we live on. It’s annual event to help them out and the men spend many nights working together to produce the maple syrup.

When the spring temperatures reach 45 degrees F during the day and the nights remain below freeing the sap starts to run. In March and April the sugar maker drills a hole in the trunk of the sugar maple and taps in a spout with either a bucket or plastic tubing attached. Sap averages 2-3% sugar and looks like clear water. The sugar content of syrup is 66.9%. For each gallon of maple syrup produced the sugar maker must collect 40 gallons. Sugaring season continues until warmer spring temperatures arrive and the leaf buds start to unfold. The sugarmaker will then pull the taps, clean their equipment and sell their wonderful product.

It's been a good maple-sugaring season.
It’s been a good maple-sugaring season.

Maple syrup can be used in many ways. On your pancakes or waffles. Used in a salad dressing. It can also be used in many other main dish recipes or in baked goods. One of our favorite ways to enjoy maple syrup in is this delicious Maple Gazed Snack Mix.

Maple Glazed Snack Mix

Our family loves the taste of pure Vermont maple syrup and it is definitely something you will find in our pantry!

Maple Syrup in our pantry.

Linked to: SmallFootprintFriday, FarmGirlBlogFest, LittleHouseInTheSuburbs, FarmGirlFriday, HomesteadBarnHop, CreativeHomeAcreHop


Enhanced by Zemanta

My Garden: The Bloedel Reserve

Recently I had the opportunity to visit the Bloedel Reserve on Bainbridge Island in the beautiful state of Washington. The reserve is just a short ferry ride from Seattle, WA and was the perfect place to visit before we had to fly home to Vermont.

Seattle from the ferry.

I love visiting other people’s gardens whether they are just a small home garden or an estate. The Bloedel Reserve is a unique, world-renowned public garden. The founder, Prentice Bloedel, intended The Reserve to be a place that “provides refreshment and tranquility in the presence of natural beauty”. Prentice and his wife, Virginia, resided on the property from 1951 until 1986. During his time as the head of several timber businesses he became a pioneer in renewable resources and sustainability. He was the first to use sawdust as a fuel to power his company’s mills. He retired in 1950 and devoted the last half of his life to the creation of these gardens.

The Reserve has numerous paths that you can wander on, all very well maintained.

Well maintained paths make it easy for anyone to enjoy the Reserve.

You can follow a map, which describes the various parts of the garden. The Japanese Garden is incredible with a guesthouse and a Stone Garden. Further along the path is the Moss Garden. You can feel the quietness of the landscape. It almost seems surreal. Moss carpets the ground and tree stumps with lush green.

The Moss Garden
The Moss Garden

Two of my favorite areas were the white birches along the walkway; the white elegance of the trucks was in sharp contrast to the greenery surrounding them.

White Birch trees
White Birch trees

Near the original mansion where the Bloedel’s lived is a beautiful pond. The Mid Pond was the first feature created by Prentice Bloedel with advice from his friend, the landscape architect Thomas Church. There are many beautiful trees including a weeping willow, which reflected in the stillness of the pond.

Mid Pond and original mansion.

If you are ever in the Seattle area do take time to visit this beautiful piece of property. I am so glad it is preserved for others to enjoy. I can’t wait to visit it again someday.

I can't wait to return.
I can’t wait to return.

Linked to: SidewalkShoes, ASouthernDaydreamer, TheBusyBees, KatherinesCorner, TheBrambleberryCottage, ADelightsomeLife, BloomDesignOnline, TheCharmOfHome, LadiesHoliday, WhatJeanLikes, TootsieTime, TheDedicatedHouse, TutusAndTeaParties, SimplyNaturalSaturdays, WeeklyTopShot, The ChickenChick, TALUOurDelightfulHome, TuesdayGreens, BackyardFarmingConnection, EcoKidsTuesday, TuesdayGardenParty, HealthyRootsHappySouls, BackToTheBasics, TuesdaysTreasures

Homemade Graham Crackers

Recently our oldest daughter was visiting us. She does her best to feed her granddaughter healthy options. While she was staying with us she made the most delicious batch of homemade graham crackers. They were so much better than store bought graham crackers. She found the recipe on the Weelicious.com website. They are so easy to make in just a short amount of time you can be enjoying a batch of these delicious crackers!

If you’ve never tried to make your own graham crackers before you’ll be surprised at how easy a process it is. I’m sure young children would have fun cutting out shapes of their own!

Homemade Graham Crackers
Adapted from weelicious.com

Ingredients:

1 cup whole wheat flour
1 ½ cups all-purpose flour
½ cup dark brown sugar
½ tsp salt
1 tsp cinnamon
1 tsp baking soda
½ cup butter, chilled and cubed
¼ cup honey
¼ cup water

Directions:

Preheat your oven to 350 degrees.

In your food processor or mixer combine the first six ingredients. Add the cubed and chilled butter to the mix and pulse/mix until the mix resembles coarse meal. Add the honey and water and continue to mix until it is well combined.

Dough ready to be rolled out.

Remove and shape the dough by rolling it out until ¼ inch thick. Cut into crackers or shapes. You can use any variety of cookie cutters or just cut the dough into squares.

Cut dough into crackers or shapes.

Place the dough on a parchment lined baking sheet and bake for 15 minutes. Cool and serve.

Cool on a wire rack.

Store in an airtight container. You could freeze these delicious crackers as well although they always seem to go pretty quickly in our household!

Homemade graham crackers ready to enjoy!

Prudent Pantry: Pork For The Freezer

As you know I recently participated in a Pantry Challenge. I challenged myself to make meals from what we had on hand. My goal was to clean out the freezer so we would have room for some pork. We have neighbors that raised two heritage pigs and we had the opportunity to purchase fresh, locally raised pork. Our neighbors were raising several Gloucester Old Spot pigs. they were born in September and are ready to go to market now at 7.5 months. They are a heritage breed that originates in England. They are known for their size and the amount of bacon they produce as well as quality lard.

Gloucester Old Spot pigs

Buying meat in bulk is a good way to save money and enjoy farm-raised meat. In the past we have purchased locally raised beef but with our children out of the house, ½ a cow or even a ¼ of a cow is too much beef for my husband and I to enjoy. I think the pork will be easier to manage.

Having never purchased ½ a pig before we had no idea what to expect or what would actually come in our share. Luckily there are numerous charts online that tell you what to expect!

Pork Diagram
Pork Diagram

Apparently every bit of the pig is useful. They turn pasture plus excess dairy and vegetables into fresh pork, bacon, hams, ribs, sausage, hot dogs, kielbasa, salami and more! Pigs produce valuable manure for the fields and gardens, till and weed gardens, naturally eradicate pest insects and weeds, clean up crops and clear brush. Looking at the chart it appears that almost every bit of the pig is used in someway, even the oink!

Pork Cuts Chart
pork cuts chart from SugarMtnFarm.com

Pigs can be slaughtered when they reach 250 pounds which takes about 7.5 months. They don’t reach butchering weight as soon as chickens but sooner than beef cattle. Once arrangements were made to take them to the butcher we had to decide just how we wanted our meat. Decisions had to be made on whether we wanted roasts or pork chops, and what size packages. The hams could be smoked or left as fresh hams. The hams can also be taken whole, halves or slices. So many decisions! We decided to take the ground pork as fresh ground pork and make our own sausages. I think I am most looking forward to the thick sliced smoked bacon. It will go perfectly with my Amazing Overnight Waffle recipe!

waffles, breakfast, prudent living
Amazing Overnight Waffles

I was a little concerned as to how much room to allow for ½ pig. I found this website  SugarMtnFarm.com which said the meat once cut up should fit into a large size cooler. I’ll let you know if that is accurate.

Half Pig Share
Half Pig Share

My Garden: Tulips Galore

This week I am far from On The Home Front visiting our children that live on the west coast. I love visiting Seattle it is such a beautiful part of the country. This time of year they are ahead of us as far as spring goes.

Scotch Broom in bloom.

Everywhere I look flowers are blooming and the grass is green. We took a day trip to Tulip Town to see all the tulips in bloom.

Tulip Town
Tulip Town

What an amazing sight. Brilliant colors everywhere.

Beautiful tulips everywhere.

The day was slightly overcast but the colors were so vibrant. It was fun to walk around envisioning what these tulips would look like in my garden!

Tulip Town
Tulip Town

It was the perfect day, walking around with our grown children enjoying the beauty.

Do you have tulips in your garden?

Hopefully when I get back to Vermont every last bit of snow will be gone and our grass will be turning green! In the meantime I’m enjoying the sights of Washington!

I love spring!
I love spring!

Frugal Tips: Making Beeswax Candles

Several years ago we had our own beehives. One of the byproducts of having your own bees, besides honey is beeswax.

Beeswax from our bees.

There are many uses for beeswax including lip balm, sore muscle salve and wood butter. I love to make beeswax candles with the wax. Not only are they a beautiful color but they burn cleaner than paraffin candles and they burn slower and are usually dripless.

Beeswax candles
Beeswax candles

Poured beeswax candles are made from melted beeswax that is reshaped in a mold.

Antique Candle Mold
Antique Candle Mold

Melt your beeswax in a double boiler. Never melt over direct heat. Melt approximately 2-3 pounds depending on the size of your mold. Do not allow wax to boil. Do not heat over 180 degrees.  You can use an old coffee can set in a pan of water to melt the wax or a container designed for melting wax with a handle. Beeswax is flammable so use caution.

Use caution when melting beeswax.

While the wax is melting set up your mold.  We use an antique mold given to us by my mother in law. Spray the inside of the mold with a silicon spray as this helps the finished candles to be released from the mold. Cut lengths of wick the length of each tube plus 3-4 inches. Thread the wick through the hole in the bottom of the mold. Tie a small knot to keep the wick from slipping though, and then use putty to fill in any gaps.

Knots in the bottom of the mold.

You don’t want the wax pouring though the bottom of the mold. Tie the wick at the top as well to keep it in place. We use a piece of wire coat hanger to hold all the wicks in place.

Wicks securely fastened in place.

You can also wet a sponge cut to size and dip in ice water, place the mold on top of the sponge.

Once the wax is melted carefully pour the wax into the mold.

Carefully pour the melted wax into the mold.

Pour slowly to avoid any air bubbles from forming. As the wax hardens it will contract, this will cause indentions in the base of the candle. You can pour more hot wax into the base after it has begun to get hard to level out the base.

You may have to add more melted wax to level out the base.

Let the beeswax cool and harden. I usually leave them overnight.

When completely cooled, cut the knots and remove the putty. Carefully remove the candles from the molds Trim the wick on the top of each candle to about ½ inch. If you have trouble removing the candles from the mold place the mold in your freezer for a short period.

Homemade Beeswax Candles

Homemade candles make wonderful gifts.

Linked to: OurDelightfulHome, BackToTheBasics, NaptimeCreations, BackyardFarmingConnection, KatheWithAnE, TimeToSparkle, CraftyGardenMama, TALU, HousewifeHowTos, WFMW, EarningMyCape, WildcraftingWednesday, NaturalMothersNetwork, ShowAndShareWednesday, RaisingArrows, TheThriftyHome, FrugalDaysSustainableWays, KatherinesCorner, TheBusyBHive, HomemakersChallenge, SevenAlive, LiveRenewed, SimpleLivesThursday, ThrivingThursdays, ALifeInBalance, FreedomFridays, TheBrambleberryCottage, TheCharmOfHome, LittleHouseInTheSuburbs, SmallFootprintFriday, DandelionHouse, TheViewFromRightHere


Surprise Recipe Swap: Spiced Pumpkin Loaf with Cinnamon Brown Sugar Glaze

SRS LogoThis is my second month participating in the recipe swap. Each month I am pared up with another blogger who writes about cooking. My task is to pick a recipe off of her site, make it and then write a post about my outcome. For me it’s a win-win situation. I learn about a new blog and a new recipe and someone else learns about my blog! Last month I made Muffin Meat Loaf. This month I was pared up with a blog called Dessert Now, Dinner Later written by Amber. Amber is a young stay at home mom busy raising her darling children, a girl and a boy. She has all sorts of delicious sounding recipes on her blog, not only desserts but dinner ideas as well. It was hard to pick just one.

However since I’ve been participating in Spring Pantry Challenge and trying to use up items from my pantry and freezer I decided to make her Spiced Pumpkin Loaf with Cinnamon Brown Sugar. I love pumpkin bread and this sounded like an amazing recipe. I had some frozen pumpkin on hand in our freezer, which I put to good use. I was not disappointed; the bread came out moist and delicious. If you are a fan of pumpkin bread give this recipe a try!

Ingredients for the pumpkin bread.

Spiced Pumpkin Loaf with Cinnamon Brown Sugar Glaze

1 3/4 cup flour
1/2 tsp salt
1 tsp baking soda
1/2 tsp baking powder
1 Tbsp Pumpkin Pie Spice
4 Tbsp butter (NOT margarine)
1/4 cup canola oil
1 cup sugar
1 cup pumpkin puree
2 eggs
2/3 cup water

Cinnamon Brown Sugar Glaze:

1 Tbsp butter
1/4 cup brown sugar
2 Tbsp milk
1/2 cup powdered sugar
Dash(es) Cinnamon

Combine flour, salt, baking soda, baking powder, & pumpkin pie spice in a bowl. Using a stand mixer, beat butter, oil, and sugar until light and fluffy.  Scrape bowl  Add pumpkin puree and 2 eggs.  Blend until combined. Slowly add flour mixture.  Scrape bowl.  Add 2/3 cup water until just incorporated.

Grease a 9-inch bread pan lined with parchment on the bottom, & pour mixture inside. Bake at 350 F for roughly 1 hour until done in the center.

Cook until done.
Allow to cool in pan on a rack.

Prepare glaze by melting butter, brown sugar and milk in a bowl in the microwave for 30 seconds (cover bowl, in case it splatters.)  Once butter is melted, whisk until sugar dissolves.  Add 1/2 cup powered sugar & cinnamon to taste and allow to cool to room temperature.

Prepare the glaze.
Pour glaze over pumpkin loaf once it has cooled down a bit.

Pour glaze over cooled pumpkin bead.

Remove bread from pan once the glaze has solidified and the bread is completely cool.  Peel off parchment paper from the bottom.  Slice and serve.

Slice and serve.Makes 12-14 slices.

Spiced Pumpkin Loaf with Cinnamon Brown Sugar Glaze

If you would like to participate in the Surprise Recipe Swap just click on the button below which will take you to the sign up page.

HungryLittleGirl
Design a site like this with WordPress.com
Get started