Thanksgiving is over and one of the best things about Thanksgiving is the leftover turkey! I look forward to making this amazing turkey soup every year. You can also make it with leftover chicken as well. The first step is to make your own broth using the turkey carcass. I usually just cover the carcass with water, add a chopped up onion and a chopped up celery stick and simmer until the carcass is falling apart. Drain the broth, allow to cool. Refrigerate overnight and skim off the fat once cooled.
Now you are ready to make your soup. This recipe can easily be doubled. Freeze any leftover broth that your don’t use in the recipe.
Amazing Turkey Soup
Ingredients:
3 Tbsp butter
1 celery stick
1 carrot
1 medium onion
1 cup up fennel bulb (optional)
1 ½ cup baby Bella mushrooms
2 cups of turkey broth
1 ½ cups diced cooked turkey
3 Tbsp flour
¼ cup cold water
1 Tbsp tarragon
1 tsp basil
½ tsp rosemary
½ tsp thyme
1 tsp onion salt
1 tsp celery salt
1 ½ cup light cream
Directions:
In a soup kettle melt butter; sauté celery, carrot, onion, fennel and mushrooms.
Add broth and turkey; simmer for 15 minutes. In a small bowl, mix flour and cold water; add to soup and stir until thickened. Add seasonings.
Continue to simmer over low heat adding the light cream just before serving.This amazing turkey soup serves 6.
I love gathering with family and friends over the holidays.
Traditional Thanksgiving Meal
Hosting a gathering can be expensive if you try to do everything yourself. Several weeks before the big day make a plan. I have an index card that I use every year for both Christmas and Thanksgiving. Finalize your guest list and confirm how many people will be there. Find out if anyone has food allergies. Make a menu plan of the foods that you would like to serve. Keep it simple; you don’t need to have lots of extra side dishes. What can be made ahead and what dishes would you like others to bring? Make a cooking plan and a shopping schedule. Remember the more preparation you can do ahead of the big day the less stressed you will be.
Many dishes can be prepared ahead of time and frozen. Pie crusts and other baked goods can be prepared ahead of time and placed in your freezer.
Pie crusts can be made ahead and frozen.
The week before thanksgiving make sure all your tablecloths and dishes are cleaned and ready to go. If possible you can even set your table ahead of time.
Every other year we celebrate Thanksgiving with my brother-in-law and his family. I love the way his wife organizes the day. About two weeks before Thanksgiving, everyone that’s invited gets an email with the food requests. Certain family members are known for various dishes, a special apple-cranberry pie, creamed onions or a green bean casserole for example.
Green Bean Casserole
The hostess provides all the table settings and a turkey and a ham.
Hostess provides the turkey.
Everyone else provides the side dishes. It’s a great way to enjoy the holiday without getting stressed out about all the food you have to prepare. I look forward to this Thanksgiving; it will be a wonderful time with the family with lots of delicious food to enjoy. I thank my brother-in-law and his wife for making it all possible; they are wonderful hosts and hostesses!
Remember you don’t have to do it all yourself! When everyone is gathered have slips of paper with various jobs written out. Everyone loves to pitch in and help. Let people do the jobs like light the candles, fill the water glasses, load the dishwasher. People are more than willing to help out and you will enjoy the day more if you are not trying to do everything yourself.
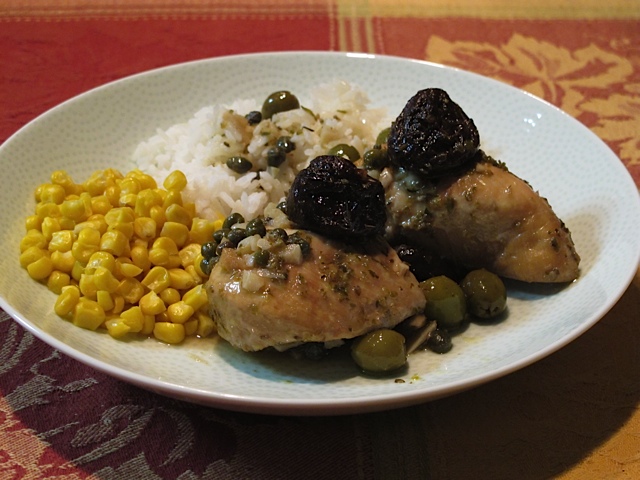
Several years ago we were served this delicious chicken marbella at a family dinner. It has a very unusual combination of ingredients and I wasn’t sure I was going to like it. Not only is it delicious but the chicken keeps and even improves over several days of refrigeration. It also travels well. The overnight marinating is essential to the moistness of the finished product. I hope you enjoy it as well as I do! The recipe could easily be halved if you are not feeding a large group.
Chicken Marbella
Ingredients:
5 pounds of chicken, I used boneless breasts but you can also use boneless thighs
1 head of garlic, peeled and finely pureed
¼ cup dried oregano
Salt and pepper to taste
½ cup red wine vinegar
½ cup olive oil
1 cup pitted prunes
½ cup pitted Spanish green olives
½ cup capers with a bit of juice
6 bay leaves
1 cup brown sugar
1 cup white wine
¼ cup Italian parsley or fresh cilantro, finely chopped
Directions:
In a large bowl, combine chicken, garlic, oregano, pepper, salt, vinegar, olive oil, prunes, olives, capers and juice and bay leaves.
.
Cover and let marinate, refrigerated, overnight. The next day preheat your oven to 350 degrees.
Arrange chicken in a single layer in one or two large, shallow baking pans and spoon marinade over it evenly.
Sprinkle chicken pieces with brown sugar and pour white wine around them.
Bake for 50 minutes to 1 hour, basting frequently with pan juices. Cook until chicken is done. With a slotted spoon, transfer chicken, prunes, olives and capers to a serving platter. Moisten with some of the pan juices and sprinkle with parsley or cilantro.
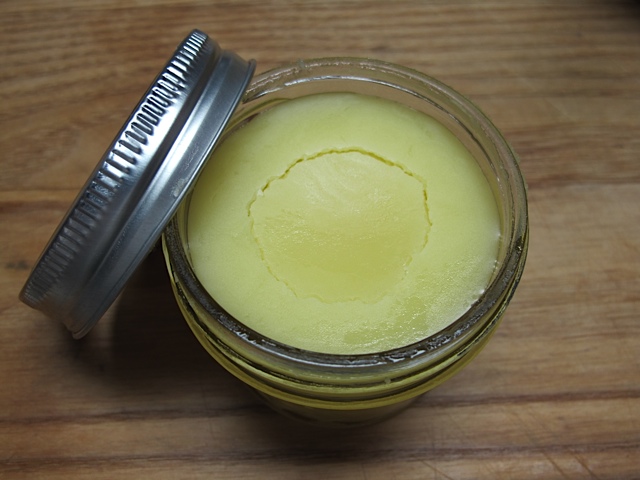
Wood butter is a wonderful homemade product that you can use for all of your wood kitchen items from wooden spoons to cutting boards. We had an old salad bowl that we’d had since we were married. The surface of the bowl really needed some restoring.
The process of restoring the bowl was quite easy. Just dab a little of the wood butter on the surface of the bowl with a dry cloth and buff into the surface.
Immediately you will notice a differance in the surface. One side clearly looks restored while the other side needs a little work.
The beeswax gives it a beautiful golden color. You can make some to keep and give the rest away over the holidays. This recipe can be easily halved.
Homemade Wood Butter
Ingredients:
8 ounces of pure beeswax
32 ounces of mineral oil
Directions:
Bring a large saucepan filled with water to a gentle boil.
Place your beeswax inside an old coffee can or a glass measuring cup and set your container gently into the boiling water.
Place the container of mineral oil inside another medium saucepan filled with water and heat to low. The mineral oil just needs to be warmed to mix with the beeswax; no need for a rolling boil!
Once the wax has melted turn off your stove and carefully add the warmed mineral oil to the beeswax; stirring with a spoon to combine.
Take your small canning jars and place them on your counter. Using a potholder carefully pour the liquid into each jar filling them almost to the top. Finish filling all the jars and wait for them to cool and firm up before using.
Warning: mineral oil is very slippery! Hold onto the coffee can carefully as you pour the wood butter into the jars or it can slip out of your hand and onto the floor which will result in an amazing mess! Speaking from experience 😉
I love having fresh flowers in the house. During the summer months I can cut fresh flowers from my garden, but during the winter it takes a little more planning. By forcing bulbs you can enjoy fresh flowers during the dark days of winter. Not only will you be able to enjoy the blooms but you can give bulbs that you’ve started as presents. Who wouldn’t appreciate a gift of bulbs when the world is white with snow! Tulips, narcissus, hyacinths, crocus and lily of the valley can be forced into flower in late winter or early spring. A pot of tulips on your windowsill in February can brighten your spirits!
Narcissus bulbs are very easy to force and I found some very healthy looking bulbs at my local garden center.
Narcissus bulbs
Buy a bag of white crushed gravel to use in your containers. Rinse the gravel to get rid of any dust. Fill each of your bowls with gravel about 2/3 rds full.
Fill your bowls 2/3 rds full with gravel.
Nestle the bulbs in the gravel ½ to 1 inch apart, placing the pointed side up.
Set the bulbs in the gravel.
Then fill in gravel around the bulbs, leaving the top halves exposed. Place them in good light and add water up to the base of the bulbs. Keep the water level at this height. Place the pots in a cool area. Within a few days roots will appear. When green shoots appear, move the pot to a cool, sunny spot.
Won’t be long before flower buds appear!
Sit back and watch them grow and bloom. It’s nice to enjoy a little bit of spring color for your home when everything outside is covered with snow!
I am always looking for ways to save money. As we approach the holidays the days are busy and full of activities. I try to take advantage of anything I can to help make the holidays less stressful, such as making double batches of holiday cookies over several evenings, and freeze to serve or distribute later.
Freeze cookies now to enjoy later.
Mail overseas packages at the cheapest rate in time to arrive before Christmas. Buy turkey and non-perishable trimmings as they come on sale. Turkeys are often priced dirt cheap from now through Christmas.
Buy turkey on sale.
Stock your freezer because a turkey that remains frozen is good for at least a year. And while you’re at it stock up on baking supplies at rock bottom prices.
Stock up on baking supplies.
Cranberries are also on sale this time of year, both canned cranberry sauce
It’s a good time to stock up on canned cranberry sauce
and the fresh cranberries.
Stock your freezer with fresh cranberries.
Stock up!
Blankets, comforters and winter wear will also be deeply discounted to boost retailers’ holiday cash flow.
November can be a good time to stock up on blankets and comforters.
November sales on baskets can provide a bounty of gift containers for you.
Buy baskets now to create Christmas baskets later.
Just remove any thanksgiving or autumn accents, cushion the baskets with shredded paper, craft straw or coordinating towels, and load the baskets up with small, associated gifts you can find year round in the clearance bins. By being aware of the items that are on sale now you can save money and time so you can enjoy a less stressful holiday season.
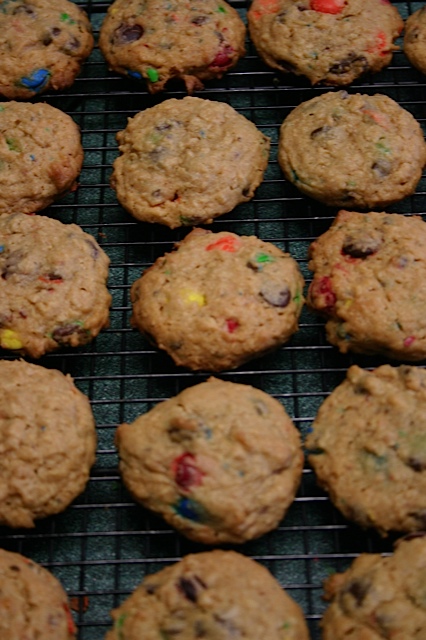
I try to make most of my cookies from scratch but this Monster Cookies recipe is quick and delicious. In a matter of minutes you can mix up a batch of doubly good cookies using two flavors of easy cookie mix, oats and chocolate candies. These cookies don’t last long in our house!
Heat your oven to 375 degrees. In a large bowl stir all ingredients together except the candies. When the dough is well-mixed stir in the candies.
On an ungreased cookie sheet place heaping spoonfuls of your cookie dough about 3 inches apart.
Bake the cookies for 12-13 minutes or until light golden brown. Cool for 2 minutes, then remove from the cookie sheet and cool on a wire rack. Cool the cookies completely. Store in a covered container at room temperature. These cookies also freeze well.
Homemade cookies are a real treat in our home. When I want to have a batch of cookies to enjoy in no time Monster Cookies is the recipe I turn to. In fat you will usually find these packages of cookie mixes in my pantry at all times!
I supposed I could experiment and try other packages of cookie mix and make up another variety! Have you ever used cookie mixes to make cookies your home?
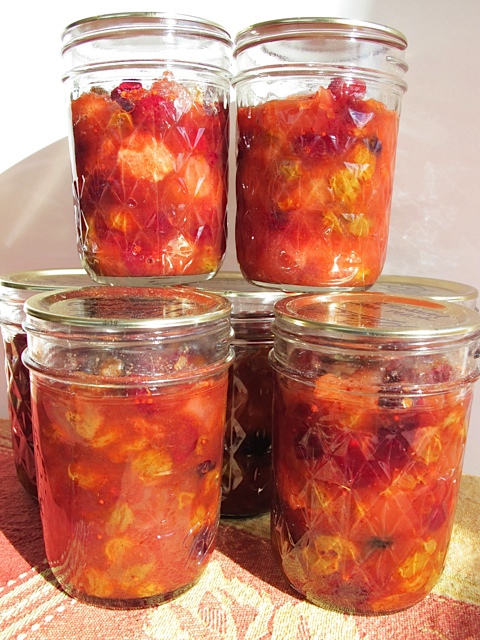
My supply of apples and pears seems to be endless this year! I was looking for something different to make and found this cranberry apple pear relish recipe. Not only did it use apples and pears but I was even able to use up some frozen cranberries I had. It will be perfect to serve with poultry or to serve as an appetizer with crackers and cheese.
Cranberry Apple Pear Relish
Ingredients:
3 cups fresh or frozen cranberries
3 cups of apples, cored and diced
2 cups of pears, peeled, cored and diced 1 ½ cups golden raisins 2 cups sugar
1 cup of orange juice
2 Tbsp grated orange rind
2 tsp cinnamon
¼ tsp ground nutmeg ½ cup orange liqueur (optional)
Directions:
Combine cranberries, pears, apples, raisins, orange juice and rind, cinnamon and nutmeg in a very large stainless steel pan. Bring to a boil over high heat, stirring frequently. Reduce the heat and boil gently, uncovered for about 25 minutes or until the mixture thickens, stirring occasionally. Remove from the heat and stir in the liqueur.
Remove hot jars from the canner and ladle relish into the jars, leaving ½ inch headspace. Process for 10 minutes for half pint jars and 15 minutes for pint jars.
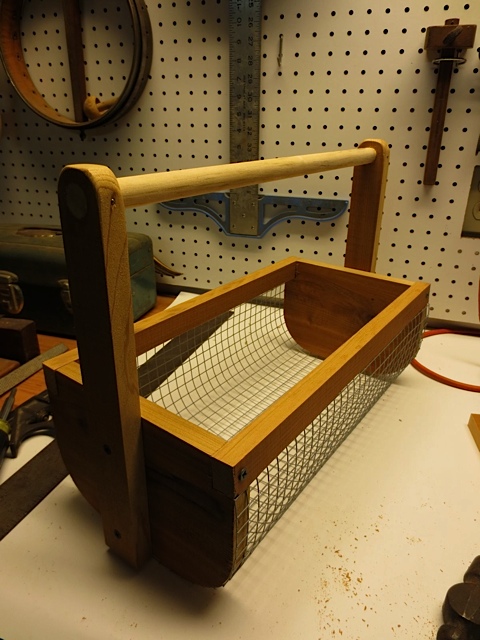
First of all you may be wondering what a “hod” is! According to dictionary.com com a hod is a portable trough for carrying mortar, bricks etc., fixed crosswise on top of a pole and carried on the shoulder. I found these directions on runnerduck.com and thought it would be a perfect solution for carrying in vegetables from the garden. My husband took one look at the directions and decided to make a few modifications. Now I have my own custom made Veggie Hod! Here’s what you need from the original directions:
1 x 6 inch cedar 3 feet long
½ inch wire mesh 16 by 16 inches
¾ inch dowel
Carpenters glue
Nails
Staples
We had some leftover ¾ inch cedar siding that was perfect for the project.
Cut the ends 5 ½” by 8”.
Radius the two bottom corners using a 1 quart paint can as a guide.
Using a band saw or jig saw (shown) cut the corner radius.
Cut the two side rails 1 by ¾ by 16 inches.
Veggie Hod wood parts list cut from ¾ inch cedar: 2 ends 5 ½ x 8″, 2 side rails 1 x ¾ x 16″, 2 handles 1 ½ x 12″, and a 3/4 inch dowel 17 ½ inches long.
Cut a ¾ x 1 inch notch in each top corner of the end pieces for the side rails.
End pieces rough cut and ready for sanding.
Cut the mesh 16 by 16 inches. Cut the wire very close to the cross wires to eliminate sharp, pointy wires. Bend one edge of the mesh 90 degrees, ½ inch in from the edge.
Staple that ½ inch edge to the bottom of one of the sides.
Align the side in one of the end notches and wrap the mesh around to mark your bend point for the other side. When you have this mark bend the mesh 90 degrees and staple to the other sidepiece.
Fasten the side rails to the end pieces with 1 ½ inch screws.
End pieces attached to side rails with wire mesh.
Drill ¾ holes at top end of handle. Draw out half-round for cut to finish.
Handle ends shaped and finished.
Attach handles to the center of each end piece with two 1 ¼ inch screws.
Slide the dowel into the handles and mark any excess dowel length and trim off. Dab some wood glue into the handle holes and insert dowel. Tap a 1 inch brad through the handle into the dowel to secure.
I can’t wait to use my Veggie Hod, it will be perfect for gathering the harvest from the garden, I’ll even be able to give the vegetables a quick wash before coming into the house.
Waiting for a coat of stain!
Since my husband made four of these I’m thinking of a winter giveaway, good idea?
This week I am celebrating all the new “likes” the On The Home Front Facebook page has received! I never thought I’d see the day where I would have over 1000 likes! I sure do love all the support. Gardener’s Supply Company is also supporting me by supplying the prizes this week.
Financial Records
I have a tendency to save everything. This isn’t necessarily a bad thing but after a while you can end up with a lot of stuff! You really don’t have to save everything, the following are suggestions about how long your should keep personal finance and investment records on file.
Tax Returns
Tax Returns: The IRS has three years from your filling date to audit your return if it suspects good faith errors. This deadline also applies if you discover a mistake in your tax return and decided to file an amended return. The IRS has six years to challenge your return if it thinks you under-reported your gross income by 25%. There is no time limit if you failed to file a return or filled a fraudulent return.
Bank Records
Bank Records: From one year to permanently. Go through your checks each year and keep those related to your taxes, business expenses, home expenses and mortgage payments. Shred those that have no real importance.
Brokerage Accounts
Brokerage Statements: Keep until you sell the securities. You need the purchase and sales slips from your brokerage or mutual fund to prove whether you have capital gains or losses at tax time.
Bills
Bills: Go through your bills once a year. I most cases, when the canceled check from a paid bill has been returned, you can shred the bill. However, bills for big purchases such as jewelry, rugs, appliances, cars, furniture, computers etc. should be kept in an insurance file for proof of their value in the event of loss or damage.
Credit Cards
Credit Card Receipts and Statements: Keep for 45 days to seven years. Keep your original receipts until you get your monthly statement; shred the receipts if the two match up. Keep the statements for seven years if tax related expenses are documented.
Paycheck Stubs: Keep for one year. When you receive your annual W-2 form from your employer, make sure the information on your stubs matches. If it does then you can shred the stubs. If it doesn’t demand a corrected form, known as a W-2c.
House Records
House Records: From six years to permanently. Keep all records documenting the purchase price and the cost of all permanent improvements, such as remodeling, additions and installations. Keep records of expenses incurred in selling and buying the property, such as legal fees and your real estate agent’s commission, for six years after you sell your home. Holding on to these records is important because any improvements you make on your house, as well as expenses in selling it, are added to the original purchase price or cost basis. This ads up to a greater profit (also known as capital gains) when you sell your house. Therefore, you lower your capital gains tax.


 Add broth and turkey; simmer for 15 minutes. In a small bowl, mix flour and cold water; add to soup and stir until thickened. Add seasonings.