Before I get down to taking about dandelions I wanted to make you aware of my Facebook link on my page! Yes, On The Home Front now has it’s very own Facebook page! Be sure to check it out and “Like” it!
Now welcome to my garden! I don’t know about you but I have a lot of dandelions in my yard.
Dandelions
After watching this video I am inspired to do something more than just pick them and toss them in the compost heap! Don’t know how many of you are familiar with Clara. Clara is a 94 year old cook and Great Grandmother. She is 100% Sicilian-American and grew up in a Chicago suburb, Melrose Park. She survived the Great Depression and claims to have actually gained weight during America’s worst state of financial despair. She has her own blog, her own website and numerous videos on YouTube all about depression cooking. Today I want to share one of her videos with you. If you are getting this in your email it is worth clicking on the video and watching it on my website!
Before I get down to taking about Frugal Tips I wanted to make you aware of my Facebook link on my page! Yes,On The Home Front now has it’s very own Facebook page! Be sure to check it out and “Like” it!
Saving money is key to living a frugal lifestyle. There are many little things that you can do to help yourself save money.
Cancel Unneeded Service
Do you have any magazine subscriptions that you never find the time to read? Most magazines have websites with many of their articles online. Use those instead. You may also be able to read your favorite magazines at your local library. Another idea would be to share a subscription with a friend.
Sell your unwanted items
There are so any ways to sell things these days; eBay, Craigslist, newspaper, or a garage sale. I have used all of these ways and have managed to earn some good money. If you live in a neighborhood coordinate a neighborhood sale. It’s a great way to get some good traffic and have a successful sale. As you are doing your spring-cleaning make three piles: items to keep, sell and donate. Not only will you simplify your life by declutttering, you will make some money to put in the bank.
Save on your household bills
Run your washing machine on cold; turn off lights when not in use. Turn your thermostat down on your hot water boiler. Many electric companies offer suggestions to save on your electric bill, take advantage of these. Hang your clothes outside instead of using your dryer; nothing smells better than sheets dried outside.
The beauty of laundry drying in the wind.
Cleaners
Make your own cleaners; you’ll be amazed at how easy it is. Here is a recipe for making your own washing detergent. Here is another recipe for your own liquid hand cleaner. For other cleaning needs you can often use vinegar in place of expensive cleaners you are used to buying. I’m convinced that my homemade window cleaner cleans better than anything I can purchase.
My homemade cleaners
Clothing Don’t pay full price for clothes, there are so many other options. Find a good consignment shop or thrift store. Buy clothes on sale. Learn how to sew. If you have clothes in need of repair, don’t throw them away, repair them!
In the midst of a baby quilt project.
Food
Take advantage of bulk buying, develop a well-stocked pantry, and grow a garden. Stop buying prepackaged meals; start making your own meals. Learn how to bake bread. Not only will you save money but you will end up living a much healthier lifestyle.
Well Stocked Pantry
Gas Plan your shopping excursions so that you are not retracing your steps. Both my husband and I are blessed to be able to work out of our home. Not having to commute to a job everyday really saves on gas! Occasionally we are even able to have business meetings at our house. I will usually serve lunch and give my boss a chance to try some of my “Recipe Box” creations!
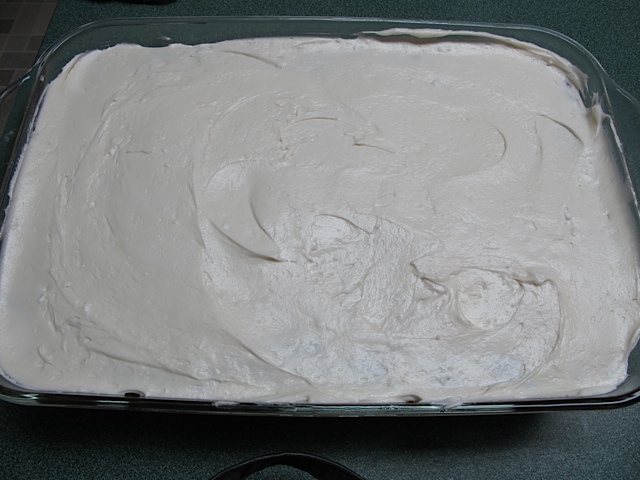
In cleaning out my freezer I found several frozen bananas. Rather than making another batch of banana bread I decided that making these delicious Frosted Banana Bars was a better option! These bars are just as delicious without the frosting.
Frosted Banana Bars
Ingredients:
½ cup butter, softened
2 cups sugar
3 eggs
1 ½ cups mashed ripe bananas (about 3 medium)
1 tsp vanilla
2 cups flour
1 tsp baking soda
Pinch salt
Frosting Ingredients:
½ cup butter
8 oz cream cheese, softened
4 cups confectioners sugar
2 tsp vanilla
Directions:
In a medium size mixing bowl, cream the butter and the sugar.
Beat in eggs, bananas and vanilla. In another bowl combine the flour, baking soda and salt. Add the flour mixture to the creamed mixture; mix well. Pour into a greased 15×10-baking pan.
Bake at 350F for 25 minutes. Cool.
For the frosting cream butter and cream cheese in a mixing bowl. Gradually add sugar and vanilla, beat well. Spread over bars.
Makes about 3 dozen.
If you would like to have a slightly less filling dessert these bars are equally as good without the frosting! It is also possible to freeze the unfrosted bars to enjoy at a later date.
In taking the time to plant a garden and harvest your own food you are interested in growing what’s best for your family. Part of the reason I have an extensive garden is to know what we’re eating. I want the food to be organic and good for us. I have become more and more interested in growing heirloom seeds and learning how to save the seeds. I want to have control over what is being planted in my garden.
In an effort to learn more I recently enrolled in a Seed Saving Class, offered by Sylvia Davatz, a local seed saver. Sylvia has her own seed catalog, Solstice Seeds, where she highlights seeds from plants that have successfully grown in her Vermont garden. This class will stretch over the entire garden season. We meet in her garden once a month from May to October to address questions and issues around seed saving. Each two-hour class allows for instruction and discussion of the various topics of seed saving as well as an opportunity for questions and comments.
I can’t think of a better way to spend two hours than exploring someone else’s incredible gardens.
Sylvia's Garden's
Sylvia’s gardens are absolutely beautiful, very well thought out so she can space her plants to collect the seeds. As we toured the gardens Sylvia discussed overwintering biennials, and which plants are good candidates for overwintering both in the garden and in her greenhouse. We were able to view which plants were just being planted as well as which plants had made it through the winter.
Well planned garden beds
There was a wonderful greenhouse set off on the edge of her property.
Greenhouse
A greenhouse is a wonderful addition to the garden, especially here in Vermont where we have such a short growing season. There was spinach growing and potatoes almost ready to be harvested!
Potatoes about to be harvested
Numerous seedlings are waiting to be moved into the garden.
Seedlings in the greenhouse.Vegetable seedlings
There is no heating source for the greenhouse and the ground never freezes! There is also a hand pump to supply water, what a wonderful idea!
Hand pump in the greenhouse.
I would love to add a greenhouse to our property.
At the end of the class we gathered together and went over some important theory regarding seed saving. An important factor is to know the various types of seeds and why saving seeds is so important. I’ve discussed this before talking about the difference between heirloom and hybrid seeds for example.
I hope you enjoy these pictures of Sylvia’s beautiful gardens. I am counting the days until our next class in June!
Buying perennials for your garden can be expensive. I have grand visions of what I want my gardens to look like but I also have a limited pocketbook. There are two ways to get around this, when your friends are dividing their perennials ask for the plants they no longer have room for. My original garden was created this way. My good friend Maggie, was dividing her perennials and supplied me with hostas, day lilies and iris. I have divided and divided these perennials over the years and am now in the position to give my extras away. Garden clubs also hold plant sales in the spring; this is another way to find perennials for your garden at a reasonable price. The plants you purchase at garden club sales have the added benefit of being grown locally. They will do well in your garden.
You can also divide store bought perennials. If you purchase a large hosta in a half-gallon pot you can divide it into a number of smaller plants. Just let it dry out a little before you attempt this. Dry soil and roots are easier to work with. Knock the plant from its pot, then with a sharp knife cut it into equal size rooted segments. If you already have hostas growing in the ground, you can increase your stock for no cost at all. Simply dig the clumps out and divide them. You’ll be amazed at how many plants you can acquire this way. Hostas recover from plant division very well. Just make sure you give them a little water after transplanting.
I am in the process of creating a new garden bed on the east side of our house, which is quite shady.
Removing sod from new garden bed.
First the sod is carefully removed, this is saved and moved to another area of the lawn.
Sod awaiting replanting.
There are some hostas growing on the side of the house already, which need to be divided. I can increase the garden bed (less grass to mow) and transplant my divided hostas at the same time. It’s a win-win situation. The clump is dug up.
Hosta clump
Using the shovel the large clump is divided into four smaller sections.
Divided hosta
Each of the smaller sections are replanted into my new garden bed.
Transplanted hostas.
In expanding any garden in Vermont you are bound to find rocks, this one will be used in a garden wall!
Large garden rock!
You too can have beautiful gardens no matter what the size of your gardening budget. Spring is a perfect time to divide your hostas, especially if you can get the transplanting done before a rainy day!
This Molasses Crinkles recipe is a favorite of our oldest son. He’s just finishing up with his finals and will be home soon to enjoy a full cookie jar! this recipe is very similar to the old fashioned molasses cookies I have shared, however this recipe is by far the favorite in our household!
Molasses Crinkles
(Makes 4-5 dozen)
Ingredients:
¾ cups butter
1 cup brown sugar
1 egg
¼ cup molasses
2 ¼ cup flour
2 tsp baking soda
1 tsp cinnamon
1 tsp ground ginger
½ tsp ground cloves
¼ tsp salt
Directions:
Combine the first four ingredients in a bowl. Mix thoroughly.
In a separate bowl combine the dry ingredients. Mix the dry ingredients into the butter mixture. Wrap the dough in some waxed paper. Chill the dough in the refrigerator for 2 hours or overnight.
Before forming your cookies, preheat your oven to 375 degrees F. Lightly grease a cookie sheet.
Roll teaspoonfuls of chilled dough into balls.
Dip the tops in sugar and place on your cookie sheet, sugar side up.
Bake for 10-12 minutes. Cool on wire rack. These cookies freeze well.
These cookies take no time at all to shape and bake. The hardest part of this recipe is waiting for the dough to chill. However if you mix up the dough before making dinner you can pop it in the refrigerator to sit over night. The next day you cn makes and bake the cookies in no time.
When I first started writing my blog, devoting Thursdays to talking about my pantry I thought I would write about what is in my pantry and why to keep a well stocked pantry. Since then I have realized that the term “prudent pantry” can mean so many things. It can mean living a prudent lifestyle, living within or below your means, or having food on hand to cook up a quick dinner.
This week I was glad that I had a well-stocked pantry and a well-stocked freezer. I had worked outside all day and all of a sudden it was time to make dinner! In a matter of minutes I had decided to cook a quick stir-fry. I checked the drawers in the fridge and found some broccoli, scallions and a half of a red pepper. Garlic and ginger I had on hand. There was some leftover rice and chicken in the freezer.
Vegetables, rice and chicken.
Hoisin Chicken and Vegetables was on our plates in less than ½ hour!
Hoisin Chicken and Vegetables
1 Tbsp cornstarch
1/3 cup chicken broth
4 ½ tsp soy sauce
4 ½ tsp hoisin sauce
1 tsp sesame oil
3 cups broccoli, cut into bite size pieces
½ red pepper, sliced
1 Tbsp canola oil
4 scallions, chopped
3 garlic cloves, minced
1 tsp minced fresh ginger
1 pound chicken breast, sliced
Cooked rice
In a small bowl, combine the cornstarch and broth until smooth. Stir in soy sauce, hoisin sauce and sesame oil; set aside.
Seasoning sauce, ginger, garlic and scallions.
In a large nonstick skillet or wok, stir fry onions, garlic and ginger in oil; stir-fry just until the color starts to change.
Saute garlic, ginger and scallions.
Add chicken and continue to stir-fry until the chicken is done. Remove and keep warm.
Saute chicken.
Add broccoli and red pepper to the pan; cook until broccoli is crisp tender.
Broccoli and red peppers.
Add chicken back to wok along with the seasoning sauce. Continue to cook until the sauce thickens and coats the chicken and vegetables. Serve over warm rice. Yields about 4 servings.
This past weekend was a beautiful weekend in Vermont. It would have been a great weekend to be outside working in the garden getting all those outside projects started. However my husband and I were in PA visiting our son who is attending Grove City College. For some reason the school holds their Parent’s Weekend two weeks before the end of classes. It was a fun weekend; it’s always good to spend time with our son.
My son and I at Grove City CollegeGrove City College
Since his college is a nine-hour drive from Vermont we decided to take two days for the drive out and we found a fabulous Bed & Breakfast called Onanda by the Lake where we spent the night.
Onanda by the Lake B&B
Our hostess Linda spoiled us, not only were the accommodations absolutely perfect the breakfast she served us was superb.
Fabulous French Toast
When we attend our son’s graduation next year I think we’re going to have to go back!
I did manage to get some work done outside before the rains came this week. As I’ve said before spring is very slow in coming to Vermont.
Our stream in early spring.
My rhubarb is almost ready to pick.
Rhubarb
The daffodils are still blooming everywhere and my bleeding heart is finally blooming.
Bleeding HeartDaffodils everywhere
The creeping phlox is in full bloom and is creeping between every rock.
Creeping PhloxCreeping Phlox
The lettuce I planted several weeks ago is making an appearance.
Tiny lettuce seedlings
I had started some lettuce inside from seed and it grew much faster than I thought it would. It really needed transplanting so I planted it in a very large pot and placed it in front of our sliding door. It has done so well and I think we’ll actually be eating it before I can move it to the garden. I’m thinking that next winter I’m going to grow lettuce inside during the long winter. Imagine fresh greens from the living room!
Inside lettuce!
Hope you enjoyed your glimpse of the spring progress. Hopefully next week I’ll have made a little more progress in the garden!
Last week I told you about making Colby Cheese, if you are at all interested in making cheese you should try making Mozzarella. In thirty minutes or so you can have a fresh batch of Mozzarella and you don’t need any special equipment other than some rennet, citric acid and cheese salt.
Cheese Supplies
Ingredients needed:
1 ½ tsp citric acid dissolved in ½ cup cool water
1 gallon milk (you may use skim but the yield will be lower and the cheese drier)
¼ rennet tablet diluted in ¼ cup cool, un-chlorinated water
1 tsp cheese salt (optional)
While stirring, add the citric acid solution to the milk at 55F and mix thoroughly. Heat the milk to 90F, stirring constantly. Remove the pot from the heat and slowly stir in the diluted rennet with an up and down motion for about 30 seconds. Cover the pot and leave undisturbed for 5 minutes.
Check the curd, it should look like custard with a clear separation between the curd and whey. If the curd is too soft, or the whey is too milky, let set for a few more minutes. Cut the curd with a knife that reaches all the way to the bottom of your pot.
Place the pot back on the stove and heat the curds to 110F, gently moving the curds around with your spoon. Remove from the heat and continue to sir slowly for 2-5 minutes. (Stirring the full minutes results in a firmer cheese)
Gently stir the curds.
Scoop out the curds with a slotted spoon and put into a 2 quart microwaveable bowl. Press the curds gently with your hands, pouring off as much whey as possible. Reserve the whey.
Microwave the curds on high for 1 minute. Drain off excess whey. Gently fold the cheese over and over (like kneading bread) with your hands or a spoon. This distributes the heat evenly throughout the cheese. Microwave two more times for 35 seconds each, add salt to taste after the second time. After each heating, knead again to distribute the heat.
Knead quickly until it is smooth and elastic. When the cheese stretches like taffy it is done. When the cheese is smooth and shiny, roll it into small balls and eat while warm. Or place them in a bowl of ice water for ½ hour to bring the inside temperature down rapidly. Best eaten fresh, but if you must, cover and store in the refrigerator.
Homemade Mozzarella Cheese
Yield: ¾-1 pound
This recipe and my other cheese recipes are from the book Home Cheese Making by Ricki Carroll. An excellent book for beginner cheese makers.
This Portuguese Vegetable Soup recipe is adapted from one of my favorite cookbooks, Bakery Lane Soup Bowl. Between my mother and I, I think we have made just about every recipe in the book and all are wonderful. Even by changing the recipe slightly the end result was absolutely delicious.
Portuguese Vegetable Soup
Ingredients:
½ pound turkey kielbasa
1 ½ Tbsp olive oil
½ cup chopped onion
1 small clove garlic, minced
2 ½ cups diced potato
4 small finger potatoes, cooked and sliced
5 cups chicken stock
1 small can diced tomatoes
1 small can drained, canned kidney beans
¼ pound chopped kale
½ cup green beans, cooked
Directions:
Cover the kielbasa with water in a skillet. Bring the water to a boil and cook until water evaporates. Remove sausage and cool. Slice into thick slices.
Add oil, onions, and garlic to skillet and sauté until onion is tender but not browned. Add the onion garlic mixture to your soup pot along with the potatoes and chicken stock. Bring to a boil and simmer until potatoes are quite tender.
Strain potatoes from the stock and mash. Return the mashed potatoes to the stock along with the tomatoes, beans and sausage. Simmer for 5-10 minutes. Then add kale and beans. Simmer another 10 minutes. Season to taste with salt and pepper. Serve hot.