Homemade Mayonnaise So Easy

After reading the ingredients for Miracle Whip, last week’s pantry game, perhaps you’re ready to make your own mayonnaise. I decided to use the recipe from the book Nourishing Traditions to make my own homemade mayonnaise. The recipe is a little different from the usual recipe for mayonnaise as it has whey in it.

Although whey is an optional ingredient I did have some on hand from making cheese and decided to add it in. Apparently the addition of whey will help your mayonnaise last longer, adds enzymes and increases nutrient content. The recipe did warn that homemade mayonnaise may be slightly more liquid than store-bought versions.

mayonnaise, homemade, prudent living

Homemade Mayonnaise

Ingredients:

1 whole egg, at room temperature
2 egg yolk, at room temperature
1 tsp Dijon-type mustard
1 ½ Tbsp lemon juice
1 Tbsp whey (Optional)
¾-1 cup extra virgin olive oil
Generous pinch of sea salt

Directions:

In your food processor, place the egg, egg yolk, mustard, salt and lemon juice and optional whey.

Process until well blended, about 30 seconds.

Drop by drop add the olive oil with the motor running. Taste and check seasoning. You may want to add more salt and lemon juice.

mayonnaise, uses for eggs

If you have added whey, let the mayonnaise sit at room temperature, well covered, for 2 hours before refrigerating. With whey added, mayonnaise will keep several months and will become firmer with time. Without whey, mayonnaise will keep for only several days.

Makes about 1 ½ cups.

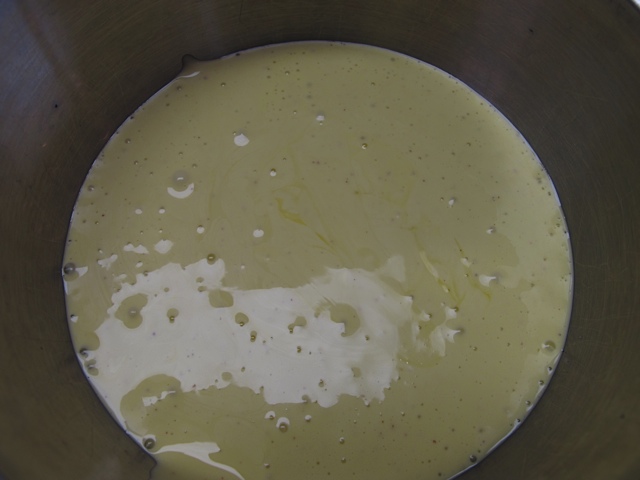
I tried a variation of the recipe using white wine vinegar instead of lemon juice and did not add any mustard. Due our farm fresh eggs the color is very yellow!

Mayonnaise, homemade

Mayonnaise can be flavored in many ways, Add herbs, dried spices, flavored vines,or dry mustard to the yolks at the start.

Homemade mayonnaise can be kept, tightly covered in the refrigerator for a day or two. When serving homemade mayonnaise and all foods containing it, keep track of the time it spends outside the refrigerator. Because raw egg contains microorganisms that start multiplying above 40F degrees,  the maximum time mayonnaise should be out of the refrigerator is two hours and when the air temperature is 85F degrees or above only one hour. When salmonella from raw eggs is a concern, you can make a Saboyon-Style mayonnaise where the yolks are cooked.

Homemade mayonnaise can be considered more of an elegant French sauce, not a store-bought sandwich spread. It has a very rich but enjoyable taste.

My Garden: Soil Testing

Before my garden is fully planted I take a soil test. I try to do this every couple of years. It gives me an idea as to what nutrients my garden is lacking and also will tell me how to correct any deficiencies.  Since I live in Vermont I can have a soil test done through the University of Vermont.

They will provide sample test kits, which include a mailer, sample bag, and information form. These are available from UVM, from UVM Extension offices and from some local garden centers. You can also download a form and mail the sample in your own clean plastic bag.

soil tests, vegetable gardening, home front
UVM Soil Testing Form

They only need about one cup of soil for a garden test.

The directions are very simple. First they need some information such as your name, address, the size of your garden and whether or not it is a home garden or a commercial production. They also want to know what crops you are growing, whether it is mixed vegetables or a specific crop. The basic test costs $14.00.

The reliability of a soil test is only as good as the sample you submit. The ½ cup of soil you are sending in must be a good representative of your garden. You want to take your sample before any lime, fertilizer or manure is added. Use only clean equipment to collect your sample.

The best way to do this is to take a number of samples from your garden and thoroughly mix them in a clean pail. Take about ten samples as a minimum for a garden up to 10,000 square feet in size.

Collect your sample by pushing the blade of a garden shovel into the soil to the desired depth. Cut out a triangular wedge of soil and set it aside. Now slide your blade into the soil again taking a thin slice from the side of the hole. Save this “core” as your sample.

soil testing, vegetable garden
Taking soil samples

Make sure all the cores are thoroughly mixed together.

soil testing, gardening
Mix the soil samples together.

Fill a plastic bag with about 1 cup of your mixed sample and place in a mailing envelope.

soil sample, testing
Place sample in a plastic bag.
soil, testing, gardening
Cup of soil to be tested.


Once they receive your sample they will mail back a detailed report.

soil testing, UVM
Soil sample ready to mail.

Linked to:
LilSuburbanHomestead,

NewLifeonaHomestead,

TheMorrisTribe 

[hana-code-insert name=’Tuesday Garden Party’ /]

[hana-code-insert name=’DigInDirt’ /]

Making Colby Cheese

I have learned to make yogurt, ricotta and mozzarella but several weeks ago decided to try making a hard cheese. Colby Cheese is a type of cheddar and only has to be aged from 2 to 3 months. Perfect for a first time cheese maker.

Making Colby cheese is rather a long process with a lot of heating the milk and then letting it set and then heating again. Once the curds were ready they had to be put in a cheese press.

Being rather frugal my husband decided to make our cheese press and our cheese mold. He used some scraps of lumber to build the press and used a plastic jar to make the mold. Very creative and the press looked very professional by the time he was finished.

homemade, cheese press

The recipe I used was from the book Home Cheese Making by Ricki Carroll, one of the best books around for home cheese makers.

First the milk was heated to 86 degrees and the starter was added. The milk was covered and allowed to sit for an hour. Making sure the milk’s temperature was 86 degrees the rennet was added, stirred for several minutes and then allowed to sit for another 30 minutes or until the curd gave a clean break.

cheese making, prudent living, Colby cheese

The curds were cut into cubes using a clean, sharp knife.

Colby  Cheese, cheese making,

The curds were then heated until the temperature reached 102 degrees, maintaining the temperature the curds were stirred gently for thirty minutes.

cheese making, prudent living, frugal tips

At this point the whey was drained off to the level of the curds and additional cold water was added. To have a nice moist cheese the temperature had to be kept below 80 degrees. This temperature was maintained for 15 minutes at which point the curds were poured into a colander and allowed to drain.

curds, cheese

Once drained, the curds were broken into smaller pieces, salt was added and the curds were placed into a cheesecloth-lined mold.

cheese mold, cheese making

The cheese was first pressed at 20 pounds for 20 minutes.

pressing curds, making cheese

Then 30 pounds for 20 minutes,

hard cheese, Colby cheese

40 pounds for 1 hour

cheese press, cheese making

and finally 50 pounds for 12 hours. Between each pressing the cheese was removed from the mold, the cheesecloth was peeled away and then re-wrapped. With each pressing you could see that the cheese was getting more compact. After the final press the cheese was removed from the mold, the cheesecloth was peeled away and it was allowed to air dry at room temperature for several days.

hard cheese, cheese making

Once the cheese was dry to the touch it was waxed.

I now have a beautiful round of cheese aging for 2-3 months. From the 2 gallons of milk I got 2 pounds of cheese. Now to be patient for the next few months before I can actually try it.

cheese wax, Colby cheese

Recipe Box: Amazing Overnight Waffles

Today’s recipe is another family favorite. If you haven’t tried amazing overnight waffles you’ve been missing an awesome treat! I love this simple recipe; you mix up the majority of the ingredients the night before. In the morning you add the butter and an egg and the mix is ready to be turned into delicious waffles. What better excuse to enjoy maple syrup. I enjoy using this recipe when we have company. It makes for a delicious, easy breakfast in the morning without much effort on your part.

Amazing Overnight Waffles

2 cups all purpose flour
1 tsp yeast
1 Tbsp sugar
½ tsp salt
2 cups milk
6 Tbsp butter, melted
1 large egg
Nonstick spray
Butter for the waffle iron (op)
Waffle iron

Combine the flour, yeast, sugar and salt in a medium size bowl.

breakfast, recipes, prudent living

Add the milk and whisk until blended.

wafle batter, breakfast

Cover the bowl tightly with plastic wrap and let stand overnight at room temperature.

homemade waffles, breakfast

In the morning the batter will have all sorts of bubbles on the surface.

batter, waffles

Preheat the waffle iron and melt the butter. Beat the egg in a small separate bowl and beat it into the batter along with the melted butter. The batter will be quite thin.

Lightly spray the hot waffle iron on all surfaces with the nonstick spray and rub on a little butter. Add just enough batter to cover the cooking surface. Cook for two to three minutes, depending on your waffle iron. Do not over bake, as you want it crisp and brown, but not too dark.

breakfast, amazing waffles

Serves three to four. These waffles also freeze well. Any leftover waffles I let cool on a baking rack and then wrap and place in the freezer.

freezer cooking, breakfast

Perfect to pop in the toaster on a busy morning!

Prudent Pantry: The Pantry Game

Today I want to mention a fantastic cookbook that can help you to use all those wonderful items you have stored in your pantry. We have the link to this book in our Home Front Store. Just click on the link on the right side of the page and you will find the link. The book is called Nourishing Traditions by Sally Fallon.

cookbooks, reference books, prudent pantry
Nourishing Traditions

This book will teach you as much about nutrition as it does about cooking. It is full of recipes and the information given is easy to understand. I highly recommend this book.

 Nourishing Traditions has a section called “Know Your Ingredients” where it will list the ingredients and you have to guess the item. Hence the Pantry Game! I will list the ingredients for you and you can try to guess the item. Enter your guess under the comments and tomorrow I will give you the answer! This is an item that could very well be in your refrigerator! It is also something that you could easily make yourself.

Product: Water, soybean oil, sugar, vinegar, food starch-modified, salt, cellulose gel (microcrystalline cellulose), mustard flour, egg white, artificial color, sodium caseinate, xanthan gum, cellulose gum, spice, paprika, natural flavor, betacarotene (color).


My Garden: Homemade Seed Tape

We’re having a cold, dreary day here in Vermont. It’s been raining on and off and I’ve even noticed a few snow flurries. Not the day to be working outside. Instead I have an inside project. I’m sure you’ve seen the seed tape they sell in catalogs. Designed to help you plant those very small seeds like carrots so you don’t have to do as much thinning. Did you know you can also make these easily at home?

Here’s what you’ll need:

Flour paste – ¼ cup flour and enough water to make a paste.

Strips of paper to make the tape, you can use black and white newspaper, single-ply toilet paper or a thin paper bag.

seed tape, vegetable seeds, planting
Strips of paper

Something to dab the glue on such as a small paintbrush or a toothpick.

Start by making the paste, start with the flour and add enough water until you have the consistency of a paste.

Check your seed packet for the recommendations as to how far apart the seeds should be planted.

seed packet, carrots, prudent living
Packet of Carrot Seeds

Dab the paste onto your strips of paper as far apart as you would plant the seeds. Just drop the seeds into the paste. Drop the same number of seeds that you would plant in your garden.

seeds, prudent planting
Allow seeds to dry in the paste.

Allow the paste to dry completely and roll up your tape. You are all ready to head out to the garden!

seeds, vegetable gardening, carrots
My homemade seed tape.

For most seeds you will just need to lay the tape down in your garden and lightly cover it with soil. Water and watch the seeds grow! The paper will eventually decompose and you’ll never see it again.

Linked to HomesteadRevival.blogspot.com,
lilsuburbanhomestead.wordpress.com

Homemade Corn Tortillas

I’ve been meaning to try making my own tortillas for some time. Today I finally got around to making Homemade Corn Tortillas. I checked out a number of recipes online and basically they are all the same! Only two ingredients needed and a little arm work!

Homemade Corn Tortillas

Ingredients:

1 ¾ cups masa harina
1 1/8 cup water

In case you’re wondering what masa harina is it is finely ground corn meal.

corn meal, corn tortillas, recipe

Directions:

In a medium bowl, mix together masa harina and hot water until thoroughly combined. Turn dough onto a clean surface and knead until pliable and smooth. If the dough is too sticky, add more masa harina. If it begins to dry out, sprinkle with water. Cover dough tightly with plastic wrap and allow to stand for 30 minutes.

Preheat a cast iron skillet or griddle to medium-high.

Divide dough into 15 equal size balls. Using a tortilla press, a rolling pin, or your hands, press each ball of dough flat between two sheets of plastic wrap.

Immediately place tortilla in preheated pan and allow to cook for approximately 30 seconds, or until browned and slightly puffy. Turn tortilla over to brown on the second side for approximately 30 seconds more., then transfer to a plate.

corn tortilla

Repeat process with each ball of dough. Keep tortillas covered with a towel to stay warm and moist until ready to serve.

 homemade corn tortillas, corn meal, prudent living

I may have to invest in a tortilla press! I found it hard to roll them into perfect circles. However I mixed up some refried beans (healthy style) and we enjoyed them for dinner! Too easy!

Recipe Box: Broccoli Chips

Several weeks ago I shared a recipe for Kale chips. My husband and I enjoyed these so much I wondered if there were other vegetable chips I could make at home.  After a bit of searching I found a recipe for Broccoli Chips on KeepItSimple.com.. I decided to give it a try. First time around I usually try a recipe as it is written; second time around I make a few changes. This recipe was really good, the only change I would make would be to either try seasoned breadcrumbs instead of the panko bread crumbs or just use more seasoning. Give it a try and let me know what you think.

vegetables, chips, healthy eating
Ingredients:

Broccoli Stalks
1 cup panko bread crumbs
1 egg plus a splash of milk, whisked together
A dash of salt, onion powder and cayenne pepper (mixed in with the crumbs)

Preheat oven to 350 degrees. Slice the broccoli stems into thin coins.

broccoli, vegetable chips

Dip the coins into the egg mixture and then coat them in the panko mix.

broccoli, eggs
Place them on a lightly greased cookie sheet.

baking, prudent living

Bake the broccoli coins for about 10 minutes or until the coins are tender and fragrant.

vegetable chips, healthy eating
You could fry these too but then they wouldn’t be as healthy a choice.

I made a batch while I was making dinner and they were perfect to munch on while I was prepping the rest of the dinner.

Linked to: notyourordinaryrecipes.com, comfyinthekitchen.com, simplysweethome.com, designsbygollum.blogspot.com, homemaidsimple.com, annkroeker.com, momtrends.com. MakeAheadMealsForBusyMoms.com, FlourMeWithLove.com, MyFavoriteFinds.blogspot.com

My Pantry: Identifying and Preventing Pantry Pests

As we work on having a well-stocked and organized pantry it is also important to have a pest free pantry. The last thing you want to find is a bug in your oats! Finding bugs isn’t unusual because bugs like what we eat. Stored foods commonly infested include flour, cereals, cracked grains, baking mixes and processed foods, macaroni, powdered milk, dried fruits, nuts, popcorn and spices.

Common insect pests you might find are: Indian Meal Moths,

pantry pests, bugs, prudent living
Indian Meal Moth

Demestid Beetles,

pantry pests, bugs
Demestid Beetle

Sawtooth Grain Beetles,

pantry pests, bugs, prudent living
Sawtooth Grain Beetle

Flour Beetles,

pantry pests, prudent living
Flour Beetle

Granary Weevil,

pantry pest, prudent living
Granary Weevil

Rice and Maize Weevils,

pests, pantry storage
Maize Weevil
bugs, pantry pests
Rice Weevil


Bean Weevils and Spider Beetles.

pantry pests, bugs
Spider Beetle
bugs, pests, pantry pests
Bean Weevil


The first indication of an infestation is often the presence of small brown beetles, moths or worms in your cupboards or on counters. Looking closer you may find them in opened packages or containers of food and in the cracks and crevices of cupboards. You want to get rid of them as soon as possible because they can multiply and spread to other stored food.

If you do notice bugs in your pantry you want to find all the potential food sources. Locate and discard all infested items. Do not overlook intact boxes or containers because many insects can chew their way into cardboard and foil.

Infested items can be thrown away or salvaged by freezing three to four days. Do not use insecticide for controlling insects in pantry areas. Removing infested items and thoroughly cleaning with a vacuum is usually sufficient. As a precaution against re-infestation, store susceptible foods in tightly sealed glass, metal or heavy plastic containers or in the refrigerator or freezer.

To prevent pantry pests when you purchase food be certain containers are not damaged and seals are intact. Store dried food in insect proof containers such as screw-top glass, heavy plastic or metal containers. This will prevent entry of insects. Keep your pantry areas clean and do not allow crumbs or food particles to accumulate, as exposed food will attract insects.


My Garden: April Update

Vermont, barns, spring
Springtime in Vermont

Spring comes slowly to Vermont. We often have snow in April but this year we’ve had much warmer weather. I’m anxious to get out in the garden but we’re still having temperatures well below freezing at night. I have planted some lettuce, spinach and parsley and as soon as we get the composted manure all spread and tilled in I will be planting my peas. Hopefully this weekend! I thought I would share some pictures of what my garden looks like here in Vermont in mid-April.

The forsythia is in full bloom. I really wanted to get a picture of the bright yellow Goldfinches in the forsythia but they are just too skittish.

spring flower, garden
Forsythia in full bloom

Remember all those bulbs I planted in the fall? Well they all seem to be coming up and many of them are in bloom. I love daffodils.

bulbs, spring flowers, home frontbulbs, spring flowers


The blueberry bushes are mulched with some pine mulch we got delivered for free from Henderson’s. They were cutting some pines just down the street and were happy to deliver it.

mulch, bushes, blueberries
Mulched Blueberry bushes

The strawberries that I mulched in the fall survived the winter and are coming along well.

berries, strawberries
Sparkle Strawberries

Lupines are coming up everywhere. They are another favorite of mine.

spring flowers, prudent living
Lupines

Soon I’ll be cooking with rhubarb. Five plants all bursting out of the ground.

vegetable gardening
Rhubarb

My oregano is up as are my chives.

herbs, homegrown
Chives
herbs, homegrown
Oregano

The garlic that I planted in the fall is also doing well.

bulbs, vegetable garden
Garlic

General view of the garden to the chicken palace.Vermont garden, spring, Vermont

Inside things are doing well. My geranium, which I overwintered indoors, is in full bloom and ready to be moved outside for the summer.

overwintering, house plants
Geraniums

The vegetable seedlings are also doing well, the tomatoes seem to grow more robust every day!

seed starting, seedlings
Vegetable seedlings

Hope you’ve enjoyed my pictures of my garden progress here in Vermont.
Linked to: Gallery of Favorites

The Morris Tribe Blog Carnival
Design a site like this with WordPress.com
Get started