I try to stay on top of my microwave and when I heat things up I usually use a cover of some sort. However sometimes I end up with a dirty microwave in need of cleaning! I found this method of cleaning my microwave to be very easy. It’s a simple as microwaving a cup of water for about three minutes. You may have to do it a little longer, depending on your microwave. When it’s done, the inside of your microwave should be nice and steamy. Let sit and cool for a few minutes before opening the door. Then just wipe the inside off with a rag and you will easily wipe away all the grime. If it doesn’t work the first time repeat until the inside of the microwave is clean and shiny.
If you want this to smell nice you can add all sorts of things to the water before you boil it. Place inside a four cup microwavable container that contains 1 cup of water a chopped up lemon, lime or orange. You can also add several tablespoons of vinegar.
Water and an orange
If the window is greasy you can clean it with a mixture of half vinegar and half water and then dry. End result – a clean microwave without using chemicals!
I realize our goal is to eat as close to the land as possible and should really avoid boxed mixes, however once in awhile I do use a boxed cake mix. My Lemon Poppy Seed Muffins are one example and this delicious Nantucket Welcome Cake is another. I found this recipe years ago in the Nantucket newspaper. I’ve been making it ever since and it’s always a hit. One of these days I’ll modify the recipe to have the whole thing be from scratch but it the meantime I will continue to use the recipe as is.
Nantucket Welcome Cake
Ingredients:
4 eggs
¾ cup oil
¾ cup apricot nectar (if you can find the small cans they are just right)
3 tsp almond extract
1 package yellow cake mix
¾ cup powdered sugar
1 lemon (the juice and the rind)
Directions:
Beat the eggs, oil, apricot nectar and almond extract into the cake mix using an electric beater. Beat for about three minutes or until all the lumps are gone. Pour into a lightly greased and floured tube pan. Bake at 350 degrees for 45-50 minutes. Let stand for 10 minutes.
Mix together powdered sugar, lemon juice and lemon zest. Remove cake from pan and while still warm glaze the top with the powdered sugar-lemon mix. Serve warm or let cool slightly before serving.
You’ve set up your pantry and it is now well stocked. How do you keep track of what food you have on hand? It’s important to know what you have in your pantry so you don’t end up with food that is not going to be eaten. There are many different forms available online for taking a pantry inventory. Here are several links: FaithProvisions.com, HiddenHermit’s blog, and OrganizedHome.com . Frugal-Families.com offers a download for your pantry that is divided up into sections such as dry goods, canned goods, etc. This should help you get started and help you to realize that taking an inventory for your pantry is not difficult, it just takes some time.
The first step in taking an inventory is to set aside some time to do a complete job. Print out or create an inventory sheet. It can be as simple as taking a blank sheet of paper and separating it into categories for the types of food you find in your pantry; such as canned goods, grains, baking supplies, pasta etc.
Working a section at a time, empty a shelf, and pull out everything single thing.
Remove all items from your pantry.
Take your list and start filling it out. As you go along check the expiration dates and remove expired items. Also remove those items which you will never eat, perhaps you purchased the item for a specific recipe, which you never made, or it’s something you don’t really like.
Once everything is removed and you’ve tossed the expired items and have a pile of items to donate, clean off the shelves. When you put everything back in the pantry you want to put things way on clean shelves.
Clean shelves
Put everything back as neatly as possible, keeping like items with like. For example, all your oils in one spot and your spices in another. If you keep your inventory in a handy place you can use it as a reference when you are going grocery shopping and for planning your future meals. Knowing what you have on hand makes it easier to plan meals and helps you to make the best possible use of what you do have in the pantry.
I try to make the time to do an inventory several times a year. It gives me the opportunity to stay on tip of what I have and make the best use of my purchases. In the spring I do an inventory so I’ll know what I need to can during the summer harvest from the garden. As we head into the fall I will complete another inventory to give me an idea of what I have managed to store for the winter.
I often run out of room to store my fresh produce. Or I put it away in a drawer and forget that I have it on hand. This video was so inspiring, what a creative way to store your food![hana-code-insert name=’Storing Produce’ /]
For those of you who have read Prudent Living’s recent online magazine this recipe may be familiar to you. I am really trying to get away from purchased cleaning products and decided I should try this bug spray as well. Much better for you than a commercial bug spray!
You may have your own source for essential oils, I purchase mine from MountainRoseHerbs.com. Their prices seem good and remember essential oils go a long way as you usually only need a few drops.
Insert the funnel into your spray bottle and fill the bottle with witch hazel. Leave about one inch of headspace.
Witch Hazel
Then add approximately 25 drops of each of citronella essential oil and lemongrass essential oil, plus approximately 15 drops of geranium essential oil.
Essential Oils
Remove the funnel and replace with the sprayer cap, shake the bottle and it is now ready to use!
Lisa Barthuly, who is a special correspondent for Prudent Living Magazine provided these solutions.
I first tasted this unusual casserole while enjoying a meal at my mother-in-law’s house. It was delicious and she was gracious enough to share the recipe with me. I decided it would be good recipe to share just before the Easter weekend, as it would be perfect with a ham. I made it recently and served it with fish and it was amazing. As you can see from the photo we almost finished it up before I had a chance to take a picture.
½ cup sugar
3 Tbsp flour
3 eggs
20 oz can crushed pineapple, unsweetened
4 slices of bread, cubed
1 stick butter, melted
Combine sugar, flour and eggs. Add pineapple with juice.
Crushed pineapple.
Place in a buttered casserole. Pour melted butter over the cubed bread and stir to mix well.
Cubed bread to top casserole.
Top casserole with the bread crumbs.
Bake 350 for one hour. Serve with your main dish.
Casserole just about finished!Momar’s Pineapple Casserole
It’s still not quite spring here in Vermont and a bowl of soup tastes really good on these cold spring days. Having some extra spinach in the fridge that I didn’t want to go to waste led me to make this delicious soup this week. It is a quick easy soup that goes together well. I think it is the only soup recipe I have that uses steel cut oats.
2 Tbsp butter
1 onion, minced
1 celery stalk, minced
1 carrot, finely chopped
2 Tbsp flour
3 ¼ cup chicken stock
¼ cup steel cut oats
1 ½ cup chopped spinach
2 Tbsp cream
salt and pepper to taste
Melt the butter in a saucepan and add onion, celery and carrots, cook about 2 minutes or until the onions are soft.
Saute onions, carrots and celery.
Stir in the flour and cook slowly for another minute, stirring constantly. Pour in the chicken broth and the oats and bring to a boil, lower the heat and cover. Simmer for 30 minutes or until the vegetables are tender.
Steel cut oats.
Stir in the chopped spinach and cook for 15 minutes.
Chopped spinach
Stir in cream and season to taste.
When I make this I sometimes omit the cream, it is delicious either way. The original recipe instructed you to add the oats with the spinach. I have always aded them with the broth so they have longer to cook, this gives the soup a nice creamy texture.
Originally a pantry was understood to be a cool and dark place where perishable foods such as freshly baked bread could be stored. It could be a room where food, provisions, dishes or linens were kept. It is usually in close proximity to the kitchen although sometimes they may be found in the basement or other areas of the home that would otherwise be considered unused space. Over time, the concept of the pantry was expanded from a simple bread room into an area where essentials could be stored in bulk.
My pantry is in an unused corner of the basement.
My basement pantry.
When the house was built we had a small room built that is unheated. The temperature stays between 45-55 year round. It is dark and cool, perfect for storing food and canned goods.
Inside my basement pantry.
Just because you don’t have a separate room to call your pantry does not mean you can’t have some place in your home where you can store extra essentials as a reserve against hard times. Tupperware boxes can be placed under a bed, for example, and filled with back-up products.
Tupperware boxes under the bed.
We also have a closet in our laundry room that was not being used, we lined it with wire shelves and also use it for storage space.
Laundry room closet.
Ideally you should have enough in your home for at least three days. A mid range pantry would be able to feed a family for a period of two weeks to a month.
As I have mentioned previously there are many items that store well over a period of time and these are things that you should have on hand in your pantry. Dried beans, wheat berries, rice and oats can all be stored in a cook dark place. I enjoy having a well-stocked pantry. We live quite a distance from the store and I try to have enough food on hand so I’m not making unnecessary trips to pick up just one or two items. You never know when you might have unexpected company. Last summer we had a house full of company and then flood damage from Irene, which made it impossible to drive anywhere. Luckily we were well stocked and managed just fine.
Soon we will begin a new growing season; this is a perfect time to increase your pantry storage. Learn how to can using a water bath canner. You would be amazed at the various foods that can be put away for the winter using this method. If you visit my Home Front Storeyou will see the Canning Kit that is available through Amazon. This is the exact canner that I have been using for years. If you are not sure about canning pick up the Ball Complete Book of Home Preserving. It is full of wonderful, simple recipes to preserve your harvest.
I will be featuring various recipes as well. I can’t wait to share my “Rhubarbeque” recipe; it is the most delicious sauce that is perfect on pork or chicken. Can you guess the secret ingredient? As soon as my rhubarb comes up I will pass that recipe along.
The seeds that I recently planted are doing well and some were are in need of transplanting already! I like to transplant the seedlings after they’ve grown two or more true leaves (the cotyledons don’t count). This can be anywhere from two to six weeks after germination.
Tomato seedlings ready to transplant.
Before I start I make sure I have everything ready, my new pots and some potting soil. I like to put a piece of paper towel or newspaper in the bottom of my pots to keep the dirt from coming out the bottom. By the time I transplant again (either into bigger pots or into the garden) this paper will have dissolved.
Pots filled with moistened soil.Pots with paper in the bottom.
Freeing a seedling from its neighbors in a pot can be daunting if you haven’t done it before. One precaution is to always grasp a plant by a leaf not the stem. The plant can survive loss or injury to a leaf but if you break the stem it is fatal! I use a spoon and start at the edge of the pot and carefully lift the seedling. I try to choose the strongest seedlings rather than transplant every single one. At the time I am tempted because they all look strong and healthy, but then I end up with way too many plants for my garden. Choose the sturdiest, most uniform plants and regretfully discard the others.
Gently transplant the seedling.
Set the seedling deeper than it was in the germination pot, placing the cotyledons just above the soil surface. Some plants, like tomatoes, will form roots along the section of the stem that is buried when you transplant deeper. Once every seedling has been transplanted make sure they are all labeled and given a drink of water.
Labels for seedlings.
Then place them back under the grow lights.
Transplanted seedlings.
This is the time of year that my kitchen really gets crowded as I usually run out of room under my grown lights. We have wonderful south facing windows so I will alternate my seedlings so they all spend a little time in front of the widows. It’s still too soon to be working outside in the garden but at least I can get my hands in the dirt transplanting seedlings!
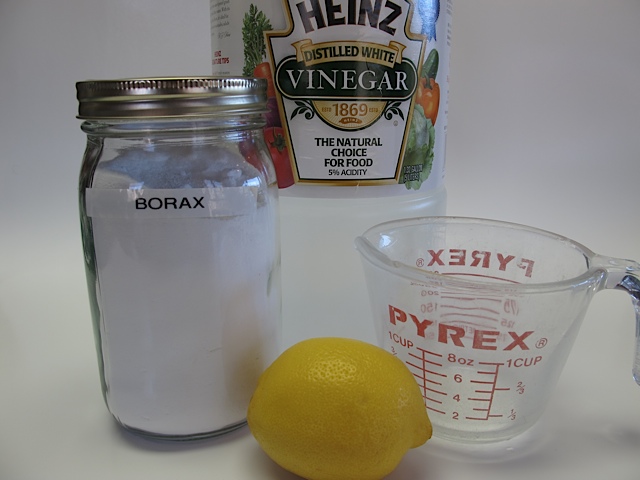
I read this simple recipe in the recent Prudent Living Magazine. As I get away from the store bought commercial cleaners I am always looking for recipes I can use at home for cleaning. This no scrub toilet bowl cleaner caught my eye right away. It uses just several household items you probably already have at home: borax, vinegar and a lemon.
Rather than take a picture of the before and after shot of our toilet you are just going to have to take my word for it! This is a very simple cleaning solution.
Flush your toilet to wet the entire bowl. Sprinkle 1 cup of borax all around the inside of the bowl, and then pour ½ to 1 cup of vinegar all around. Let it sit undisturbed overnight and voila, clean! If you have heavy stains in the bowl a bit of scrubbing might be required.
Next time you need to clean your toilet and are looking for a no scrub toilet bowl cleaner give this simple method a try. No harmful chemicals for the environment and it works!
For a heavy duty toilet scrub try this: combine 1 cup of borax and ½ cup lemon juice to form a paste. Apply this to the toilet bowl using an old rag or sponge. Let is sit for a few hours and then scrub off. Flush the toilet. the result, clean toilets withouts chemicals!
Lisa Barthuly, who is a special correspondent for Prudent Living Magazine provided these solutions.