Do you use fresh ginger in your cooking? When you purchase fresh ginger you usually buy a large section of root. However you may only need a small amount in your recipe. What do you do with the rest of the root? Years ago my mother took a Chinese cooking class, in the class she learned this wonderful tip for storing ginger and I’ve been using it ever since.
Peel the ginger root. Cut the root into smaller sections and place in a glass jar.
Peeled ginger in a jar.Peeled ginger
Pour sherry over the ginger until covered.
Pour sherry over the ginger.
Store in the refrigerator. The ginger will stay fresh until you have used it up and you can even use the flavored sherry in cooking if you like.
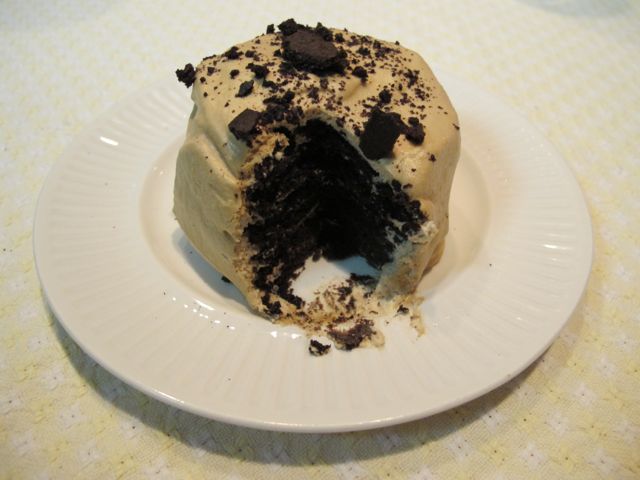
I’m sure many of you have fond memories of those delicious icebox cakes made with the Nabisco Famous Chocolate Wafers. In our family we always called this special dessert Surprise Cake.
In all the years of enjoying them I never thought to make them as individual cakes. However I came across this recipe in a book called Cook What You Love by Bob and Melinda Blanchard. This recipe makes the most elegant but extremely simple dessert. You make it several hours ahead or even a day ahead so the cookies have time to soften and then serve as a fancy dessert the next night. Good enough for family or company!
Surprise Cake
Ingredients:
1 ¼ cups heavy cream
3 Tbsp sugar
1 tsp vanilla extract
2 tsp instant coffee powder
24 Nabisco Famous Chocolate Wafers
Crushed Chocolate Wafers for garnish
Directions:
Using an electric mixer beat the cream, sugar, vanilla and coffee together until the cream holds its shape.
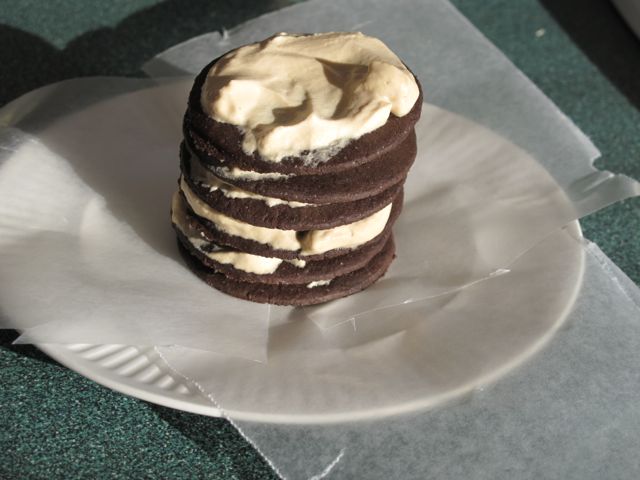
Spread about 1 Tbsp of the cream onto each wafer. Stack 6 wafers together for each serving, alternating the wafers with the cream and pressing slightly so they hold together.
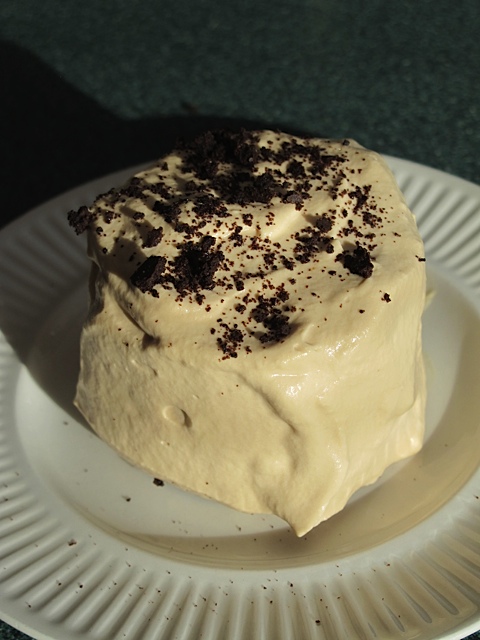
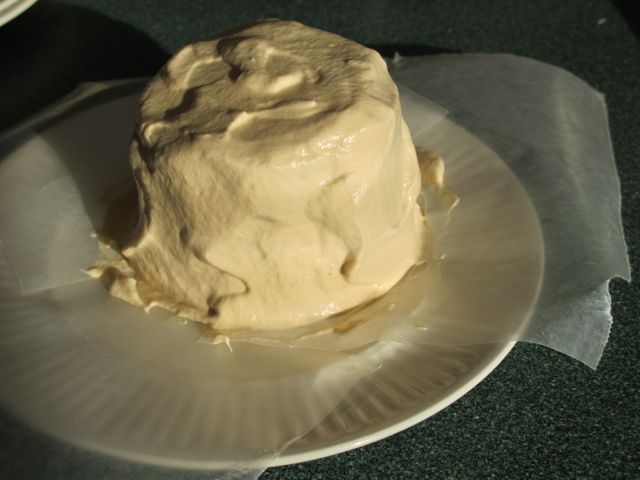
Spread the remaining cream over the outside of the stacks to cover the wafers completely. I use a little wax paper under the first cookie to keep the plate clean.
Once the cookies are covered with cream I remove the wax paper.
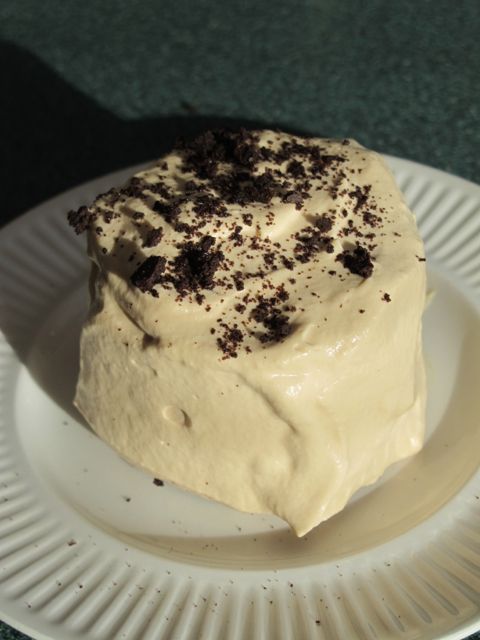
Chill for 4-6 hours or overnight. Sprinkle with crushed cookie crumbs and serve.
Are you a dog lover? As we stock our pantries let’s not forget about our four legged friends! As a treat for our dogs I decided to make Homemade Dog Biscuits.
We have two dogs in our household; Riley, a Boston Terrier:
and Purtie, a pug.
Neither of these dogs were ours to begin with but they have made their home with us. Purtie was originally our daughter Katie’s dog. However Katie settled on the west coast and Purtie didn’t.
Riley belongs to our oldest daughter, Jessica. She and her husband moved to London for two years and Riley came to live with us. Both dogs love their treats. They will often go outside on the coldest nights just because they know they will get a treat when they come inside. With trying to get back to basics and have a healthier lifestyle I decided to look into recipes for dog biscuits. Figured it couldn’t be too difficult. I found a very simple recipe and decided to give it a try.
Homemade Dog Biscuits
They smelled delicious as they were baking!
Ingredients:
4 cups whole-wheat flour
2 cups oatmeal
½ to ¾ cups chunky peanut butter
2 ½ cups water
Directions:
Mix all the ingredients, adding more hot water if necessary.
Knead well.
Roll out to ¼” thickness and cut into shapes with small cookie cutters.
Bake on a greased cookie sheet at 350 degrees for 40 minutes.
Turn off heat and let cool in the oven overnight.
I have to say they were a big success!
A sad note: I made these dog biscuits last weekend with the thought of writing about them today. Purtie, our pug has had some health issues recently and yesterday she took a turn for the worse. We think she suffered some sort of stroke. She spent the day quietly in her bed and passed away late afternoon. So this post is in honor of Purtie, she was a wonderful addition to our family and will be greatly missed.
Last week I started my first batch of seeds. In just a matter of days there were green sprouts showing through the dirt!
Here are the onion seedlings:
Onion seedlings
The broccoli seedlings:
Broccoli sprouts
And the lettuce:
Head lettuce
Today I will start some more. Pretty soon my kitchen will be filled with flats of green growing plants! Just wanted to share the progress. for those of you that haven’t seen my little video clip for Prudent Living, I’ve attached that as well! There may be snow on the ground here in Vermont but spring is coming!
Staying healthy is important. We try to take precautions to stay healthy. We always tried to avoid unnecessary trips to the doctor’s office. Shortly after moving to Vermont a friend sent us the recipe for “The Master Tonic”. At first I was a bit skeptical but made a batch and figured whenever we started to feel under the weather we would take a dose. Whether or not it was a coincidence we managed to stay very healthy! I even had several friends who asked for the recipe! I share it with you today exactly as it was shared with me. Beware when you chop fresh horseradish the fumes are quite powerful and when you chop hot peppers DO NOT rub your eyes, and be sure to wear gloves! When you gargle and swallow with this tonic I swear you can feel fire coursing through your veins!
Master Tonic: A Natural Antibiotic
Pro biotic: antiviral, anti-bacterial, anti-fungal and anti-parasitical.
Important note: As required by law, this information is provided by the right of free speech for educational purposes only, as natural or non-pharmaceutical remedies or therapies are in some nations today now often deemed illegal. We must therefore insist that if you are ill or have any disease or healthy problem that you contact a medical doctor immediately and ask their advice before trying any formulae, or suggestion given in this material.
This is a modern-day version of a recipe for an extremely powerful natural antibiotic originally used to fight infection like the Bubonic Plague that killed over a third of the world in the 1300’s. Unlike pharmaceutical antibiotics it fights both bacteria and viruses, and is effective against pathogens that have developed immunity to existing drugs.
Master Tonic Ingredients
Master Tonic:
1 part fresh chopped garlic cloves (anti-bacterial, anti-fungal, anti-viral anti-parasitical)
Chopped Garlic
1 part fresh chopped white onion, hottest onions available (similar properties to garlic)
1 part fresh gated ginger root (increases circulation to the extremities)
Chopped Ginger
1 part fresh grated horseradish root (increases blood flow to the head)
1 part fresh chopped Cayenne Peppers, the hottest peppers available, i.e. Habanero, African Bird, or Scotch Bonnets etc. (A great blood stimulant)
Hot Cherry Peppers
1 bottle raw, unfiltered, unbleached, non-distilled apple cider vinegar
Fill a large glass jar ¾ of the way full with equal parts of the above peeled, fresh, chopped or grated herbs.
Ingredients layered in a large glass jar.
I use a ½ gallon glass-canning jar and add a cup of each of the above ingredients. Then fill up the rest of the jar to the top with raw, unfiltered, unbleached, non-distilled apple cider vinegar. (It should look milky) shake jar at least once a day for two weeks, and then filter the mixture through a clean piece of cotton (an old t-shirt) or cheesecloth, then bottle and label. If possible make sure all the vegetables and herbs are fresh and organically grown if possible, use dried herbs only in an emergency.
Master Tonic
This tonic stimulates maximum blood circulation while putting the best detoxifying herbs into the blood. It strengthens the good guys (probiotic) in your system that helps define against infection that broad-spectrum pharmaceutical antibiotics kill. This formula is not just for the sniffles; it has helped to turn around the deadliest of infections.
The dosage is ½ to 1 ounce, two or three times daily (1-2 Tbsps. a time), gargle and swallow. Don’t dilute with water. For ordinary infections, a dropperful taken 5-6 times a day will deal with most conditions. It can be used during pregnancies, is safe for children (use smaller doses) and as a food is completely non-toxic. Make up plenty; it does not need refrigeration and lasts indefinitely without any special conditions.
(I believe the friend that shared this with me got it from The University of Natural Healing, Dr. Richard Schultzs’ adaption of Dr. Christopher’s’ original anti-plague tonic)
This Sweet and Sour Chicken recipe is from a much-loved cookbook, which is my husband’s. He has owned this book since 1980 and we have enjoyed numerous recipes from it. The cookbook is called Pei Mei’s Chinese Cook Book Volume 1 and is very unique as one page is in Chinese and the other page is in English.
Miss Fu Pei-Mei was a celebrated television chef in Taiwan and at the time the book was written had over fifteen years of experience demonstrating the art of Chinese cookery. This book is a collection of more than one hundred traditional dishes. We have made many of them and have never been disappointed. The book was originally published in 1969. You can still find used copies online. This recipe feeds about four and is easily doubled. It works equally well for pork, shrimp or fish.
Sweet and Sour Chicken
Ingredients:
1 lb of boneless chicken
2 peppers (sweet)
1 cup pineapple chunks
Marinade:
½ Tbsp soy sauce
1 Tbsp cornstarch
1 Tbsp cold water
1 egg yolk
In a medium size bowl, combine marinade ingredients. Slice chicken very thin. Best if done while the chicken is still fairly frozen as you can slice it thinner.
Soak in marinade for at least ½ hour.
Cut peppers into halves, remove seeds and membranes, and cut into 1” squares. Set aside.
In a small bowl, combine seasoning sauce ingredients. Stir and set aside.
Heat a few teaspoons of peanut oil in your wok. I use a non-stick pan, shaped like a wok with a flat bottom. When the oil is hot, stir-fry the chicken until it just starts to brown.
Remove to a bowl. Add peppers and pineapple to pan.
Stir constantly until just tender but not soft. Add seasoning sauce and chicken. Stir until thickened and serve immediately. Delicious served with rice.
Peanut Butter is a staple in our house. Now that our children are out of the house we don’t use it as often as we used to but it is still a staple I like to have on hand. According to the “best by” date on jars of peanut butter, and from what I read on the Internet, the recommended shelf life is 18 months. Beyond that date the product does not spoil, but may develop off-flavors due to age. The end of the recommended shelf life is noted by the “best by” date stamped on the jar.
Both opened and unopened jars of peanut butter can be stored at room temperature. It is best to store peanut butter with the jar tightly closed and in a cool place. You can store peanut butter in the refrigerator if you want. Refrigeration may help to retain optimum flavor, particularly if the room temperature tends to be warm. Keep in mind that colder storage will make the peanut butter firmer and not as easy to spread.
Do you wonder if peanuts can be stored longer? According to Diamondnuts.com, nuts (in shells or not) can be stored in the freezer for 24 months.
If you are interested in having peanut butter as part of a long-term storage plan the best thing to do is purchase peanut butter powder. Hermetically sealed in the absence of oxygen, you can plan on a storage life of 4-5 years at a stable temperature of 70 degrees. It should keep proportionally longer if stored at cooler temperatures.
Peanut butter Powder
These are all interesting facts! For the time being I will plan on having just an extra jar or two on hand.
I also thought I’d try making my own peanut butter. How hard could it be? I had some peanuts on hand and decided to give it a try.
Raw peanuts
The peanuts were raw, so the first thing to do was roast them. This was easy. I just placed them in a shallow pan and set them in a pre-heated 350 degree oven for 15-20 minutes.
Roasted peanuts.
After roasting is done remove them and let them cool for a short while.
Once the peanuts were cooled off, I placed them in my food processor.
Processing the peanuts.
I added the salt and honey and processed for one minute. I continued to process while slowly drizzling in the peanut oil until the mixture was smooth.
Looks like peanut butter!
I then placed my peanut buyer in an airtight container and stored it in the refrigerator. Was that ever easy, and the result is so tasty!
Homemade Peanut Butter
Here is the simple recipe:
15 ounces of shelled and roasted peanuts
1 tsp kosher salt (I used sea salt)
1 1/2 tsp honey
1 1/2 Tbsp peanut oil
Place the peanuts, salt, and honey into the bowl of a food processor. Process for 1 minute. Scrape down the sides of the bowl. Place the lid back on and continue to process while slowly drizzling in the oil and process until the mixture is smooth. Place the peanut butter in an airtight container and store in your refrigerator.
Yesterday I picked up my seed order from the local co-op and today I am going to start a few seeds indoors. I tend to get carried away when reading the seed catalogs and if I had the room I would start twice as many as I do. However I only have one simple growing table with two grow lights so my space is limited.
My grow lights and simple table.Seed starting set-up.
I have a chart where I have written down what seeds I will start and when to start them.
My seeds and my list!Seed starting charts
There are several resources available on line. I have made two downloads to help me stay organized this year. Little House in the Suburb has a little booklet you can put together. By determining your last day of frost you work backwards to determine what you should plant and when. I also downloaded a seed-starting chart from Martha Stewart. It is basically the same information just on one sheet. The booklet I’ve used before, I want to see which works better.
Today I am going to start my leeks, onions and broccoli. I will start the broccoli in a small box and for the leeks I will use a different type of container. In the smaller containers I usually put a paper towel in the bottom to keep the soil mixture contained. By the time I need to transplant the paper towel will have dissolved.
Seeds and planting containers.Paper towel is used to contain the soil mixture.
In a previous posting you may recall that I made my own seed starting mixture, I have filled the containers with this mixture and moistened them slightly.
Container for the leeks.
One rule of thumb is to plant the seeds 2-3 times as deep as the seed is wide. Leek and onion seeds are rather small and are pretty much sprinkled on the top of the soil.
Once my seeds are planted I make sure the soil is moist. One way to do this is to fill a plastic bin with water and float the pot in it until the surface is damp. I then label each container with the date and the name of the plant. This will help me keep track of how many days it took the seeds to germinate and will also help me when it comes time to plants the vegetable plants in the garden. I may be able to tell leeks from broccoli but it is very important to keep track of the variety of peppers and tomatoes.
Cover the seeds with a plastic or glass cover to create a mini greenhouse. You need to keep the seeds warm; a heating pad may be necessary. You do not need a grow light until the seeds sprout. Once you see the first seed sprouting remove the cover and place under your grow light. Keep a close eye on the seedlings, as you don’t want them to dry out.
Creating a mini-greenhouse.
It’s a wonderful feeling to finally have some seeds planted. I will continue to plant more as the weeks go by. Won’t be too long before I’ll be able to be outside working in the garden!
I don’t know about you but I love to read and I have quite a collection of books. Recently I decided that I really didn’t need to have so many and I should take the time to go through my bookshelves and weed out those books that we no longer want. However, before I just make a large pile to donate to the library, I check to see if any of the books are worth anything.
The first place I check is Amazon.com. It is quite easy to re-sell books on Amazon. You have to have a seller’s account which just means setting up an account, which is then linked to your bank account, so that when you sell a book Amazon can deposit your money directly into your bank account. They take a small percentage but also give you a shipping credit. You can also buy your postage directly from Amazon. Every two weeks they deposit a check directly into your account for the books you have sold. You can list the books in your sellers account, sometimes you can even sell the books directly to Amazon, they will tell you what they will pay you and even let you download the postage for free to ship the book to them. Usually this service is just for textbooks.
Another option for selling books online is through MyBookBuyer.com. I believe this site started out with buying textbooks but you can now sell any books to them. It is very easy, you list your books by the ISBN and immediately they tell you what they will pay you for the book. Once you get your quote you package up your books and ship them for free. They will pay you within three days of receiving the books either by a direct deposit into a PayPal account or they will mail you a check. It took me less than a half an hour to go through my pile of books, find out which ones were worth anything and within a week I had a check in the mail for almost $30. Not bad for a half an hours worth of work.
If some of the books you have are more valuable you can also try selling them on eBay. I have found that it is well worth my time to check these web sites to find out who will give me the most money. I’ve sometimes sold books on one web site for quite a bit of money while on another web site they are not worth much. It surprises me that folks don’t do more Internet searching.
Perhaps you have books you have read and aren’t going to read them again. Did you know you can exchange them for new reading material? PaperBackSwap.com is such a site, this web site allows you to swap, trade and exchange books for free. You just list the books you’d like to swap with other members. You do have to pay for the postage for the books that are requested from you but in exchange you receive a credit. Each credit is worth a book, books you request are mailed to you for free. Our nearest library is a twenty-minute drive from my house. This is a wonderful way for me to have a steady supply of reading material. Just for posting your first 10 books you will receive two book credits. You can use those two credits to request your two books right away. You use the Search page, and browse the search PaperBackSwap Library by title, author or genre. When you find a book you want, just click the “Order This Book” button. The books you receive are free and yours to keep. When another member requests one of your books an email comes directly into your inbox from PaperBackSwap. You then accept the request and mail the book. It is very easy to print out your wrapper, wrap the book and add postage. Then just pop the book in the mail. Postage is by media mail and is usually only $2-$3.00. When the member gets your book you get a credit. I have been using this website for over a year and it has worked so well. You can even add books to a wish list and when they become available you are notified.
Your local library is also a wonderful place to donate used books; usually they have book sales where they will sell your books to raise money for the library. So take some time and go through your bookshelves, you may be able to make some money or exchange the books for new reading material.
This corn chowder recipe has been enjoyed for years. Today was a cloudy day and I decided it was a perfect day to make a batch of Mom’s Corn Chowder. You don’t need to use heavy cream when making the chowder, I often use milk or fat free half and half. I hope you enjoy it as much as we do.
I have so many fond memories of my mom making this chowder than when I mix up a batch it immediately feel like my mom is in the kitchen with me!
Mom’s Corn Chowder
Ingredients:
½ cup diced bacon
2 Tbsp butter
¾ cup chopped onion
¾ cup chopped celery
1 quart chicken stock
2 cups diced potatoes
3-10 oz packages of frozen corn
1 cup heavy cream
Salt and pepper to taste
Directions:
Sauté bacon in butter until crisp and browned.
Add onion and celery; cook until vegetables are crisp tender.
Meanwhile, measure stock in large pot, add potatoes and cook until just tender.
Puree 2 packages of corn in the blender, using a little of the hot stock while blending. Add blended corn and whole kernels, sautéed vegetables and cream to soup pot. Season to taste with salt and pepper. Heat to serving temperature. Enjoy!