Homemade Salad Dressing Mix

During the holidays I am always trying to think of things I can make to give as presents. One idea is a good homemade salad dressing mix. This can be made up and placed into a jar. Include a recipe for salad dressing and for a marinade and the gift recipient will have two ways to enjoy your gift!

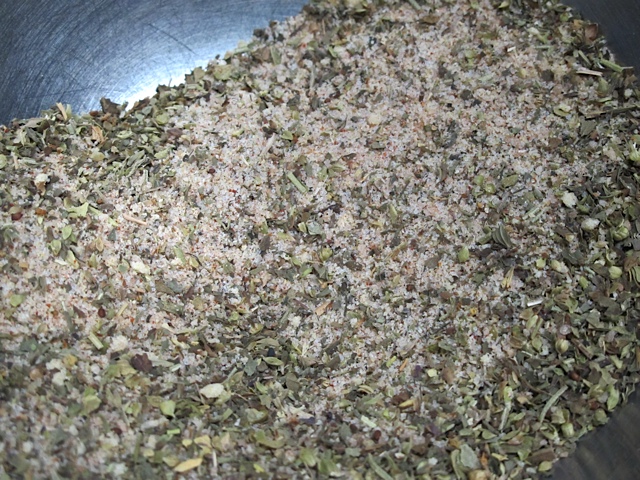
Here is my homemade alternative to packaged store-bought Italian dressing mixes, it makes about 2/3 cup:

Homemade Salad Dressing Mix

Ingredients:

1 ½ Tbsp dried oregano
1 ½ Tbsp dried basil
1 ½ Tbsp garlic salt
1 ½ Tbsp onion powder
1 ½ Tbsp salt
¾ Tbsp paprika
¾ Tbsp dried dillweed
¾ Tbsp dried rosemary
½ tsp freshly ground black pepper
Dash of cayenne pepper

Directions:

Combine all herbs and spices thoroughly.

Directions to make an Italian salad dressing:

Combine 1 ½ Tbsp of the herb mix with ¼ cup vinegar, 2 ½ Tbsp water, and ¾ cup oil in a jar with a tight fitting lid. Shake well. Let stand for at least one hour to blend flavors.

Directions to make a marinade:

Combine 1 ½ Tbsp of the herb mix with ½ cup red wine, 2 tsp thyme, ½ pound sliced fresh mushrooms and l large onion, sliced. Delicious on steak!

Regardless of whether you decide to make this delicious dressing mix to keep or to give away it will be enjoyed. The nice thing is that you will know exactly what the ingredients are. No items that you won’t be able to pronounce!

Turkey Vegetable Soup

I love leftover turkey. Unfortunately this year we won’t have any leftover turkey since we’re spending the holiday with my daughter and her husband on the west coast. However this is one of my favorite recipes for Turkey Vegetable Soup, it’s adapted from a recipe I found on the TasteOfHome.com website and works perfectly with leftover turkey! It also freezes well. the addition of curry gives it a slightly unique taste.

Turkey Vegetable Soup

Makes about 2 quarts and serves about 6

Ingredients:

2 medium onions, chopped
2 tablespoons canola oil
2 to 3 tablespoons all-purpose flour
1 teaspoon curry powder
3 cups reduced-sodium chicken broth
1 cup diced potatoes
1 celery rib, sliced
1/2 cup thinly sliced fresh carrots
2 tablespoons minced fresh parsley
1-1/2 teaspoons minced fresh sage
2 cups cubed cooked turkey breast
1-1/2 cups fat-free half-and-half
1 package (9 ounces) fresh baby spinach, coarsely chopped
1/4 teaspoon salt
1/4 teaspoon pepper

Directions:

In a Dutch oven, sauté onions in oil until tender. Stir in flour and curry until blended. Gradually stir in broth. Add the potatoes, celery, carrots, parsley and sage. Bring to a boil. Reduce heat; cover and simmer for 10-12 minutes or until vegetables are tender. Stir in the turkey, half-and-half, spinach, salt and pepper. Cook and stir until spinach is wilted and soup is heated through. Serve hot.

My Garden: Forcing Bulbs

Now that my garden is put to bed I can concentrate on other ‘gardening’ activities inside. Forcing bulbs inside is a good way to have blooming flowers mid winter. They also make a great present, who wouldn’t appreciate a gift of bulbs when the world is white outside! Tulips, narcissus, hyacinths, crocus and lily of the valley can be forced into flower in late winter or early spring.  A pot of tulips on your windowsill in February can brighten your spirits!

It is a good idea to keep the same variety in one pot as the blooming times often vary. Bulbs are also planted much closer together than you plant them outside. With the exception of narcissus bulbs, bulbs must be given a cold temperature of 35-48 degrees F for a minimum of 12-14 weeks. You can either keep them in a cold frame, an unheated attic or cellar or even a refrigerator!  In the refrigerator the pots should be covered with plastic bags that have a few holes punched in them.

Since I didn’t want to have to put my bulbs in a cold spot for weeks, I am gong to force paper white narcissus bulbs. I found some very healthy looking bulbs at the local nursery.

First I rinsed the gravel to get rid of the dust. I filled each of my bowls with gravel about 2/3rds full. I then nestled the bulbs in the gravel ½ to 1 inch apart, placing the pointed side up.  Then fill in gravel around the bulbs, leaving the top halves exposed. Place them in good light and add water up to the base of the bulbs. Keep the water level at this height.  I then placed the pots in a cool area. Within a few days roots will appear. When green shoots appear, move the pot to a cool, sunny spot. Sit back and watch them grow and bloom. It’s nice to enjoy a little bit of spring color for your home when everything outside is covered with snow!


Homemade Hot Chocolate Mix

This simple homemade hot chocolate mix recipe makes enough to give as a gift or to just keep on hand for those cold winter months. It’s a wonderful item to have in your pantry.Once you start making your own mix you’ll never go back to store bought again!

Like a good homemade baking mix having this hot cocoa mix in your pantry means you are ready at any time to enjoy a cup of hot cocoa! Nice to have on  hand when you have a houseful of company during the winter months!

Homemade Hot Chocolate Mix

Ingredients:

10 2/3 cups dry milk
6 oz non-dairy coffee creamer
1 lb Nestle’s Quik
1/3 cup confectioners sugar

Directons:

Combine all ingredients and store in an airtight container. To use mix ½ cup with 1 cup of hot water.

For the cheapest way to make a single serving of hot chocolate use the following recipe:

For one serving of Hot Chocolate combine:

1/3 cup dry milk
1 tsp cocoa
1 tsp sugar

Add to 1 cup of hot water.

There is nothing I enjoy better after coming in from a full day outside then sitting by the wood stove and enjoying a nice cup of hot cocoa!

Pumpkin Chocolate Icebox Cake

When I saw this Pumpkin Chocolate Icebox Cake recipe in the November issue of Sunset magazine I knew I had to try it. It is a very easy, no bake recipe, which makes a delicious, fall dessert. It’s pretty from the top and even prettier when you cut a slice! I tried it last weekend and it was a hit. Perhaps this will be a new tradition for our Thanksgiving table!no cook, Pumpkin icebox Cake

Pumpkin Chocolate Icebox Cake

Serves 12 (depending on the size piece!)

Ingredients:

3 packages (8oz@) of cream cheese, room temperature
1/2 cup packed dark brown sugar
1/2 cup granulated sugar
1 can (15 oz.) pumpkin
2 tablespoons half-and-half
1/8 teaspoon salt
3/4 teaspoon pumpkin pie spice
1 teaspoon vanilla extract
28 chocolate graham cracker sheets (12 oz. total)
Unsweetened cocoa powder, for dusting

Directions:

Beat cream cheese and sugars in a bowl with a mixer on medium speed until smooth. Then beat in pumpkin, half-and-half, salt, pumpkin pie spice, and vanilla until smooth and fluffy. Lay enough graham crackers in a 9- by 9-in. pan to cover bottom (cut to fit if necessary). Spread a quarter of pumpkin mixture over crackers with an offset spatula. Layer 3 more times, ending with pumpkin mixture.layer cake, icebox cake, no cook 
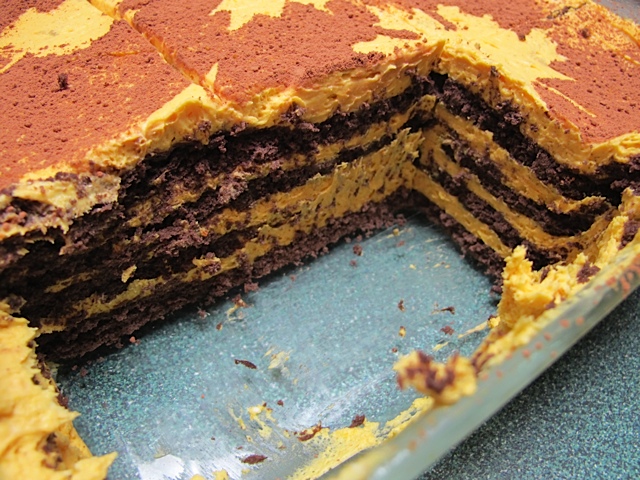
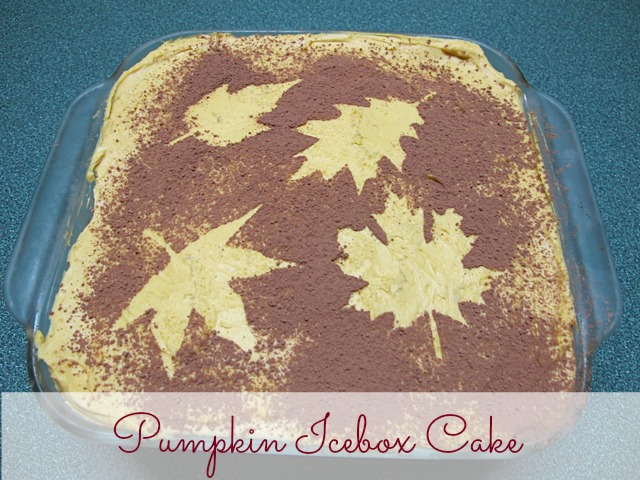
Cover; chill overnight. Set leaf cutouts (trace them on paper) on top and dust with cocoa, then remove. Cut cake into squares.dessert, pumpkin, no-cook

Prudent Pantry: Quinoa

How many of you enjoy eating Quinoa? Have you ever tried it? It is usually considered a grain but it is actually a relative of leafy green vegetables like spinach and Swiss chard. It is an ancient grain once considered the “gold of the Incas”! It is high in protein and it’s protein is considered a complete protein, meaning it contains all nine essential amino acids. It is a good choice for vegetarians concerned about adequate protein intake. It is also a good source of manganese, magnesium, iron, copper and phosphorus. Besides all it’s healthy properties is tastes good. It has a somewhat nutty flavor when cooked. Quinoa should be stored in an airtight container. The best location for storing quinoa is in a cool, dark, dry cabinet. It will stay fresh for one year or longer if properly stored, especially if it is stored away from sunlight and heat.

One of my favorite recipes is a Quinoa Pilaf, which I serve with a Sweet Chili-Glazed Chicken! Here are the recipes for you to enjoy.

Sweet Chili-Glazed Chicken with Quinoa Pilaf

¼ cup sweet chili sauce
2 tsp grated lime zest
1 tsp lime juice
2 tsp canola oil
2 scallions, thinly sliced
1 clove garlic
½ tsp ground cumin
2 cups chicken broth
1 cup quinoa, rinsed
2 Tbsp dried currants
1 pound chicken, cut into ¼ pound pieces

Combine the chili sauce, lime zest and lime juice in a small bowl, this will be the glaze for the chicken. To make the pilaf, heat the oil in a medium saucepan over med-high heat. Add the scallions, garlic and cumin. Cook, stirring constantly, until fragrant, about 30 seconds. Add stock, quinoa and currants; bring to a boil. Reduce heat and simmer, covered, until quinoa is tender and liquid is absorbed, about 20 minutes. Remove from heat and keep warm.

Meanwhile spray a large nonstick skillet with a nonstick spray and set over med-high heat. Add chicken and cook turning frequently and basting with glaze until chicken is cooked through. Serve with pilaf. This recipe is adapted from a Weight Watchers recipe and is delicious!


My Garden: Finally Put To Bed!

fall, garden
Fall garden all cut back.

“Fall is not the end of the gardening year; it is the start of next year’s growing season.”
Thalassa Cruso

Some years I never get around to doing a full fall clean up of the gardens. This year almost everything is cleaned up. I really have to thank my mom for giving me a weekend of help! She came for a visit several weeks ago and we spent a good portion of the weekend cutting back the flower beds. I have one small flower bed to still cut back but the rest is cut back and cleaned up! What a wonderful feeling.

All the decaying plant material has been moved to our compost heap, which will help to keep the garden free of insects and diseases. I have weeded the strawberry beds and covered them with straw to protect them over the long cold winter. I have also added some composted manure to the rhubarb bed and covered it with straw. As I mentioned in a previous blog my garlic is planted and mulched. I even dug up my two rosemary plants and brought them inside for the winter. Nothing like a little fresh rosemary in the middle of winter!!

strawberry bed, fall garden, weeding
Fall strawberry bed.
strawberry bed, mulch, fall garden
Strawberry bed all mulched.

The last thing we did was to empty our compost bin that is close to our kitchen, into the garden. It was amazing to see the beautiful black compost! Once all these chores were complete we let the chickens have free range of the vegetable garden! They love it and in just a few weeks will have scratched every bit of garden soil. The surface of the garden will look like we’ve had a miniature rototiller busy at work! They eat up any weeds that have sprouted and pick up any lose bits of plant material. Plus it’s just fun to watch them busy at work.

compost, fall garden, chickens
Chickens enjoying the compost pile!
compost, fall garden,
Compost pile a day later.


Now the snows can come, my garden is wonderfully cleaned up and ready to face the winter. Before I know it those seed catalogs will begin arriving in the mail. I can sit by our woodstove and plan next years garden!

winter, garden, snow
The winter garden.

Frugal Tip: Homemade Laundry Detergent

Making your own laundry detergent is one way to save money on an ongoing basis. The recipe basically uses three items: a soap of some sort, washing soda and borax.

The most typical type of soap used is Fels Naptha. This is an old fashioned type of soap usually found in the laundry aisle. You can also use Ivory.

Washing soda is not to be confused with baking soda; they are not the same thing! It is a white powder and its purpose is to help remove dirt and odors. The brand to look for is Arm & Hammer Washing Soda. You can usually find it in the laundry section at the grocery store.

Borax is a naturally occurring mineral, used as a whitener and deodorizer. The brand to look for is 20 Mule Team, this should also be found in the laundry section. That’s it! Mixed with water you can make a liquid laundry detergent or don’t add water and just have a powder form, whatever your preference. The recipe I used also called for baking soda, which is also used as a deodorizer.

Homemade Laundry Detergent Recipe

1 bar of Fels Naptha soap, shaved
4 cups of hot water to melt the soap
3 gallons of hot water
1 cup of borax
2 cups of washing soda
1 cup of baking soda
1 large container about 4-5 gallons size

Here’s what you do: 
Grate the soap into a saucepan. Add 4 cups of hot water to the pan.  Simmer on low until the soap melts completely into the water. Add borax, washing soda and baking soda to the hot water. Simmer on low until it dissolves with the soap. If the mixture is not melting, add more water if needed. Add 3 gallons of hot water to your large container.  I used a large 5-gallon bucket. Add the mixture to the hot water. Mix with a large spoon until it
completely dissolves, let cool overnight. You will notice that it turns into a thick gel.

I do have an HE washing machine so after reading numerous recommendations I will only use a small amount. This is a low sudsing detergent and should work fine! Due to the gel like consistency I read that the mixture should be stirred well each time before using. I will fill a large Mason jar or old laundry detergent bottle with 1/2 – 3/4 of the liquid mixture and the rest with water. I will shake it really well before each use and should not have any problems with my HE washer doing it this way. It smells wonderful!

Butternut Squash Lasagna

This Butternut Squash Lasagna recipe was introduced to me by my sister over a year ago, the minute I tasted it I knew it was a keeper. I think this is one of the most delicious ways to enjoy Butternut Squash! The recipe was adapted from a recipe found on the Epicurious.com web site. When my sister made it she substituted yogurt for the heavy cream and it was delicious! Enjoy!!

Butternut Squash Lasagna

Serves 6

Ingredients:

3 pounds butternut squash, quartered, seeded, peeled, and cut into 1/2-inch dice (about 9 1/2 cups)
3 tablespoons oil
4 cups milk
2 tablespoons dried rosemary, crumbled
1 tablespoon minced garlic
1/2 stick (1/4 cup) unsalted butter
4 tablespoons all-purpose flour
nine sheets dry no-boil lasagne pasta
1 1/3 cups freshly grated Parmesan (about 5 ounces)
1 cup heavy cream
1/2 teaspoon salt

Directions:

Preheat the oven to 450°F and oil a large shallow baking pan.

In a large bowl toss squash with oil until coated well and spread in one layer in pan. Roast squash in oven for 10 minutes and season with salt. Stir squash and roast 10 to 15 minutes more, or until tender and beginning to turn golden.

While squash is roasting, in a saucepan bring milk to a simmer with rosemary. Heat milk mixture over low heat 10 minutes and pour through a sieve into a measuring cup.

In a large heavy saucepan cook garlic in butter over moderately low heat, stirring, until softened. Stir in flour and cook, stirring, 3 minutes. Remove pan from heat and whisk in milk mixture in a stream until smooth. Return pan to heat and simmer sauce, whisking occasionally, about 10 minutes, or until thick. Stir in squash and salt and pepper to taste. Sauce may be made 3 days ahead and chilled, its surface covered with plastic wrap.

Reduce temperature to 375°F. and butter a baking dish, 13 by 9 by 2 inches.

Pour 1 cup sauce into baking dish (sauce will not cover bottom completely) and cover with 3 lasagne sheets, making sure they do not touch each other. Spread half of remaining sauce over pasta and sprinkle with 1/2 cup Parmesan. Make 1 more layer in same manner, beginning and ending with pasta. In a bowl with an electric mixer beat cream with salt until it holds soft peaks and spread evenly over top pasta layer, making sure pasta is completely covered. Sprinkle remaining 1/3 cup Parmesan over cream. Cover dish tightly with foil, tenting slightly to prevent foil from touching top layer, and bake in middle of oven 30 minutes. Remove foil and bake lasagne 10 minutes more, or until top is bubbling and golden. Let lasagne stand 5 minutes. Serve and enjoy!

Prudent Pantry: Organization!

Having an organized pantry will actually save you money by identifying what you’re using, what you’re not using and what you’ve bought in duplicate. It will allow you to take stock of your cooking habits and tells you what you should and should not buy in bulk. Do you have the habit of picking up a box of pasta every time you go to the store only to realize that you don’t eat pasta that often? To do a good job of organizing your pantry give yourself some time, a few hours where you can focus on the task and not be interrupted.

Take everything out of the pantry including food, food storage containers and junk or trash that may have accumulated. Dust the pantry, starting with the highest shelf, and then wipe down each shelf one at a time. Be sure to check for cobwebs! Line up the food items in one space so you can see everything at once. Use your kitchen table or even the floor if you have to. That way you can spot duplicates, spoiled foods and get a general idea of how much space each type of item will need. Check the expiration dates and discard those items that have expired. Ask yourself if you use that item or if it was just an impulse buy. If you don’t use it throw it out! Ask yourself if you like the item? If not throw it out or donate it to a food shelf (if the dates are still good). Organize the like food items for example cans of beans and soups, bottles of oils and vinegar, jars of spices, boxes of grains, boxes of breakfast cereal. It may take a little time but you want to have like items near each other. Invest in some boxes and containers to store those spice packets in. Trays, bins or baskets help in maintaining a clutter-free pantry. As you begin to put things back in your pantry be creative – keep all those breakfast cereals on one shelf, preferably on the lowest one, so that your children can easily access them.

Isn’t it a pleasure to see a pantry closet neat, tidy and clutter free? With all necessary ingredients within one’s reach, cooking is a snap. You can find things, sort them out and even stock up in minutes.

Once your pantry is well organized you will be able to maintain it. What’s the goal of establishing and maintaining a pantry? It’s two-fold: household convenience and protection against unexpected events. A well-planned pantry means the household will never run out of commonly used products such as toilet paper. More importantly, a pantry is a reserve against hard times. Whether it’s job loss, illness, or natural disaster, a pantry ensure that the family will continue to be fed, clean, and comfortable in the face of adversity. A beginner’s pantry focuses on convenience and contains back-up products for each storable item used in the home. The standard is simple: for each open bag, box or carton in the household, the pantry contains a second, back-up product; toothbrushes to spaghetti. A good first goal: a three-day supply of food and hygiene supplies adequate to support your family plus one additional person. More robust pantries serve additional goals. A mid-range pantry can feed a family for a period of two weeks to a month in case of emergency. This pantry includes substitutes for fresh foods, such as powdered milk, dried fruits and vegetables, and protein products. This pantry offers convenience and basic protection.

Regardless of what your goal for your pantry is investing in your pantry pays off in savings of time and money. So take stock of your pantry and  get organized!


Design a site like this with WordPress.com
Get started