Zucchini Sauce with Pasta

As I mentioned last week I have an abundance of zucchini! I always plant a few extra plants and they all seem to survive giving me lots of zucchini. I don’t mind as I love zucchini and am always looking for new ways to enjoy it. A friend of mine shared this Zucchini Sauce with Pasta recipe with me recently. I decided to give it a try! It serves about six so my husband and I will be enjoying this for the rest of the weekend! No complaints, it was delicious!zucchini sauce

Zucchini Sauce with Pasta

Ingredients:

1 onion, chopped
2 large cloves of garlic, minced
2 pounds of medium zucchini, diced
¼ cup basil, minced
4-6 Tbsp olive oil, divided
Sea salt and freshly ground pepper
1 pound of penne pasta or other pasta of your choice.

Zucchini Sauce

Directions:

Finely chop the onion and mince the garlic. Cut the squash into ½ inch pieces.

Put a large pot of water on to cook the pasta.

In another large pot, sauté the onion in 1-2 Tbsp. of the olive oil. Sauté for 5-7 minutes or until the onion is soft. Stir in the garlic and sauté for another minute and then add the zucchini, along with 2 Tbsp. Olive oil. Cook uncovered for about three minutes and then cover the pot, lower the heat and cook until the zucchini are extremely tender, about 15-20 minutes. Stir occasionally and add a little water if you notice the zucchini is sticking to the pan. Just before the zucchini is done add ¼ cup of minced basil.

While the zucchini is cooking bring the pot of water to boiling and cook the pasta. When the pasta is done combine the cooked pasta with the zucchini sauce. Cook over medium heat until the pasta is nicely coated with the sauce. Sprinkle with Parmesan if desired.Zucchini Sauce

Enjoy.Zucchini Sauce

Coconut and Curry Scallops

This month I seem to be cooking my way through the June issue of the Clean Eating magazine. There are so many delicious and healthy recipes. Many of their recipes take less than ½ hour to put together, start to finish, plus they usually make four servings which is perfect for my husband and I. We can enjoy a dinner and leftovers for lunch the next day. This Coconut and Curry Scallops recipe is no exception. It’s rather mild as far as curries go but still very tasty.Coconut and Curry Scallops

Coconut and Curry Scallops

Ingredients:

1 Tbsp. coconut oil
1 ½ Tbsp. ginger, peeled and minced
1 clove garlic, minced
1 Tbsp. Curry powder
1 tsp. ground turmeric
½ tsp. Cinnamon
1 pound of bay scallops, defrosted overnight in the fridge if frozen, rinsed and patted dry.
1 cup trimmed green beans
1 cup cubed red or orange bell pepper
¾ cup full-fat coconut milk
½ cup plain whole milk yogurt
½ cup quartered button mushrooms
½ lemon, juiced
¼ cup fresh basil, thinly slicedCoconut and Curry Scallops

Directions:

In a large skillet, on medium high heat the coconut oil. Add ginger, garlic, curry, turmeric and cinnamon and sauté until fragrant, 30 seconds to one minute. Add the scallops, green bean and pepper and sauté for 2-3 minutes, stirring occasionally.Coconut and Curry Scallops

Stir in coconut milk, yogurt and mushrooms. Reduce heat to medium and simmer for four minutes. Turn off heat and stir in the lemon juice. Garnish with basil.

I served the coconut and curry scallops over quinoa, which was delicious. You could also serve over brown rice.Coconut and Curry Scallops

I have never cooked with frozen scallops before and I was amazed at how good they were. I found some at our local co-op and they didn’t even smell fishy at all! Have you cooked with scallops before? In our early married life the only time I ever had scallops was when my husband’s grandmother served her delicious scallop casserole which was basically scallops, Ritz crackers and butter! Although Gram’s recipe was tasty this recipe is much better for you!Coconut and Curry Scallops

An Abundance of Zucchini?

Despite the fact that I’ve cut back on my garden I am still growing a healthy crop of zucchini! I love zucchini and I always grow more than I need.When I have n abundance of zucchini here are a few ways I use it up.

As a Main Coarse:

Zucchini and Parmesan Crusted Chicken

This recipe has been adapted from a recipe I tried using HelloFresh. Although the original recipe was good I felt it needed a little something more so I added some minced garlic! Why have I never thought of topping a chicken breast with shredded zucchini? It keeps the chicken moist and tender while it is cooking. The addition of garlic and Parmesan gives a delicious flavor to the mix.Zucchini Parmesan Crusted Chicke

Zucchini Fettuccine Alfredo

I love using my spiralizer to create vegetable  noodles. I use the noodles in all sorts of ways. Sometimes I use vegetable noodles in place of pasta when serving spaghetti and meatballs. I’ve recently been experimenting to create a Fettuccine Alfredo using zucchini noodles and a light sauce. This extra light Alfredo sauce for pasta gets its silkiness from fresh ricotta and grated Parmesan cheese. I think it’s a winner! Perfect all by itself of serve as a side dish with grilled steak.Zucchini Fettuccine

Zucchini Quiche

A friend I worked with shared this recipe with me years ago. I have made it every summer since then and we still enjoy it! You can serve it as a complete dinner along with a salad or use it as a side dish.Zucchini Quiche

Turkey, Quinoa and Zucchini Meatloaf

Looking for a delicious and healthy meal? Try this delicious meatloaf recipe, it works best to make individual meatloaves.

Preserving

Corn Zucchini Salsa

This is a new recipe for me this year! Serve this delicious salsa with tortilla chips or try it on top of grilled chicken breasts or fish. It’s got just the right amount of zip!Corn Zucchini Salsa

Zucchini Relish

The same friend that shared her chocolate zucchini cake recipe also gave me this wonderful relish recipe. I don’t even buy relish any more as this is the family favorite.  Making this relish is a two-day affair so be sure to plan accordingly.

As a Dessert

Chocolate Zucchini Cake

This recipe is especially good if you have some oversized zucchini that need to be used up. A friend of mine shared this recipe with me years ago and we’ve been enjoying it ever since.Chocolate Zucchini Cake

Wondering what to do with your zucchini? Hopefully these recipes will give you a few ideas! Are you a zucchini lover? What is your favorite recipe?

SaveSave

SaveSave

Chicken Bruschetta – A Perfect Summer Meal

During the busy summer months I love to find quick delicious dinners. This Chicken Bruschetta is not only delicious but takes less than 15 minutes to prepare!Chicken Bruschetta


You can mix up the Bruschetta part of the recipe the day before and save yourself even more time. There is minimal cooking time in the oven so you don’t have to worry about heating up the kitchen on a hot summer night. I was so impressed by this Chicken Bruschetta that I am planning to serve it for our company next time they visit! The recipe is divided into three parts, the chicken, the salad and the bruschetta.Chicken Bruschetta


Chicken Bruschetta


Ingredients:


Chicken:

12 skinless, boneless, chicken tenders ( just under two pounds)

½ lemon, juiced

1 Tbsp. Parmesan cheese

½ tsp. black pepper


Salad:


24oz Quartered artichoke hearts in water, drained and rinsed

1/3 cup feta cheese

¼ cup fresh basil, thinly sliced

½ lemon, juiced

1 Tbsp. extra virgin olive oil

2 tsp. red wine vinegar

1 tsp. oregano

¼ tsp. black pepper

4 tsp. pine nuts


Bruschetta:


3 plum tomatoes, diced

½ cup fresh basil, finely chopped

4 tsp. extra virgin olive oil

1 tsp. red wine vinegar

2 cloves garlic, minced

¼ tsp. sea salt


Directions:


First prepare the Bruschetta. In a small bowl, combine all bruschetta ingredients. Cover and place in the refrigerator. Can be made the day before.


Prepare the salad. In a medium bowl coming all the salad ingredients except the pine nuts.


Prepare the chicken. Adjust your oven rack sop that it is about six inches below the broiler and preheat the broiler to high. Place the chicken on a large rimmed baking sheet. Drizzle with lemon juice and sprinkle the cheese and pepper evenly over the chicken. Broil the chicken for six minutes. I found the chicken wasn’t quite done so I flipped it over and cooked form a few minutes on the second side until cooked through.


On a lower rack, while the chicken is cooking bake 1 1/3 ups of the bruschetta in an uncovered ovenproof dish, until warmed. Add the artichoke salad mixture as well and bake for 2-3 minutes or until warmed.


I found that by placing everything in the oven at the same time was perfect.


To serve layer the artichoke mixture, 2-3 chicken tenders and 1/3 of the bruschetta. Top with 1 tsp. pine nuts.Chicken Bruschetta


This Chicken Bruschetta serves four.Chicken Bruschetta


An added bonus for this recipe, use the leftover Bruschetta on your poached egg the next morning. Delicious!Bruschetta


This original recipe was adapted from Clean Eating.

Raspberry Jam – Simple and Delicious

Yes the house is on the market and I’ve cut back on my gardening and I’m really not planning on doing any preserving this year. Except the raspberries are doing so well and I just love this old-fashioned jam so I just couldn’t resist. Last week I made a small batch of simple and delicious raspberry jam. The intense raspberry flavor of this jam makes it a long-time favorite. Warming the sugar beforehand keeps the jam boiling evenly and ensures success.

I love the recipes that just make a small batch of jam. This jam only makes 4 cups. Perfect to spread out and enjoy over the course of the year.Raspberry Jam

Raspberry Jam

Ingredients:

4 cups raspberries

4 cups granulated sugar

Directions:

Place the sugar in an ovenproof shallow pan and warm in a 250-degree oven for 15 minutes. Warm sugar dissolves better which will help the jam to boil evenly and ensure that your  jam is a success.

Place the berries in a large stainless steel or enamel saucepan. Bring to a full boil over high heart, mashing the berries with a potato masher as they heat. Boil hard for one minute, stirring constantly.Raspberry Jam

Add the warm sugar, return to a boil and boil until the mixture will form a gel, about 5 minutes.

Ladle into sterilized jars and process for ten minutes or as directed in your canning book.Raspberry Jam

Makes exactly four cups and the jars of  jam will look so nice on your pantry shelf!Raspberry Jam

Are you growing raspberries in your garden? This is a relatively new raspberry bed for us but with all the rain the plants seem to be very happy and are producing a wonderful crop of raspberries this year. I will not be making anymore raspberry jam instead we will just have to enjoy the berries as we pick them!

SaveSave

SaveSave

SaveSave

Stir Fry Rice Noodles with Shrimp

Stir fry noodles serve as a complete, one dish meal. Learn how to cook Stir Fry Rice Noodles with Shrimp in this post.

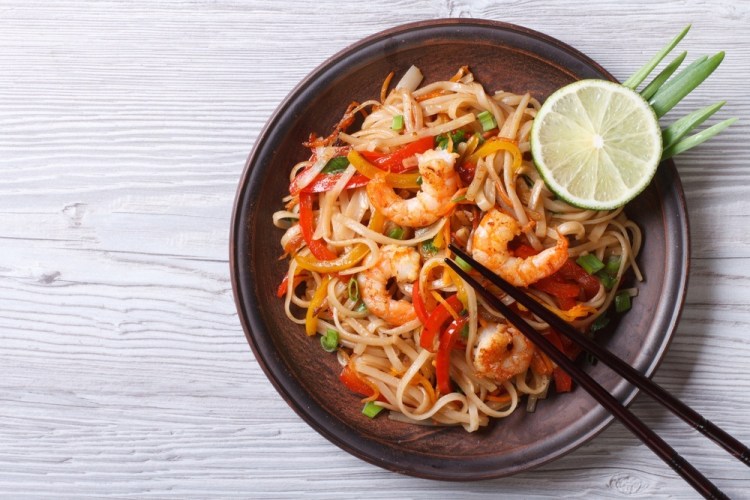
When you hear the words “stir fry”, what first comes to your mind? Some people would say vegetables. I’d say noodles. It’s one of my favorite comfort foods. Stir fry noodles are easy to prepare. You would also love the fact that it can be served almost any time of the day—whether in the morning or late at night.

You can stir fry any noodle, whether it’s rice noodles, soba noodles or udon noodles. You can also do it with fresh or dried noodles. In fact, it is also possible to stir fry regular Italian noodles.

What I like about rice noodles is that these are a lot firmer compared to other noodle types. Thus, it won’t turn mushy after you sauté them in the pan.

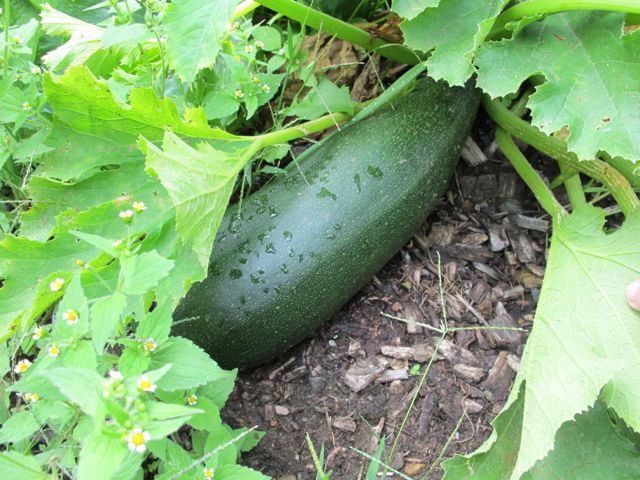
Rice noodles are also called pad thai noodles or rice sticks. They look like fettuccine and come in different packages.

Health benefits of rice noodles

Aside from being delicious and easy to cook, there’s another reason why I love to feast on stir fry noodles.

Rice noodles are very nutritious. It is packed with fiber, protein, zinc, and iron. And if you are looking to lose weight, rice noodles are a better alternative to cooked white rice. A cup of stir fry rice noodles has about 180 calories, while a cup of cooked white rice has 200 plus calories.

If you are looking for a gluten-free food, just consider stir-fried rice noodles. After all, rice is naturally gluten-free. Thus, rice noodles are also a good alternative to noodles made from wheat flour.

Rice noodles are rich in zinc which can promote a well-functioning immune system and iron, which helps the body in producing red blood cells.

These noodles are also packed with protein. A cup of cooked rice noodles contains about 2 grams of protein or nearly 3 percent of the daily protein needs of men. It also contains about 1.8 grams of fiber, representing 7 percent of the recommended daily requirement for men.

Tips in stir frying rice noodles

Aside from the noodles, a typical stir fry rice noodles recipe contains four to five ingredients. Chicken and beef are common ingredients as well as snow peas and bean sprouts. The said veggies are quick cooking so they should be added towards the end of the cooking.

It is also possible to add broccoli and carrots. But since the said vegetables are hard, I would recommend you steam them first so that you will have an easier time stir frying them.

You don’t need to visit an Asian grocery just to get a special kind of sauce or liquid seasoning for stir-frying noodles. You can simply season stir fry noodles with soy sauce or rice wine.

Some experts suggest using chili garlic sauce or oyster sauce to make the stir fry noodles richer and more flavorful.

In pushing and tossing food around the wok, using a wooden spatula or metal chan is highly recommended. The latter is particularly very useful in removing food from the wok.

Stir Fry Rice Noodles with Shrimp Recipe

Now let’s go to the stir fry rice noodles with shrimp recipe. This is one-dish meal because it has starch courtesy of the rice noodles, and lots of fresh veggies. Plus, the shrimp further makes this dish complete.

This recipe serves four people. It should take you around an hour to finish it.

Ingredients:

  • 12 ounces medium shrimp, peeled and deveined
  • 4 ounces of pad thai noodles
  • One tablespoon of peanut oil
  • One tablespoon of rice vinegar
  • Two and a half teaspoons of honey
  • One tablespoon of ground chile paste
  • One tablespoon of soy sauce
  • Two tablespoons of chopped unsalted cashews
  • One tablespoon of sliced garlic
  • Two teaspoons of fresh ginger, sliced
  • One green Thai chile
  • Three fourths cup of snow peas
  • Three fourths cup of fresh bean sprouts
  • One fourth teaspoon of salt
  • 12 sweet mini peppers
  • Three fourths cup of carrots, matchstick cut

Step by step guide

  1. Combine the vinegar, soy sauce, honey and ground chile paste in a medium bowl. Stir well then add the shrimp. Toss to coat. Cover this and refrigerate for about 30 minutes.
  2. Cook the noodles by following the package directions. Remove the salt and fat by rinsing the noodles with cold water and draining it.
  3. Heat a large wok over medium-high heat. Add the oil and swirl to coat.
  4. Add the cashews as well as ginger, garlic, and chile to the pan. Stir fry for a minute or until the garlic has turned brownish. Remove the cashew mixture from the pan and set aside.
  5. Increase the heat then add the carrot, sweet peppers and salt. Stir fry for two minutes. Add the shrimp mixture then stir fry for another two minutes.
  6. Stir in the noodles and peas. Cook for a minute. Toss to coat.
  7. Return the cashew mixture to the pan. Add the bean sprouts and cook for a minute. Toss frequently.

That’s it! You now have yummy stir fry rice noodles with shrimp that you can serve or enjoy any time of the day.

What do you think of this recipe? Let me know your thoughts by writing in the comments section below.

Summer Break – It’s Time

After much consideration I have decided to step away from my blog, Nancy On The Home Front, and take a summer break. At least somewhat of a break. I will still be co-hosting the Homestead Blog Hop on Thursdays and sharing recipes on Friday. I’ll also be sharing some guest posts periodically.Summer Break


When I started this blog I had a strong focus on “prudent living” and did posts on gardening, having a prudent pantry, frugal tips and of course recipes. During the last six years I have written over 1,400 posts! As our house is now on the market my focus has shifted. We no longer have chickens on our property and I have cut back on my garden substantially. summer break


Instead our focus here on the home front is selling our home! I have been de-cluttering for the last year and we are also packing. The realtors tell you to pack up the personal stuff so that the potential buyers can imagine themselves living in your home. Eventually we will be moving and when we get that offer we want to be ready. Our garage currently looks like some sort of storage unit and the house itself feels very empty and impersonal. I sure hope we get an offer soon!summer break


I am so thankful for you, my faithful readers. You have been with me over the six years, many of you since the first post on September 19, 2011! I appreciate your faithfulness and your loyalty. Each comment left has meant so much to me. The blogging community is a wonderful thing and the friendships made are so special. I couldn’t have made it this far without the encouragement and support of other bloggers.summer break


I will be posting on my Facebook page and the other social media sites. If you are not already a follower on Facebook, please stop by and like my page. I may be taking a summer break but I still want to stay in touch.summer break


Have a wonderful summer and I look forward to returning full-time  in the fall!fall colors

Superfood Salad

SuperFood Salad
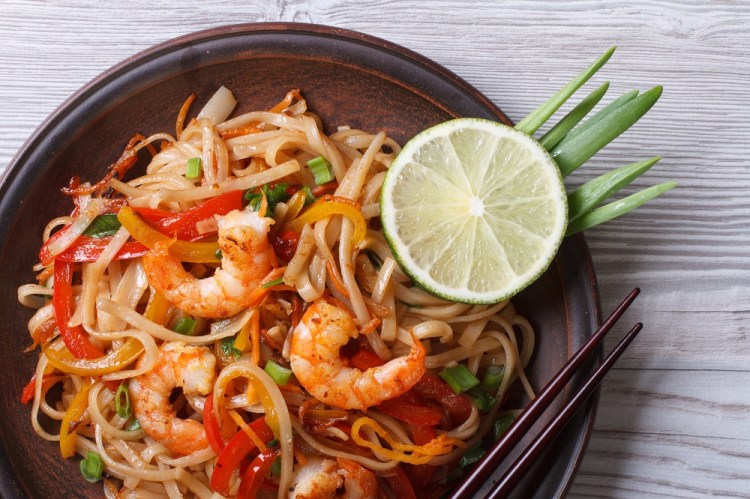
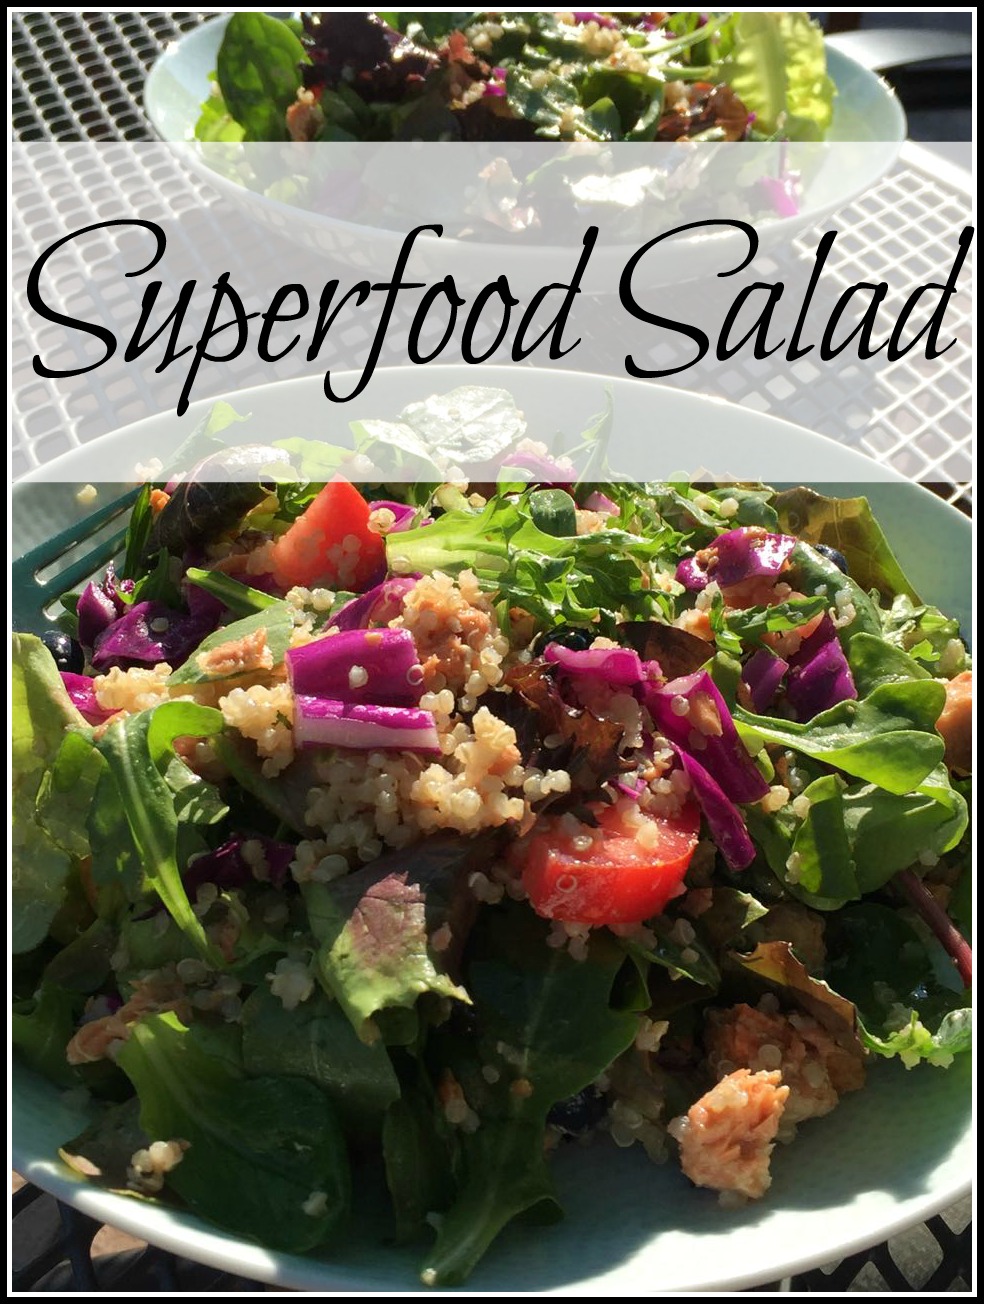
Are you looking for a delicious salad that you can serve as a dinner? This superfood salad incorporates an abundance of superfoods, which makes it filling enough to serve as your next meal! It has a wonderful flavor and is very colorful! If you have never tried adding cooked quinoa to your salad you are in for a real treat! I have never tried canned salmon before this salad and I was pleased at how delicious canned salmon can be! If you don’t want to use the salmon you could substitute beans or lentils or ever cooked chicken. We will be enjoying this  salad all summer!superfood salad

Superfood Salad

Ingredients:

Dressing:

6 Tbsp extra virgin olive oil
2 Tbsp apple cider vinegar
2 tsp maple syrup
1 clove garlic, minced
½ tsp Dijon mustard
½ tsp sea salt
Ground pepper to taste

Salad:

9 cups of baby spinach leaves or other greens
2 cups finely chopped red cabbage
1 ½ cups cooked quinoa
1 cup blueberries
1 cup sprouts, broccoli or other
¼ cup unsalted Brazil nuts
1 6-7 oz can of wild salmon, preferably without bones
1 large avocado, peeled, pitted and cubedsuperfood salad

Directions:

Prepare your dressing in a jar and shake to combine all dressing ingredients.

Combine all salad ingredients in a large bowl and toss to coat with the dressing. If you are making the salad several hours before dinner I would keep it chilled in the refrigerator and add the dressing just before serving.superfood salad

I love when I can find a meal that can be put together earlier in the day. When you get busy during the rest of the day it’s nice to know you have a refreshing salad waiting for you in the refrigerator. This superfood salad is a real winner! I hope you enjoy it as much as we did!superfood salad

Grilled Veggie Flatbread

Veggie Flatbread

I’m always looking for tasty, quick dinners. Finding a quick dinner that is both delicious and healthy is a win-win. This Grilled Veggie Flatbread fits the bill; you use a pre-made crust and load it with whatever veggies are in season. The flatbread is spread with a mixture of ricotta and herbs and then topped with your vegetables. The flatbread can then be cooked on a grill or in your oven. Before serving top the flatbread with arugula or spinach and a little Parmesan. We enjoyed half for dinner and ate the leftovers for lunch the next day. I’m already looking forward to having it again with a different mixture of vegetables!Veggie Flatbread

Grilled Veggie Flatbread

Ingredients:

¾ cup Ricotta cheese
½ cup chopped fresh basil
¼ cup pitted and chopped Kalamata olives, divided
¼ tsp. black pepper
1/8 tsp. red pepper flakes
1 12 inch refrigerated unbaked whole grain flatbread crust
2 Tbsp. olive oil, dived
1 small bell pepper, thinly sliced
1 can artichokes hearts in water, drained and patted dry.
1 tomato, thinly sliced
3 cups baby arugula or spinach
2 Tbsp. grated Parmesan cheese

Directions:

Preheat your oven to 425 or prepare your grill for indirect grilling. In a medium bowl combine the ricotta cheese, basil, 2 Tbsp. olives, black pepper and pepper flakes. Place the flatbread o a baking sheet and brush with 1 Tbsp. olive oil. Spread the ricotta mixture evenly over the top.

Arrange the bell pepper, artichoke hearts, tomato and remaining olives over the ricotta on the flatbread. Bake on the baking sheet or place directly on the unheated side of the grill. Bake or grill until the flatbread is crisp on the bottom and the vegetables are heated, about 12-15 minutes.Veggie Flatbread

Remove from the oven and sprinkle with the remaining 1 Tbsp. Olive oil and top with the Parmesan cheese. Cut into 8 wedges and serve. Makes 4 servings.Veggie Flatbread The original recipe can be found on cleaneating.com.

Angel Pie – light and delicious

I was asked to bring a dessert to a potluck this week and decided to bring my husband’s grandmother’s recipe for Angel Pie.Angel Pie 
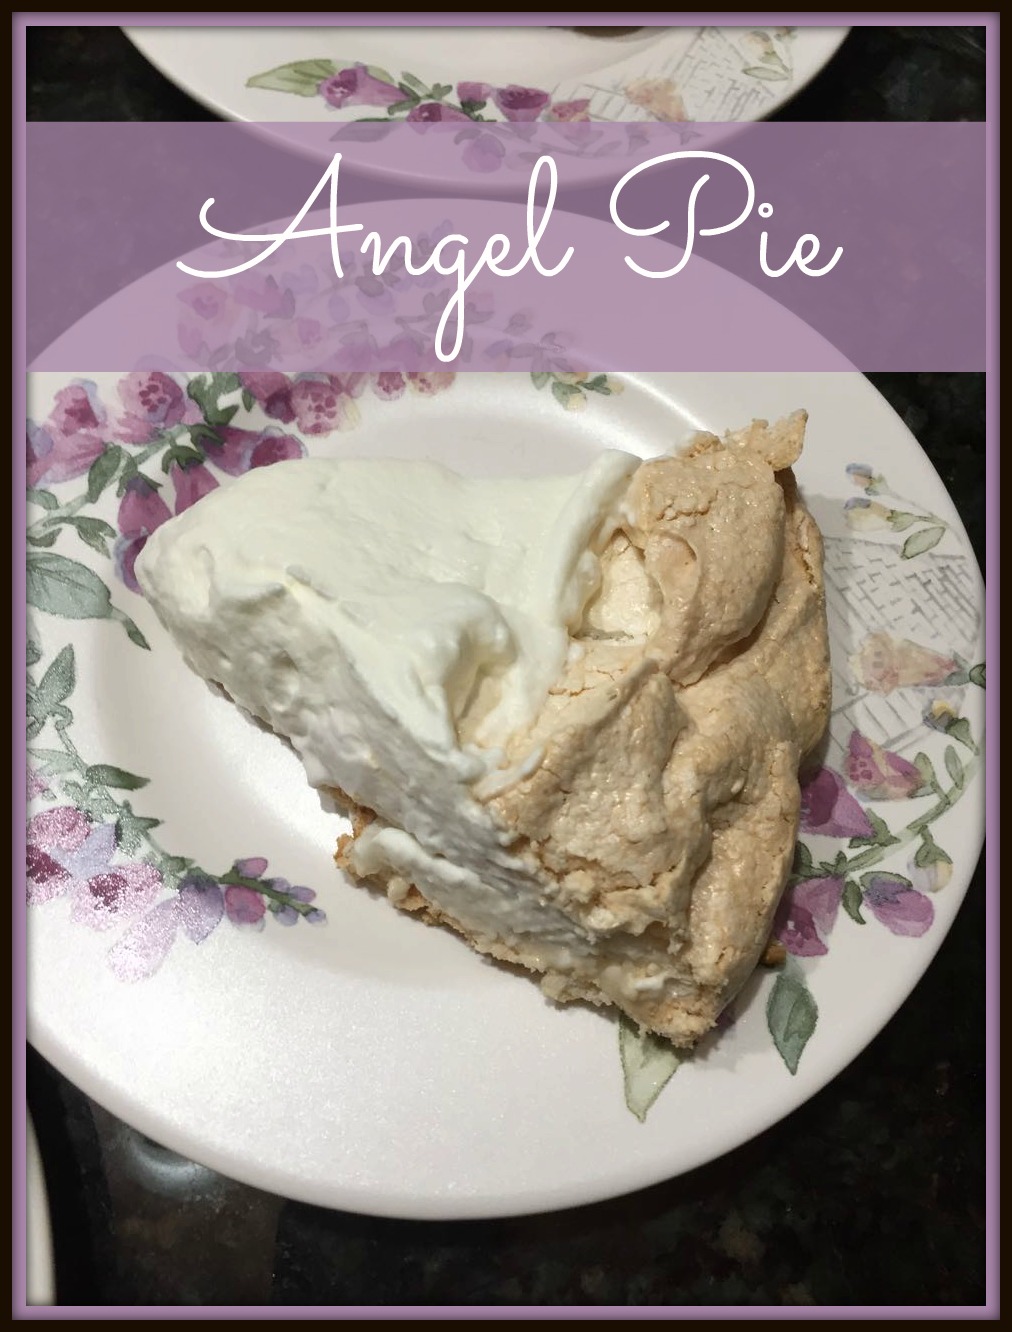
When I first met Alma she served me this pie and I thought it was amazing. When my husband and I got married my mother-in-law included this recipe in a collection of family recipes she gave me. I’ve been making this pie for almost 40 years! It’s easy to make and always a big hit. Since I am now getting ripe strawberries from our garden I decided to serve the Angel Pie with fresh strawberries. It’s been a while since I’ve made this pie, but it was a big hit.Angel Pie

Angel Pie

Ingredients:

¼ tsp salt
¼ tsp cream of tartar
4 egg whites
1 cup sugar
½ tsp vanilla
½ pint heavy cream

Directions:

Combine the salt and cream of tartar to the egg whites. Beat the egg whites until stiff. Beat in the sugar, adding just a spoonful at a time. Beat in the vanilla. Spread the mixture in a well-buttered 9” pie plate. Spread the mixture a little higher around the edges to create a rim. Bake for one hour at 275, or until the meringue is dry and firm to the touch but not browned. Let cool in the oven.Angel Pie

While the Angle Pie is cooking whip the heavy cream. When the pie is cool spread with the whipped cream.

I cored some strawberries and cut them in half to serve with the pie. Once you have a bite of this delicious Angel Pie you will understand the name! So light and delicious!Angel Pie

I love serving recipes that have been in the family for generations. Alma, my husband’s grandmother was such a good cook that after she passed away we made a cookbook of her recipes. It has been shared with many family members and is well loved in our kitchen! It’s always a good sign when everyone cleans their plate!Angel Pie

Do you have a favorite family recipe?

Design a site like this with WordPress.com
Get started