Peppermint Lip Balm

As the Christmas season approaches I start to think about various homemade gifts I can give to friends and family. I really enjoy giving and receiving homemade gifts. I make peppermint lip balm every year and give some away and keep enough to keep me supplied. I just love it that much!

I purchase these cute little tins from Rose Mountain Herbs and with a homemade label your gift looks very professional.

home remedies

The recipe is simple and the lip balm can be mixed up in no time. I use local honey and our own beeswax! We haven’t had bees in a while but we still have a good supply of beeswax. The beeswax gives the lip balm a beautiful color.

lip balm, homemade creams, prudent living

The vitamin E is squeezed out of the Vitamin E capsules; you get about 3 drops out of one capsule.

Homemade Peppermint Lip Balm

Ingredients:

6 Tbsp almond oil
2 tsp honey
4 tsp beeswax, grated
5 drops vitamin E oil
5 drops peppermint essential oil
8 – ½ oz lidded pots

Directions:

In a double boiler, melt almond oil, honey and beeswax together. I used a tin can placed in water.

Remove from heat, allowing mixture to cool slightly. Add vitamin E and peppermint oils and stir until well blended. Spoon into tins and allow to cool before covering.

homemade remedies

Warning! If you make this once you will love it so much you will want to make it every year!

lip balm, prudent living
Peppermint Lip Balm

Almond Crescents with Burnt Butter Icing

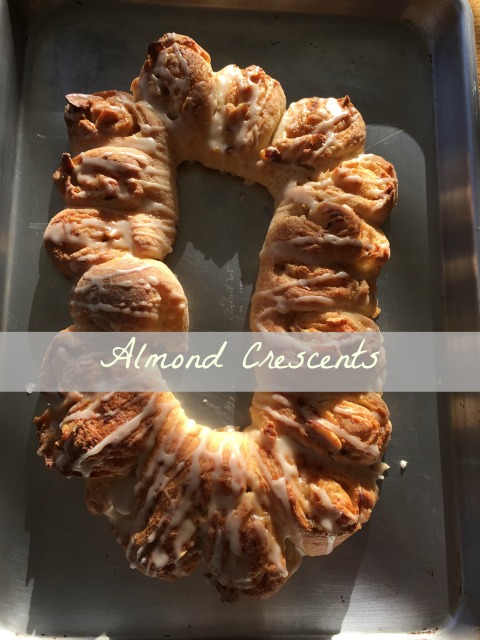
These yeasted almond crescents are similar to Danish, with their buttery crumb, rich filling and flavorful icing. They require no kneading so they are very easy to put together. The recipe makes 2 crescents, each serving about six people. One you try a bite it will be hard not to take a second serving!

Almond Crescents with Burnt Butter Icing

Ingredients:

Dough:

2 ½ cups flour
2 ½ tsp. Yeast
1 tsp. Salt
8 Tbsp. butter, cut into ½ inch pieces and chilled
¼ cup warm evaporated milk (110 degrees)
¼ cup warm water (110 degrees)
2 Tbsp. sugar
1 large egg

Filling:

½ cup light brown sugar
½ cup sliced almonds, toasted
3 Tbsp. unsalted butter, melted

Burnt Butter Icing

Ingredients:

2 Tbsp. unsalted butter
1 cup confectioners’ sugar
2 Tbsp. milk

Directions:

For the dough:

In a food processor pulse the flour, yeast and salt until blended. Add the butter and pulse until the mixture resembles cornmeal. Turn the mixture into a large bowl. 

Beat the milk, water, sugar and egg in a medium bowl. Using a rubber spatula, fold the milk mixture into the flour mixture. The mixture will be sticky. Divide the dough into two pieces, wrap tightly in plastic wrap, and refrigerate until well chilled, at least two hours and up to 24 hours.

For the filling:

Line two baking sheets with parchment paper. Stir the brown sugar and almonds together in a small bowl.

Working one piece of dough at a time on a lightly floured surface, roll the dough out to a 14 by 9 inch rectangle. Brush the dough with half of the melted butter, then sprinkle with half of the almond mixture. Leave ¼ inch border around the edges. Starting at the long end, roll the dough into an even cylinder and pinch the dough to seal. Form the cylinder into a crescent shape on your prepared baking sheet. Slice the dough by making cuts around the outside o the ring, spacing them about one inch apart.

Rotate each piece of dough cut side up. Repeat with the remaining dough and filling.

Cover with plastic wrap coated with cooking spray and let rise until the dough is almost doubled in size, about one hour.

Adjust your oven racks so they are in the upper middle and the lower middle positions and preheat your oven to 350 degrees. Bake until the crescents are golden brown, about 20 minutes, rotating the baking sheets halfway through. Cool on a rack until just warm, about 40 minutes.

For the icing:

While the almond crescents are cooling, heat the butter in a small saucepan over medium heat. Swirl the pan constantly, until the butter is golden brown, 3-5 minutes. Transfer the butter to a bowl and whisk in the confectioners’ sugar and milk. Drizzle the icing over the crescents. Serve.

I can’t wait to make these delicious crescents again, maybe they’ll be a little more picture perfect next time!

Spiced Crabapple Jelly

You may remember when I made the Crabapple Pluerry Jam last month. I had some crabapples left over and I decided to make a batch of Spiced Crabapple Jelly. This jelly is wonderful with chicken.

Spiced Crabapple Jelly

Ingredients:

2 pounds of crabapples, cut into large pieces, about 8 cups
6 cups of water
¼ cup cider vinegar
½ tsp. Cider vinegar
2 cinnamon sticks, 3 inches long
1 ½ cups sugar

Directions:

Combine the crabapples, water, vinegar, cloves and cinnamon sticks in a large stainless steel saucepan. Cover an bring to a boil over high heat, reduce heat and boil gently for 30 minutes. Strain the mixture through a coarse sieve and discard the solids. Pour the liquid through a jelly bag.

Return the strained liquid to a pan and add the sugar. Bring to a boil and boil rapidly, uncovered, until the mixture will form a gel, about 15 minutes, stirring occasionally. Remove from the heat.

While the liquid is cooking make sure your canning jars are ready. Ladle the liquid into sterilized jars and process for 10 minutes in your water bath canner.

Makes 2 cups.

I canned this recipe in small 4oz jars. The color is beautiful and they will be perfect to add to a gift basket.

Canning with crabapples is so satisfying, the end results are delicious and are always enjoyed by others. Maybe I need to plant a crabapple tree in our small yard!

Goal Setting Update Week 43

It feels like fall now and it’s been a rainy week! We planted a few trees on our small property and are thankful for the rain. As the year moves toward December I’m working away at completing all my goals. It really helps to write a goal setting update each week.

  1. Continue to monetize my blog. Thanks to all of you who have checked out my page on Amazon! If you haven’t yet just click on the link and pay my storefront a visit! I would so appreciate it! Even if no purchases are made Amazon like to see traffic to my storefront! I do appreciate all of your support!

2. Create a cookbook. It seems that this next stage of creating a cookbook is even more work than moving all the recipes into a document! Trying to get a little done each week, this goal may be accomplished in 2020! I look forward to the goal setting update that says this goal is completed!

3. Have 20 minutes of exercise at least 5 times a week.  So nice to have this goal a part of my weekly routine. I’ve been faithful to go to my exercise class three times a week, I just love being able to walk there! Couldn’t be more convenient! although sometimes the walk is wet!

4. Explore ten 2 parks or hiking trails in the state of Washington or Oregon! No new parks explored this week although we did explore a new pumpkin patch with our grandchildren! Loved seeing the fields of pumpkins!

5. Incorporate 20 COMPLETED! My husband made an excellent eggplant pizza this week using eggplant we received from our CSA! It was so good! It’s the second one he’s made.

6. Read 35 new books this year. COMPLETED! Finished my thirty-fifth book, Stilettos to Stetsons by Janice Hood. A friend at my exercise class gave me this book to read, when I saw the title I imagined it was some romance novel. In actuality it was a true story written by Janice Hood about her life. She lived in England and her husband dropped dead of a heart attack when she was in her late 40s. Eventually she is visit friends in Texas and meets a Texas rancher and falls in love. It was actually a very good story and I learned a lot about ranching in Texas!

7. Complete Four knitting or sewing projects this year. COMPLETED! Making good progress on my latest project, a child sweater! Almost finished with the back. I love knitting baby sweaters because they go so quickly!

8. Visit family on the west coast. We’ve had fun with company and traveling to see friends. Still have family to visit however!

9. Explore Six 3 new museums in the area. No new museums this week. I took a look see what other museums our library pass covers, thinking we may go to the Chinese Gardens in Portland soon. I’m thankful for my weekly goal setting update as it sure keeps me focused on the goals!

10. Find A New Home COMPLETED! Wonderful to have this goal completed! Our new house is finally feeling much more like our home. The majority of the unpacking is behind us and we just have some art work to hang on the walls. So nice to have this goal completed!

The greater danger for most of us isn’t that our aim is too high and miss it, but that it is too low and we reach it.
 Michelangelo

This post may contain affiliate links. These affiliate links help support this site.

For more information, please see my disclosure policy. Thank you for supporting Nancy On The Home Front.

Overnight French Toast Casserole

When we have company I love to enjoy the company and not spend all my time in the kitchen. Finding recipes I can make ahead is so important. One of my favorite recipes is an Overnight French Toast Casserole. It’s a wonderful recipe that you can put together the night before and just pop it in the oven in the morning. In no time at all you will have the house smelling wonderful and be enjoying a warm, delicious breakfast.

Overnight French Toast Casserole

Ingredients:

10 cups of French bread, cut into 1-inch cubes.
8 eggs
3 cups milk
4 tsp. sugar
1 tsp. vanilla extract
¾ tsp. salt (optional)

Topping:
2 Tbsp. butter
3 Tbsp. sugar
2 tsp. cinnamon

Directions:

Place the bread cubes in a greased 13×9 inch-baking dish. In a large bowl, whisk the eggs, milk, sugar, vanilla and salt. Pour the mixture over the bread.

Cover and refrigerate for 8 hours or overnight.

Remove the casserole from the refrigerator 30 minutes before baking. Dot with the butter. Combine sugar and cinnamon and sprinkle over the top.

Cover and bake at 350 for 45-50 minutes or until a knife inserted in the center comes out clean. Let stand for five minutes and serve. Wonderful served with maple syrup.

 This recipe was written feeds 8-12 people which is perfect when you have a houseful of company. When it’s just my husband and I it is easy to halve the recipe and make just enough for four people. Of coarse you should serve it with real maple syrup so you can really enjoy it!

If you’re looking for other breakfast recipes to enjoy try my amazing overnight waffles. They are a real favorite in our house and like the overnight french toast, the batter should be mixed up the night before which makes it so easy to get breakfast on the table.

Skillet Beans and Sausage

It’s hard to believe that the summer is behind us and the school year is off to a good start. As the weather becomes cooler our thoughts often turn to comfort foods. This skillet beans and sausage is easy to make and warming on a cold autumn evening. This meal is wonderful with a loaf of crusty bread and a salad.

Skillet Beans and Sausage

Ingredients:

¼ cup olive oil
4 cloves of garlic, chopped
1 medium onion, chopped
12 ounces of turkey kielbasa sausage, cut into ½ inch slices
Two 15oz cans cannellini beans, drained
2 Tbsp. brown sugar
½ cup white wine (could also use chicken broth)
¼ cup red wine vinegar
¼ cup chopped fresh parsley

Directions:

Put the olive oil, the chopped garlic, and chopped onion in a large sauté pan. Cook the mixture, stirring often, over medium heat for 3-4 minutes or until the onion is soft and just begins to turn brown. Add the sliced sausage, the drained beans, the brown sugar, wine and vinegar to the skillet. Simmer the mixture for 10 minutes, stirring often. Sprinkle the parsley on top and serve. You could make this dinner ahead of time and just reheat before serving. Serves 4-6 depending on the size of the servings.

There is something about the creaminess of these beans and sausage that make it such a comforting meal. We are going to be enjoying this a few times this coming winter.

We have several meals that we enjoy using various kinds of beans. Usually I will can my own dried beans just to make sure I always have some on hand. Having canned beans on hand is so convenient. Do you cook with dried beans? What are your favorite recipes?

The Rain Barrel Workshop

Our local Tualatin Riverkeepers is a community-based organization that protects and restores the Tualatin River watershed. They constantly offer programs to educate the public on the importance of a clean watershed.   Recently they held a rain barrel workshop.

Rain barrel workshops are offered during the year to community members throughout the region. These workshops are meant to teach people about water conservation and how to collect rainwater to home gardens and plants.

In Vermont we had abundant water coming out of the ground. Our well produced gallons of water a minute and we never had to give a second thought about our water. Here in Oregon it is a different story. We rely on city water and pay for every drop that comes out of our faucet. We are learning ways to conserve water and having a rain barrel was on our list!

Why should we care about water conservation?

Everyone lives in a watershed. What we do impacts the health of our river and ground water storage systems. The Tualatin River and its tributaries are used for drinking water, irrigation, recreation and serve as critical habitat for fish and wildlife. Since we all use and depend on this water, we care about its quality.

Stormwater runoff, or excess water that flows over impervious surfaces into storm drains, is one of the leading causes of pollution in streams and lakes. Stormwater is not just standing water that comes from a major weather event, it is all the water that flows through our street drains.

When we lived in Vermont, very little rainwater became stormwater. Trees, plants and soil captured most of the rain. Water that soaks into the ground is cleaned and filtered by soil microbes and recharges streams, wetlands , and rivers, which is ideal.

In the very developed area we now live in streams and wetlands are impacted by infrastructure that changes runoff and groundwater adsorption patterns. Too much runoff can increase flooding, damage riverbanks and pollute waterways.

What can we do?

There are three things we can do to help.

Reduce pavement.

If we can remove impervious surface coverings at your home, a little goes a long way toward reducing stormwater and helping water conservation. In the Portland Metro area the average rainfall is high, one square foot of removed payment can prevent an average of 22 gallons of runoff per year! Good alternatives to impervious surfaces in landscaping are pavers made of porous material, mulch or gravel. For other ideas check out the website depave.org.

Rain Gardens

Plants improve water quality by filtering pollutants before runoff enters streams. Rain gardens help slow runoff and allow plants to clean water before it enters the watershed. Even plants in containers help reduce runoff!

Rain Barrels

Rain barrels are another suggestion. During the rain barrel workshop we learned about the importance of water conservation. We were given a rain barrel and told how to attach it to our gutters. The water we collect is not potable but can be used to water our landscape.

It’s amazing what you can learn during a morning workshop. I am really looking forward to doing our part to conserve water so that less water is going into stormwater.

Goal Setting Update Week 42

We’ve been enjoying our first fall in Oregon. The days have been a mix of sun and rain and the nights have been much cooler. We planted two espalier apple trees in our backyard. They will provide some greenery and hopefully a little fruit at the same time! As we head toward the end of the year I am so pleased with the goals I’ve accomplished this year. It really helps to write a goal setting update each week.

  1. Continue to monetize my blog. Thanks to all of you who have checked out my page on Amazon! If you haven’t yet just click on the link and pay my storefront a visit! I would so appreciate it! Even if no purchases are made Amazon like to see traffic to my storefront! I do appreciate all of your support!

2. Create a cookbook. It seems that this next stage of creating a cookbook is even more work than moving all the recipes into a document! Trying to get a little done each week, this goal may be accomplished in 2020! I look forward to the goal setting update that says this goal is completed!

3. Have 20 minutes of exercise at least 5 times a week.  So nice to have this goal a part of my weekly routine. I’ve been faithful to go to my exercise class three times a week, I just love being able to walk there! Couldn’t be more convenient!

4. Explore ten 2 parks or hiking trails in the state of Washington or Oregon! No new parks explored this week we spent the weekend in Eugene, Oregon and it was fun to explore that town again.

5. Incorporate 20 Completed! Made a delicious vegan pumpkin mac and cheese this week. It was so good and creamy. Hard to believe there wasn’t any cheese in it!

Also made my Autumn Apple Cake for a family dinner. Everyone loved it.

Apple cake, apples, baking

6. Read 35 2 new books this year. Finished my thirty-fourth book, The Guest Book by Sarah Blake. I had been waiting for this book for weeks! It was well worth the wait. The Guest Book was a great story spanning three generations. Moving back and forth across the three generations in the story and trying to figure out how everything tied together kept me reading, I couldn’t put the book down!

7. Complete Four knitting or sewing projects this year. Completed! I have started on a new project, a baby sweater! I had enough yarn on hand and the pattern. I love knitting baby sweaters because they go so quickly!

8. Visit family on the west coast. We’ve had fun with company and traveling to see friends. Still have family to visit however!

9. Explore Six 3 new museums in the area. No new museums this week. I took a look see what other museums our library pass covers, thinking we may go to the Chinese Gardens in Portland soon. I’m thankful for my weekly goal setting update as it sure keeps me focused on the goals!

10. Find A New Home COMPLETED! Wonderful to have this goal completed! Our new house is finally feeling much more like our home. The majority of the unpacking is behind us and we just have some art work to hang on the walls. So nice to have this goal completed!

If you want to live a happy life, tie it to a goal, not to people or things.
Albert Einstein

This post may contain affiliate links. These affiliate links help support this site.

For more information, please see my disclosure policy. Thank you for supporting Nancy On The Home Front.

Canning Elderberry Syrup

Usually I make just enough Elderberry Syrup to get a through a season but this year I decided to try canning Elderberry Syrup. My husband came home one day with two pounds of dried elderberry and it would make a lot of syrup, more than would stay fresh in the fridge for the season.

I enjoy making elderberry syrup and it sure helps with battling the various colds during the winter. If you don’t have access to fresh elderberries you can find dried elderberries. Often you can find a good deal on Amazon. My husband found a local source of dried elderberries, which is what I used. I used a local source of honey as well. You can also use maple syrup as a sweetener.

Making elderberry syrup, canning elderberry syrup

Elderberry Syrup

Ingredients:

2/3 cup organic dry black elderberries (3 ounces)
3 ½ cups water
2 Tbsp. fresh ginger
1 tsp. cinnamon powder
2 whole cloves
1 cup raw local honey

Directions:

Pour the water into a medium saucepan and add your elderberries, ginger, cinnamon and cloves.

Making elderberry syrup

Bring to a boil and then cover and reduce heat to a simmer for about 45-60 minutes.

The liquid will be reduced to almost half. Remove from heat and let cool. Mash the berries using a spoon. Pour through a strainer into a glass jar.

Making elderberry syrup, canning elderberry syrup

Discard the elderberry mash into your compost. To the elderberry syrup in the jar add one cup of honey and stir well.

That’s all there is to it! Store in the refrigerator and take daily for its immune boosting properties. Standard dose is ½ tsp. – 1 tsp. For children and ½-1 Tbsp. for adults. If you do get the flu you can take the normal dose every 2-3 hours. I am not a doctor so if you are really sick don’t hesitate to see professional advice from your primary care physician! Hopefully you are enjoying a healthy winter!

Now if you have made more elderberry syrup than you can use in the next two weeks the syrup can also be canned. While the berries are simmering prepare your jars for canning. The jars should be kept hot until ready for use.

Once you have prepared the syrup pour the hot liquid into your hot jars leaving 1/8  inch headspace.  Process the jars in boiling water for ten minutes using your water bath canner. Any unsealed jars should be refrigerated.

The syrup can also be stored in your freezer.

The Best Ever Maple Scones

Hopefully you read my book review on Wednesday about Michelle Visser’s book, Sweet Maple: Backyard Sugarmkaing From Tap To Table. Today I am sharing Melissa’s recipe for The Best Ever Maple Scones. I love scones and the glaze used on these scones is reason enough to make them!

The Best Ever Maple Scones

Ingredients:

4 ½ cups flour
½ cup brown sugar
2 Tbsp. baking powder
½ tsp. Salt
1 ½ tsp. Cinnamon
Pinch of nutmeg
1 cup butter, cold and cubed
¼ cup Plus 2 Tbsp. maple syrup
2 eggs
1 cup cream
1 tsp. Vanilla

Ingredients For Maple Glaze:

1 ½ – 2 cups powdered sugar
3-4 Tbsp. heavy cream
2 Tbsp. maple syrup
½ tsp. Vanilla

Directions:

Preheat your oven to 400 degrees F. Mix flour, brown sugar, baking powder, salt, cinnamon and nutmeg together in a large bowl, then cut butter in with a fork until the dough resembles coarse crumbs.

Add in the rest of the ingredients, stirring just until combined. Turn out the crumbly dough onto a floured surface, working it until it comes together. Make 2 balls with the dough, patting each down into a 1 inch thick circle. Slice each circle into 8 triangular pieces.

Place the scones onto baking sheets and bake for 15-16 minutes, or until the scones turn light brown on the edges.

Mix the glaze ingredients, adding more cream if you would like the glaze thinner and more powdered sugar if you would like the glaze thicker. Drizzle the icing over the sconces.

Rather than make two large circles I used my mini scone pan, which makes bite size scones! Like the recipe says these are the best ever maple scones! For more mouthwatering recipes buy yourself a coy of this wonderful book, Sweet Maple: Backyard Sugarmaking From Tap To Table.

This post may contain affiliate links. These affiliate links help support this site.

For more information, please see my disclosure policy. Thank you for supporting Nancy On The Home Front.

Design a site like this with WordPress.com
Get started