Recently we spent a weekend in Eugene, Oregon. We had one beautiful day perfect for a long bike ride and one very rainy day. We spent the rainy day making grape juice. Our friends had an abundance of grapes on their property and a good friend of theirs also had buckets of grapes from his property. What better an activity for a wet, rainy day then making grape juice.
The process was rather easy.
First the grapes were plucked off the stems and rinsed gently in a bowl of water. Once the grapes were picked through to removed any loose stems and debris they were crushed to release the juice.
Crushing the Grapes.
There are several ways you can crush grapes, with your fingers, with a Foley mill and with this amazing contraption that was designed perfectly for making juice. It was a metal cone with a specially designed wooden piece made to fit in the cone and pushed against the side with your hand. The ball on top perfectly fit in your hand and makes rolling it around very easy. In no time at all we were making juice!
Once you’ve managed to get as much juice out of the grapes as possible the grapes skins were set aside in another bowl. Later all the skins would be placed in a cheesecloth bag for further squeezing. No juice was wasted!
Enjoying the Grape Juice.
We then compared the two varieties of grapes. They were both delicious but one variety was definitely sweeter than the other. For the most part the juice from the two varieties was kept separate.
Once all the juice was collected it was placed in glass jars, and plastic bags to go into the freezer. The juice is so strong that our friends said they usually dilute it 1:4. What a satisfying days work and our friends now have a freezer full of grape juice.
There is something so satisfying about a group of friends gathering together to work on a project. It’s a good feeling to actually be able to see the fruits of your labor when you are finished. It also made me wonder if we could grow some grapes on our little piece of property?
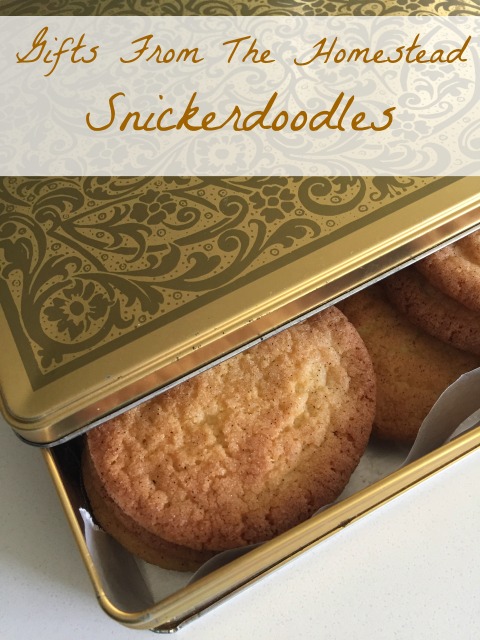
Who doesn’t enjoy giving gifts from the homestead? This cookie recipe has been in our family for many, many years. I remember the first time I ever made Snickerdoodles for a friend, she said the taste of these cookies reminded her of a cookie her grandmother used to make. They are a timeless classic and everyone I have ever served them to just loves them. These Snickerdoodles are delicious with a buttery cinnamon flavor. Perfect with your afternoon cup of tea.
Snickerdoodles are sometimes confused with sugar cookies since they share the same basic ingredients; four, butter, eggs and vanilla. The one difference is that these cookies also contain cream of tartar, this gives them a chewier texture and a more crackly top than sugar cookies. The cookie balls are also coated in a sugar cinnamon mixture before baking which results in that buttery cinnamon taste.
Snickerdoodles are easy to make and freeze well. You can even mix up the dough, form your balls and freeze for later baking. This cinnamon delicious cookie is also great for gift giving. Make a basket for your neighbor and include a tin of cookies and a box of tea. It’s a perfect gift for a new mom, someone recovering from surgery or just a welcome to the neighborhood gift.
Here is your shopping list for making Snickerdoodles. Most of these items you probably have in your refrigerator or pantry.
Shopping List
Butter Sugar Eggs Flour Cream of Tartar Baking Soda Salt Cinnamon
Gifts From The Homestead: Snickerdoodles
Ingredients:
1 cup butter 1 ½ cup sugar 2 eggs, beaten 2 ¾ cup flour 2 tsp. cream of tartar 1 tsp. baking soda ½ tsp. salt
1 ½ tsp. cinnamon ½ cup sugar
Directions:
Cream the butter with 1 ½ cups sugar in a large bowl. Add the eggs and continue beating. In another bowl combine the flour, cream of tartar, baking soda and salt. Stir into the egg mixture. Wrap the dough with wax paper or plastic wrap and refrigerate the dough for 30 minute.
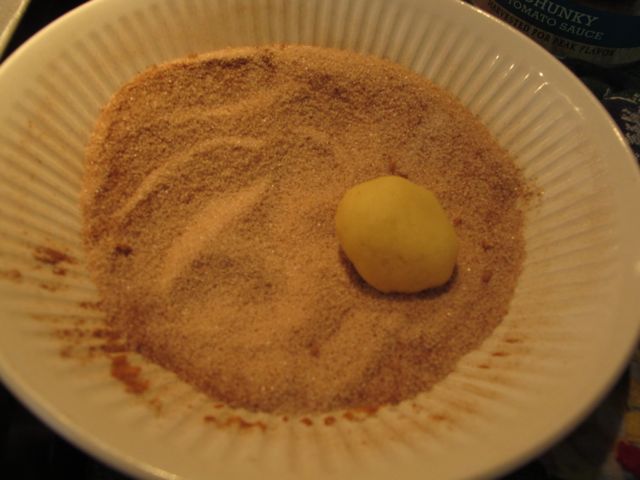
Position the rack in the upper third of your oven and preheat the oven to 400 degree. Mix the remaining ½ cup sugar and 1 ½ tsp. cinnamon in a shallow dish and set aside.
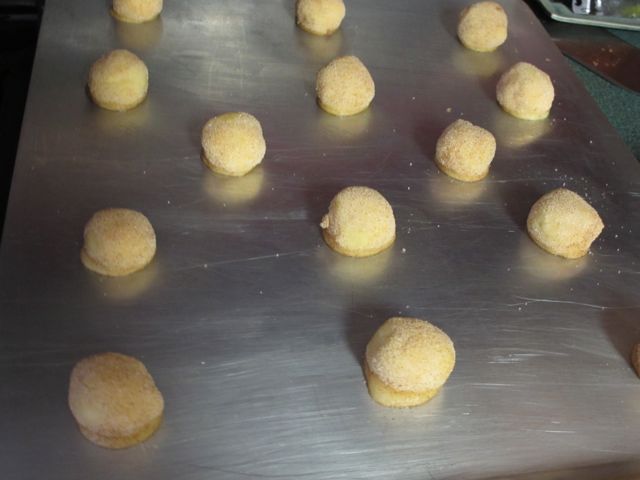
When the dough has chilled for thirty minutes, shape the dough into 1” balls and roll in the sugar mixture.
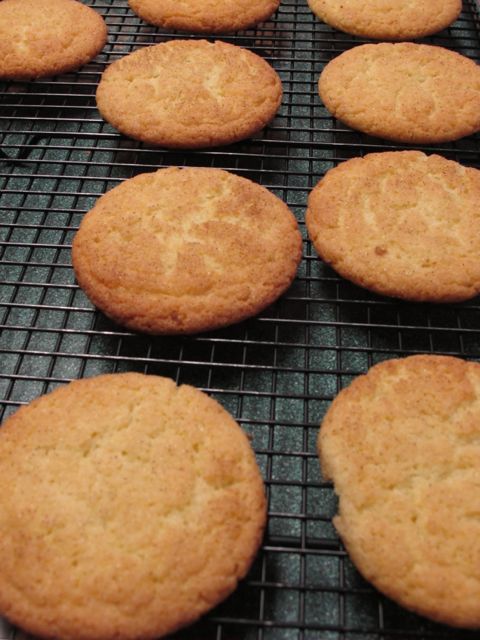
Arrange the cinnamon-sugar coated cookie balls on your baking sheet and bake for 10-12 minutes at 400 degrees F.
Makes about 4 dozen cookies.
Time to complete:
Including the chilling of the dough this recipe will take about 1 1/2 hours. The nice thing about this recipe is that you can make the dough one day and make the cookies the next. Next time you are looking for gifts from the homestead try these delicious cookies.
You may also mix the cookie dough three days ahead, cover and chill. Let the cookie dough come to room temperature before portioning and coating in the cinnamon-sugar.
For more gifts you can make in an hour or less check out the links below.
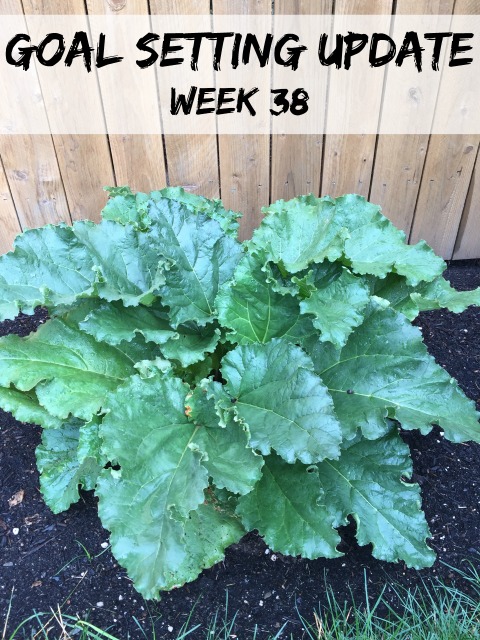
It definitely feels like we have entered into a different season here on the west coast. Our forecast now includes rain! We haven’t had rain all summer as you might imagine the lawns and gardens are very happy! Hard to believe it’s time for another goal setting update!
Continue to monetize my blog. Thanks to all of you who have checked out my page on Amazon! I so appreciate those who have made purchases through my links and my page. Running a blog has many hidden expenses and I appreciate all of your support! Every little bit helps with the expenses!
2. Create a cookbook. I continue to work away at this project. Trying to sort through at least 20 recipes from my blog each day! The goal is to be finished with copying all the recipes into a document by October first! At the same time I am updating each post as I go along so it’s taking a lot of time each day! Thank goodness I do a goal setting update each week to keep me on track of completing this goal!
3. Have 20 minutes of exercise at least 5 times a week. I am really enjoying my exercise class. I can walk to class and am getting to know the women in the class. We meet for an hour Monday, Wednesday and Fridays. I just love having exercise scheduled into my routine. Still trying to get a daily walk in although with the rain it doesn’t always happen!
4. Explore ten 2 parks or hiking trails in the state of Washington or Oregon! No new parks to talk about this week.
5. Incorporate 20 1 new recipe into our dinner plans with the focus on healthy eating. Tried a new recipe called Green Surprise Dip from the cookbook Simply in Season. I had some Swiss Chard from our CSA and the dip is amazing! I’ll share the recipe soon!
6. Read 35 5 new books this year. Finished my thirtieth book this week, An American Princess: The Many Lives of Allene Tew. Enjoyed this book which tells the story of Allene New and spans her life of five marriages! If you’re interested in reading this book you can get it for your kindle on Amazon for only $1.99.
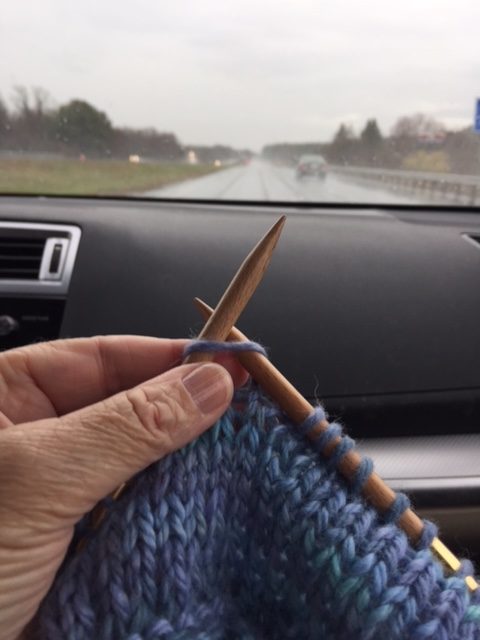
7. Complete Four 1 knitting or sewing projects this year. Decided to bring my bag of knitting with me on our short road trip. Always enjoy knitting in the car, no new projects finished yet! Looking forward to the goal setting update where I have completed my last project for the year!
8. Visit family on the west coast. Over the weekend we had a wonderful visit with friends in Eugene, Oregon. Still have to find time to visit the extended family we have on the west coast.
9. Explore Six 3 new museums in the area. No new museums this week. Have to look and see what other museums our library pass covers!
10. Find A New Home COMPLETED! Wonderful to have this goal completed! Our new house is finally feeling much more like our home. The majority of the unpacking is behind us and we just have some art work to hang on the walls. So nice to have this goal completed!
“It’s harder to stay on top than it is to make the climb. Continue to seek new goals” – Pat Summitt
This post may contain affiliate links. These affiliate links help support this site.
For more information, please see my disclosure policy. Thank you for supporting Nancy On The Home Front.
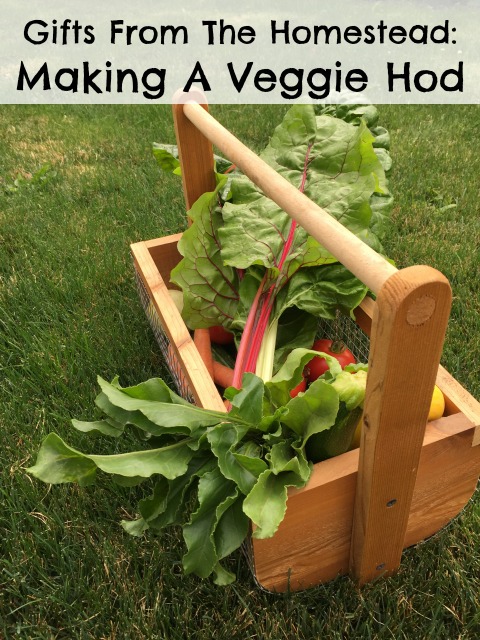
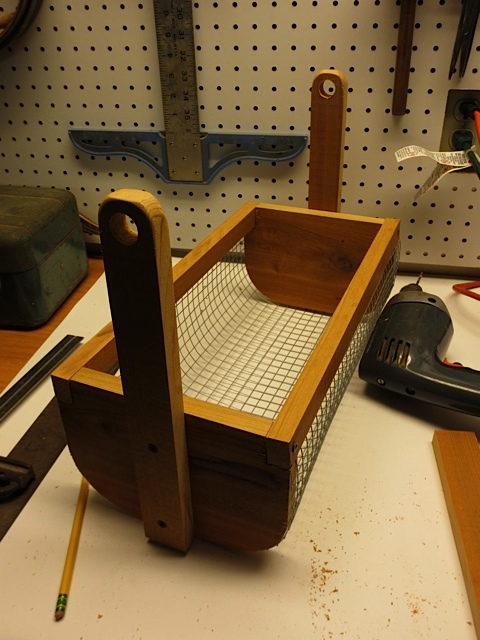
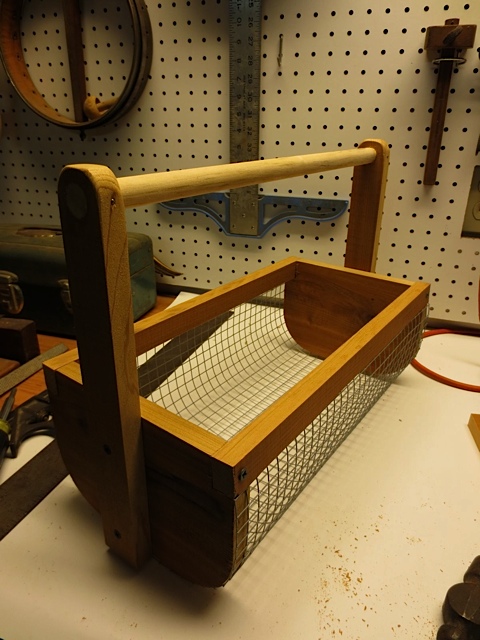
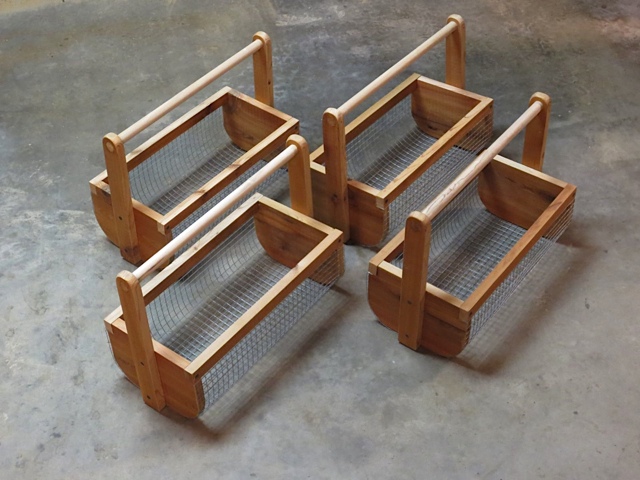
Looking for gifts from the homestead for the gardener in your family? Make a veggie hod, it is perfect for gathering the harvest from the garden. The Veggie Hod is strong and you can even rinse your vegetables before bringing them into the house.
First of all you may be wondering what a “hod” is! According to dictionary.com com a hod is a portable trough for carrying mortar, bricks etc., fixed crosswise on top of a pole and carried on the shoulder. I found these directions on runnerduck.com and thought it would be a perfect solution for carrying in vegetables from the garden. My husband took one look at the directions and decided to make a few modifications. Now I have my own custom made Veggie Hod!
You can even make your own veggie hod from scrap lumber you might have available on your homestead. We happened to have some extra cedar planks from building our home and they made the perfect veggie hod.
Gifts From The Homestead: Making a Veggie Hod
Shopping List:
1 x 6 inch cedar plank, three feet long ½ inch wire mesh, 16×16 inches ¾ inch dowel Carpenter’s Glue Nails Staples and Stapler
Instructions:
To make the project go smoothly collect the materials you will need first. We had some leftover ¾ inch cedar siding that was perfect for the project.
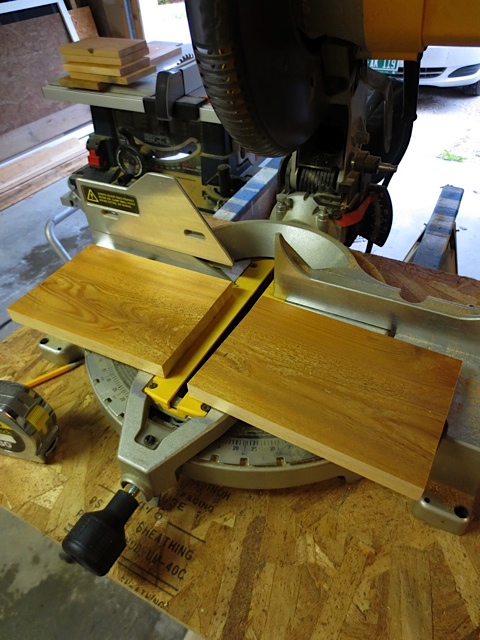
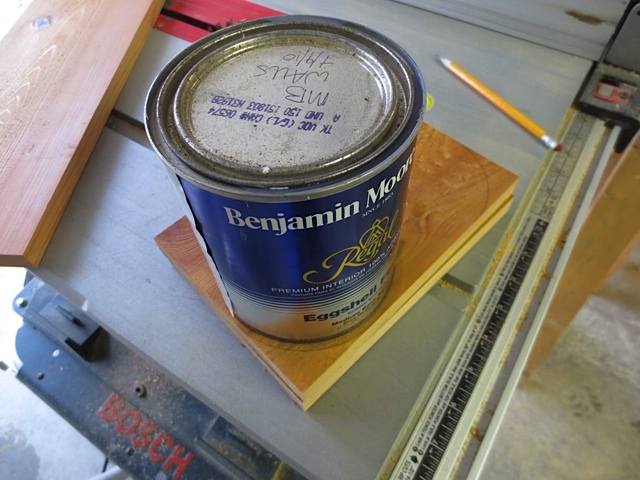
Cut the ends of your plank so that you have two pieces measuring 5 ½” by 8”.
Cutting the ends.
Radius the two bottom corners using a 1 quart paint can as a guide. Using a band saw or jig-saw (shown) cut the corner radius.
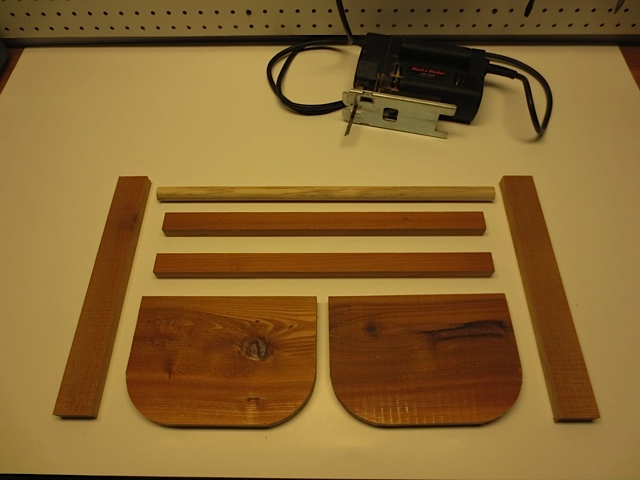
Using what’s left of the cedar plank, cut the two side rails 1 by ¾ by 16 inches and 2 handles 1 ½ x 12″.
You should now have the following parts cut from the cedar plank: 2 ends 5 ½ x 8″ 2 side rails 1 x ¾ x 16″ 2 handles 1 ½ x 12″ 3/4 inch dowel 17 ½ inches long.
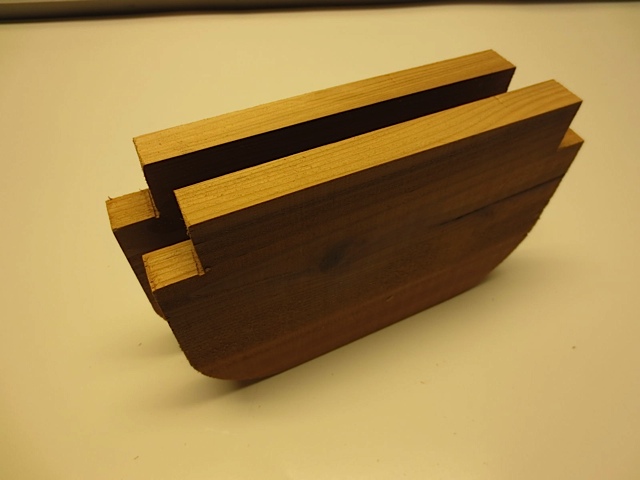
Cut a ¾ x 1 inch notch in each top corner of the end pieces for the side rails.
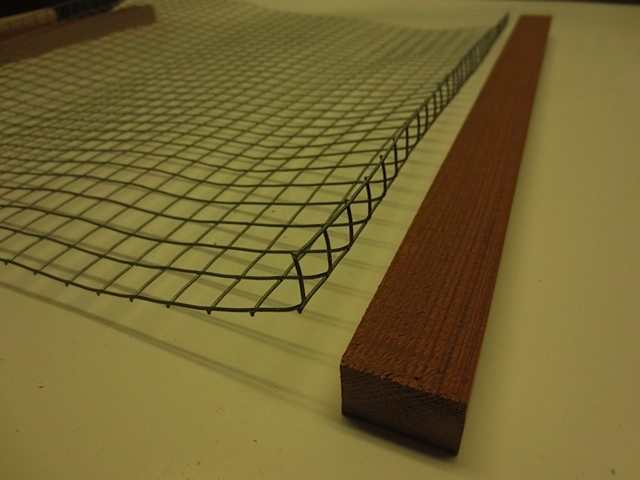
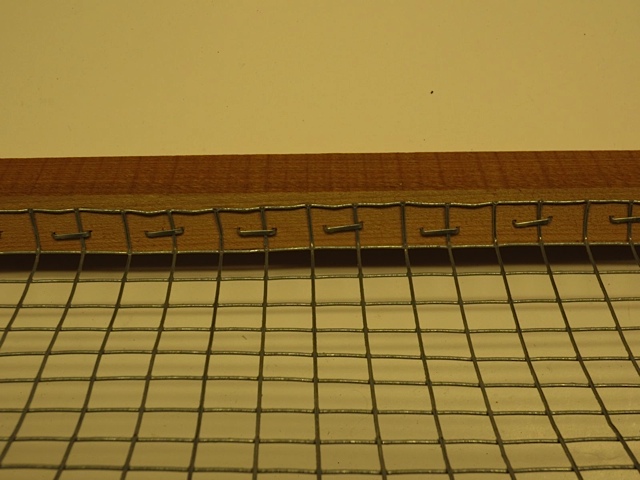
Cut the mesh 16 by 16 inches. Cut the wire very close to the cross wires to eliminate sharp, pointy wires. Bend one edge of the mesh 90 degrees, ½ inch in from the edge.
Staple that ½ inch edge to the bottom of one of the sides.
Align the side in one of the end notches and wrap the mesh around to mark your bend point for the other side. When you have this mark bend the mesh 90 degrees and staple to the other sidepiece.
Fasten the side rails to the end pieces with 1 ½ inch screws.
End pieces attached to side rails with wire mesh.
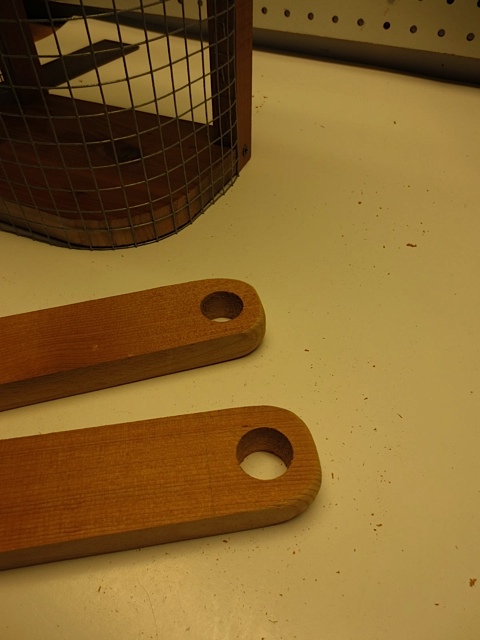
Drill ¾ holes at top end of the handles. Draw out half-round for cut to finish.
Attach the handles to the center of each end piece with two 1 ¼ inch screws.
Slide the dowel into the handles and mark any excess dowel length and trim off. Dab some wood glue into the handle holes and insert dowel. Tap a 1 inch brad through the handle into the dowel to secure.
The Veggie Hod, is perfect for gathering the harvest from the garden, I’ll even be able to give the vegetables a quick wash before coming into the house.
If you have a gardener in your family and are looking for perfect gifts from the homestead make a veggie hod!
Time To Complete
Once you have all the parts to make this Veggie Hod it should come together in a day or less.
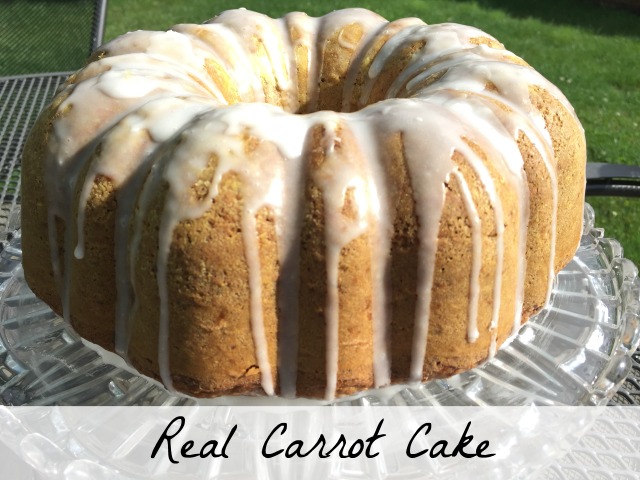
As the weather become a little more fall like I am much more tempted to make warm comforting meals. My husband has a real sweet tooth so I decided to take advantage of the abundance of carrots at the Farmer’s Market and make a real carrot cake. Carrot cakes often have a thick cream cheese frosting but this cake has a rum infused glaze.
Use your food processor fitted with a shredding disk to make a simple job of grating up a pound of carrots!
Real Carrot Cake
Ingredients:
Cake:
3 cups plus 2 tsp. Flour 2 tsp. Baking powder 2 tsp. Baking soda 2 tsp. Cinnamon ½ tsp. Salt 1 cup walnuts, chopped 1 cup raisins 5 large eggs, room temperature 1 ¾ cups sugar 1 cup vegetable oil 1 pound carrots, peeled and grated
Topping:
½ cup dry white wine of vermouth 1 cup confectioners’ sugar 2 Tbsp. buttermilk 1 tsp. dark rum
Directions:
For the cake:
Adjust the racks in your oven to the middle position and preheat the oven to 325 degrees. Grease and flour a 12-cup Bundt pan. Whisk the 3 cups of flour, baking powder, baking soda, cinnamon and salt in a medium bowl. Toss the walnuts, raisins and 2 tsp. flour in a small bowl until well coated.
With an electric mixer at medium-high beat the eggs and sugar until combined. Lower the speed to medium and slowly add the oil, turn the speed back to high and beat until the mixture is light and creamy. Gently stir in the flour mixture, the walnuts and raisins and the carrots until well combined. Scrape the batter into the prepared pan and bake for 50-60 minutes or until the cake is done. Cool the real carrot cake in the pan for 30 minutes and then turn onto a wire rack to cool completely. This will take at least an hour.
Once the cake is cool brush the top with the vermouth or wine. Whisk the confectioners’ sugar, buttermilk and run in a medium bowl. Drizzle over the cake. Serve. This cake can be stored at room temperature of up to 5 days.
Serving this real carrot cake is a perfect way to welcome in the fall season.
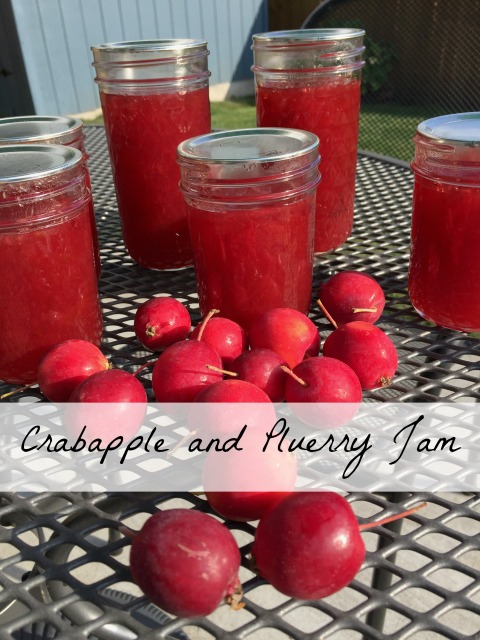
On Saturday I was so excited to find crabapples at our local Farmer’s Market. I couldn’t resist making some jam. When we were living in Vermont I always would make a batch of Crabapple and Plum Jam. This year I decided to try a slight variation, Crabapple and Pluerry Jam. A Pluerry is a cross between a cherry and a plum, the taste of a pluerry is very much like a plum.
I decided it would be a perfect combination and would cook up a batch of crabapple and pluerry jam.
Usually crabapples are used in jellies rather than jam. When combined with plums or pluerries they impart a sweet-tart flavor and the color is absolutely gorgeous. A perfect fall jam. Don’t overcook this jam as both pluerries and crabapples are naturally high in pectin and this jam thickens considerably after it is cooked.
Crabapple and Pluerry Jam
Ingredients:
3 cups of quartered unpeeled crabapples 1 ½ cups water 1 cinnamon stick about 4 inches long 4 cups of sliced pluerries5 cups of sugar ¼ cup dry red or white wine or grape juice.
Directions:
Place crabapples, water and cinnamon stick in a very large stainless steel or enamel saucepan. Bring to a boil over high heat, cover, reduce heat and boil gently for 10 minutes or until fruit is soft. Remove from heat and discard cinnamon stick. Press crabapples though a sieve; discard solids.
Return crabapple pulp to saucepan. Add pluerries, sugar and wine. Bring to a full boil and boil rapidly, uncovered, until mixture will form a gel, about 20 minutes, stirring frequently. Remove from heat.
Ladle into sterilized jars and process in a water bath canner for 10 minutes.
This jam makes a wonderful gift over the holidays as well, if you can bare to give any away!
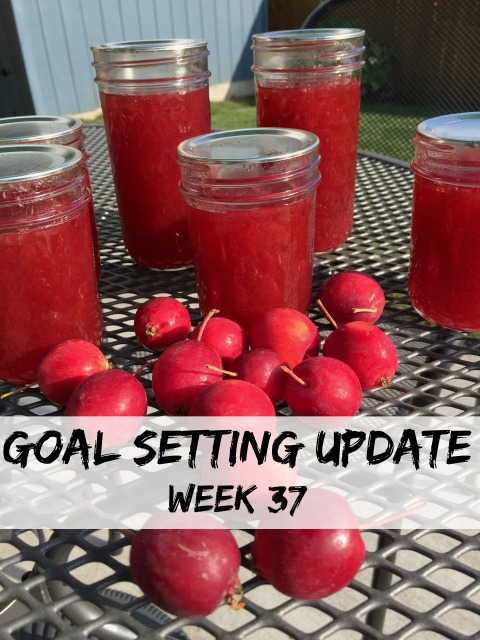
September seems to be off to a good start. We’re enjoying staying put for a bit and accomplishing those projects that we’ve been meaning to get to since we moved into our home. I’ve even had time to make some jam to fill our small pantry! Here I am once again with my goal setting update!
Continue to monetize my blog. Thanks to all of you who have checked out my page on Amazon! I so appreciate those who have made purchases through my links and my page. Running a blog has many hidden expenses and I appreciate all of your support!
2. Create a cookbook. This goal is turning out to be so much bigger than I imagined! I am faithfully working on copying recipes from my blog to a document which I can then use to create a cookbook. Over 400 recipes which amazes me! Just trying to figure out whether I want to make one big cookbook or several smaller books. And do I want an actually paper copy or just an e-book? So much to figure out. I’m just happy I’m making progress!
3. Have 20 minutes of exercise at least 5 times a week. I am really enjoying my exercise class. I can walk to class and am getting to know the women in the class. We meet for an hour Monday, Wednesday and Fridays. I just love having exercise scheduled into my routine. My husband and I also try to go for an evening walk before the days get any shorter.
4. Explore ten 2 parks or hiking trails in the state of Washington or Oregon! No new parks to talk about this week. We were going to go to Mt. Hood over the weekend but the forecast for Mt. Hood was rain. Maybe next week my goal setting update will include a new park or hike!
5. Incorporate 20 1 new recipes into our dinner plans with the focus on healthy eating. Tried a new recipe using spiralized zucchini noodles and mushrooms! I actually made it twice this week and forgot to take pictures each time! One of the ladies at exercise week sent me home with a zucchini so I made good use of it!
6. Read 35 6 new books this year. Finished by twenty-ninth book this week! I read Thin Air by Lisa Gray. It’s a murder mystery which means you read it quickly as you want the murder to be solved! the main character is Jessica Shaw, a private investigator. Her focus is on missing persons. She receives a photo of a missing child, only to realize the child is herself! Further investigation leads her to the information that her biological mother was killed the night she was abducted!
7. Complete Four 1 knitting or sewing projects this year. Just about time to pick up my knitting once again! We have rain in the forecast which means cooler weather. Just the time when you want to pick up knitting again. Looking forward to finish up one last knitting project to complete my goal setting update!
8. Visit family on the west coast. We have made plans to visit friends in Eugene, Oregon later this month. Have to see if we can make plans to visit some extended family as well.
9. Explore Six 3 new museums in the area. No new museums this week. Have to look and see what other museums our library pass covers!
10. Find A New Home COMPLETED! Wonderful to have this goal completed! Our new house is finally feeling much more like our home. The majority of the unpacking is behind us and we just have some art work to hang on the walls. So nice to have this goal completed!
“Begin with the end in mind.” – Stephen Covey
This post may contain affiliate links. These affiliate links help support this site.
For more information, please see my disclosure policy. Thank you for supporting Nancy On The Home Front.
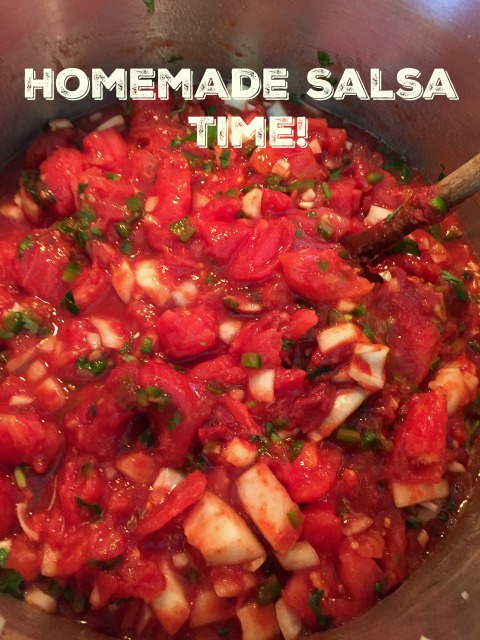
Last week I had a counter full of tomatoes and decided to make a batch of salsa. Whenever I decided to make one of my traditional recipes I always check my blog first for the recipe. I was so surprised to see that I had never shared this recipe before despite the fact that I make homemade salsa most every year. It’s about time I shared this wonderful recipe with you!
This recipe originally came from a dear friend of mine and I believe that she also makes a batch or two of salsa every year. There are no special ingredients and I imagine you probably have everything you need to make a batch. The recipe can easily be doubled or tripled as well! Just depends on how many jars of salsa you’d like in your pantry. When we lived in Vermont I used to make fancy labels and give the salsa away as gifts!
Homemade Salsa
Ingredients:
5 lbs. Tomatoes, washed, peeled, cored and chopped. (I dip them into boiling water for one minute, and then move to cold water and skin them that way). Then when they are cool you can peel and core.
2 Cups chopped onions 1 ½ C. seeded, chopped Jalapeno peppers (use rubber gloves!) 2/3 C. Bottled lemon juice (I use half and half with Lime juice) 3 TBS Chopped fresh Cilantro 2 ½ tsp. Salt 4 small cans of tomato paste 6 heaping TBS Garlic (I just use the jar of it)
Directions:
In a large 6-8 Quart pan, combine all the above ingredients, Bring to a boil and the lower the heat and simmer several hours, stirring occasionally. While the sauce is simmering prepare jars for canning in a water bath canner. Spoon the salsa into your hot jars, leaving a half-inch at the top. Wipe the jars and tops and treads clean. Place hot lids on jars; screw bands firmly. Process the jars in the boiling water canner for 15.minutes. Remove and let cool.
If you prefer a hotter salsa add more jalapenos or keep the seeds.
Earlier this summer we had the opportunity to tour our local Clean Water Facility. This facility recovers resources and clean used water from area homes and industries to nearly drinking water standards!
I was intrigued; I had never toured a clean water facility before. The tour latest about 90 minutes and we walked through the whole process from when the water comes in from the homes and industries to when the water leaves the facility and goes into the Tualatin River.
When we lived in Vermont we had our own well, which supplied delicious water from the ground. We had the water tested and it was perfect. We got over 40 gallons a minute that meant we never had to worry about running out of water. Even during the hottest, driest months we never had a water issue.
We also had our own septic tank which meant every 3-5 years we would have to have it pumped out. Beyond that I never gave a thought to where the waste went after it was pumped.
Living outside of Portland, Oregon, it’s a different story. We have public water, which we pay for and our waste goes into public pipes that actually travel to the Clean Water Services Facility! It seemed that taking a tour of the facility would let us know exactly how our waste and water is treated and what happens to it.
What surprised me was how many other people were also interested in water! Apparently over 25,000 tour the facility each year! The day was slightly overcast but perfect for a tour. Our tour guide was engaging and full of information including the various scientific processes involved in treating the water. During the majority of the tour there were no bad odors, which really surprised me!
After aerating the water and removing the heavy solids the water is eventually strained out for further processing. You would never guess which two items do not decompose and must be manually pulled out? Wipes and fruit and vegetable labels. These items should not be put down the drain!
The other interesting fact is that the majority of clean water facilities release the water back into the large rivers at this point. However because the river that the water is released into is a much smaller river, the water continues to be processed and cleaned.
Inside we got to see the control rooms. We saw how the controls used to look for the older equipment.
Most equipment is now all controlled on a computer screen. They can check everything in a matter of minutes.
What happens to the solid waste? After processing it is turned into plant fertilizer! We were all given a sample to take home and use on our gardens.
Do you have a private well and a septic tank or do you rely on public services? If you have a clean water facility near you I would see if they offer tours. It was really very interesting.
Here we are in the month of September! So much has happened in the last year! Selling our home in Vermont, moving cross country, finding a new home, moving again, and travel. No wonder the days are flying by! Here I am with my goal setting update!
Continue to monetize my blog. Thanks to all of you who have checked out my page on Amazon! I so appreciate those who have made purchases through my links and my page. Running a blog has many hidden expenses and I appreciate all of your support!
2. Create a cookbook. I have been working hard to accomplish this goal. I have a set number of recipes to work through each day. I sure hope I can get it all done by the end of the year!
3. Have 20 minutes of exercise at least 5 times a week. Between the exercise class I joined in town which meets three days a week and daily walking this goal is finally being accomplished each week!
4. Explore ten 2 parks or hiking trails in the state of Washington or Oregon! No new parks to talk about this week although we did enjoy a trip to the coast last week and explored two different beaches! amazing how different beaches can be from one another.
5. Incorporate 20 2 new recipes into our dinner plans with the focus on healthy eating. No new recipes this week, instead relied on old favorites like the Southwestern Veggie Taco! I just love this recipe!
6. Read 35 7 new books this year. Finished Cimarron this week. I read this story many years ago and always remember it made such an impression on me. It’s a fascinating story about the Oklahoma Land Rush originally written in 1929! By the time I finished the book it was not as good as I remembered!
7. Complete Four 1 knitting or sewing projects this year. Just one more project to complete this year. However knitting has been put on hold until the weather cools off.
8. Visit family on the west coast. We made plans to visit friends in Eugene, Oregon later this month. Have to see if we can make plans to visit some extended family as well.
9. Explore Six 3 new museums in the area. No new museums this week. Have to look and see what other museums our library pass covers!
10. Find A New Home COMPLETED! Wonderful to have this goal completed! Our new house is finally feeling much more like our home. The majority of the unpacking is behind us and we just have some art work to hang on the walls. So nice to have this goal completed!
“You wanna fly, you got to give up the thing that weighs you down.“ Toni Morrison, Novelist
This post may contain affiliate links. These affiliate links help support this site.
For more information, please see my disclosure policy. Thank you for supporting Nancy On The Home Front.