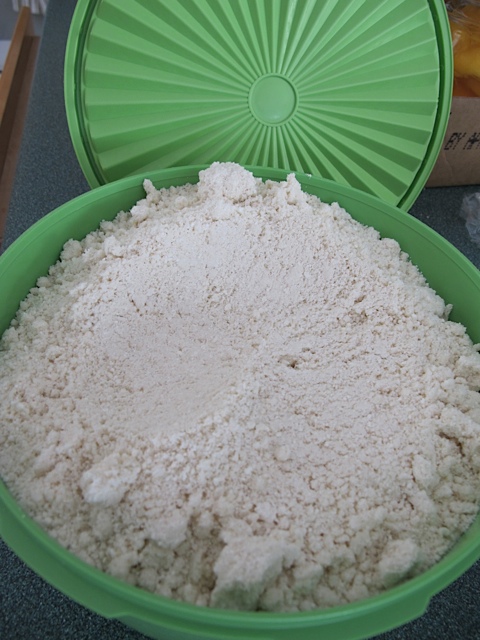
Did you know you can make your own “better than Bisquick” recipe at home? making your own homemade baking mix is very easy and you can store it in your freezer or refrigerator and it will be good for 2-3 months. A friend of mine gave me this recipe years ago, you can use it in any recipe calling for Bisquick such as biscuits, muffins, pancakes, waffles or any other type of dish.
Homemade Baking Mix
Ingredients:
8 ½ cups of all-purpose flour
4 Tbsp baking powder
1 Tbsp salt
2 tsp cream of tartar
1 tsp baking soda
1 ½ cups non-fat dry milk powder
2 ¼ cups shortening
Directions:
In a large bowl, stir the dry ingredients together. Mix thoroughly.
Cut the shortening into the dry ingredients until the mix is the consistency of corn meal.
Place the mix in a covered container and keep it in a cool, dark place. In warm weather it should be refrigerated. I keep my container in the refrigerator. Makes about 13 cups. Remember to label your container with the date!
This baking mix can also be stored in the freezer. It’s a wonderful mixture to have on hand. Perfect for making all sorts of things!
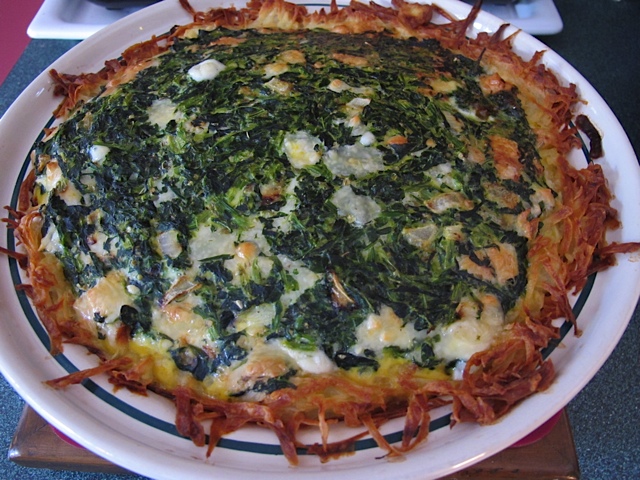
I have been making this recipe for a number of years. It can be put together rather quickly and in just over an hour you can have dinner on the table. The recipe was adapted form a Taste Of Home recipe that I found. We usually eat Potato Spinach Pie for dinner but you could serve it for a brunch as well. As a bonus it is also a lower fat recipe!
Potato Spinach Pie
Ingredients:
3 cups of coarsely shredded peeled potatoes
2 Tbsp olive oil, divided
1 tsp salt, divided
1/3 cup chopped onion
1 pkg (10 oz) frozen spinach, thawed and squeezed dry
1 cup (4 oz) shredded Swiss cheese
½ cup fat free evaporated milk
2 eggs, beaten
2 egg whites, lightly beaten
1 tsp dried oregano
¼ tsp nutmeg
Directions:
In a bowl, combine the shredded potatoes, 4 tsp olive oil and ½ tsp salt. Press onto the bottom and up the sides of a 9” pie plate coated with cooking spray.
Bake at 425 degrees for 20-25 minutes or until the crust is lightly browned. Cool on a wire rack.
Reduce oven temperature to 350 degrees.
In a non-stick skillet, sauté onion in remaining oil until tender. In a bowl, combine spinach, Swiss cheese, milk, eggs, egg whites, oregano, nutmeg, onion and remaining salt. Pour into baked crust.
Bake for 25-30 minutes or until top begins to brown and a knife inserted near the center comes out clean. Let stand for 10 minutes before cutting. Makes about 6 generous servings.
I love combining flavors when making jam. When I found this recipe calling for lavender I had to try it. You don’t often think of cooking with lavender but it subtly accefts the flavor or the peaches and adds a wonderful flavor to this peach lavender jam. Plus I was able to use my own lavender that I harvested!
This will be a wonderful jam to enjoy during the cold winter months.
Peach Lavender Jam
Ingredients:
2 Tbsp dried lavender flowers
½ cup boiling water
4 cups finely chopped peaches (about 5-6 medium peaches)
2 Tbsp lemon juice
6 cups sugar
1 pouch liquid fruit pectin
Directions:
Place the lavender flowers in a small bowl. Pour boiling water over the flowers and let the flowers steep for 20 minutes.
After twenty minutes strain and discard the flowers. Save the lavender liquid.
Combine the lavender liquid, the chopped peaches, the lemon juice and sugar in a very large stainless steel saucepan.
Bring the mixture to a full boil over high heat and boil hard for 2 minutes, stirring constantly. Remove from heat and stir in pectin. skim off any foam using a large spoon.
Ladle the lavender peach jam into sterilized jars and process in your water bath canner for 10 minutes.
Having peach jam in your pantry is like having a taste of summer to enjoy during the winter months.
It’s the time of the month when I attend my seed saving class. This class is so enjoyable and I always come away having learned something! This August class focused on harvest of seeds.
Sylvia’s Gardens
Sylvia had several varieties of lettuce, which had gone to seed. She is very careful and harvests the seedpods when they are ripe rather than cutting the whole plant down at once. If rain is forecasted she often covers the whole plant with a tarp to protect the seedpods. The little yellow flowers are so delicate.
Tango Lettuce Flowers
Leek and onion plants take a long time for the seed to mature. Often they get very top heavy and must be staked or trellised to keep the seed heads from falling over.
Leek Seeds
One concern Sylvia shared is the lack of pollinators this year. Normally the flowers would be covered with pollinators but not this year. The escarole is a member of the chicory family and the flowers are so blue. This seeds on this plant ripen from the bottom up.
Escarole Flowers
The Bulb Fennel is covered with flowers as well. Sylvia is not sure it will produce mature seeds this year due to the lack of pollinators.
Bulb Fennel Flowers
Two plants I haven’t grown in my garden before are Amaranth and Broom Corn. I think I will try both plants next year. You can eat the leaves of the Amaranth as well as the seed plus the flowers are just beautiful!
Amaranth Flowers
Broom Corn is actually used to make brooms and you can certainly see why.
Broom Corn
The most exciting part of the class was to see how well the rice experiment is going. Sylvia has several varieties of rice growing and they all look so healthy. Several of the varieties are already producing seed. How exciting to think that we can actually grow rice in Vermont.
Rice growing in Vermont!
At the end of the class Sylvia gave us a demonstration in threshing wheat. The seed heads had been harvested and dried.
Seed Heads in Threshing Box
They were then placed in a threshing box and you actually stepped on them with your shoes and twisted your feet.
Threshing Wheat
The grain was released and you could then blow the chaff away and what was left was the grain.
Grain and chaff.
As always I left the class inspired and filled with ideas of what varieties I want to try in my garden next year.
Have you ever used a credit card to get something for nothing? We have one credit card, which we use and always pay off the balance each month. By using our card we are able to earn points for purchasing items including plane tickets.
Several years ago our daughter and son-in-law moved to Europe. Then they informed us they were expecting! How was I going to be able to travel to be with them when the baby was born? Luckily we had been using our card, paying off the balance and accumulating points. We decided to put everything we could on the card and continue to pay it off each month. End result, I was able to fly to London after our granddaughter was born on a “free” ticket! An experience I wouldn’t have missed for anything.
Our first grandchild
I would only suggest using this method to buy something like a plane ticket if you are disciplined enough to avoid the credit card trap. The last thing you want is credit card debt hanging over your head. Early in our married life we got into credit card debit and we have vowed to never go back there.
However if you are disciplined you can use a credit card to pay regular monthly expenses and earn points at the same time. Such items such as your groceries, gas or car repairs can all be paid with a credit card. You must be committed to paying off the balance when you get your statement however. Using credit makes it much easy to over spend. Do a little research to find out what card works best for you, there are different cards, which offer different rewards. Don’t get more than one credit card. You have to track your spending before the statement comes in and keeping track of your one card will be more than enough.
Credit Cards
Don’t purchase anything for which you don’t already have the money in the bank. If you find you cannot be disciplined DO NOT use this method. Remember it is far easier to go into debt than it is to get out of debt.
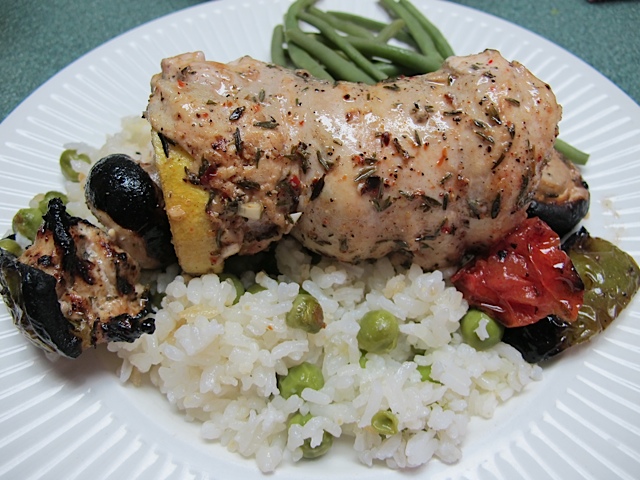
Recently I reconnected with an old friend and former neighbor, Des Park. Years ago he invented a wonderful blend of hot peppers, which he called Des’s Deadly Dash! It was wonderful; you can use it anywhere you might want to use dried pepper flakes. We had lost touch with Des and cherished our little bottle of diminishing Deadly Dash and had no idea whether or not we could even purchase the spice any more. We were thrilled when Des was found on Facebook! Not only is he still making Des’s Deadly Dash but he has three different versions; Classic, Speechless and Breathless and he is currently working on a version called Reckless! Des’s Deadly Dash is perfect for using on chicken kabobs!
Des’ Deadly Dash
Des has been working with hot peppers since the 70’s when he found out about the wonderful properties capsaicin bring the human body. Be sure to check out his website, he has all sorts of information including pictures of his garden and recipes. When I asked Des which recipe he would recommend using his Deadly Dash with he gave me this recipe called Deadly Dash – Chicken Kabob. I decided to give it a try. This recipe can be fond on his website. My recipe below is slightly different from the recipe online, I had to make a few changes as I never can leave a recipe alone! The result was excellent!
Please remember that this recipe doesn’t require Deadly Dash but it never hurts to add it!
Grilling Chicken Wrap Kabob Recipe
Ingredients:
4 Boneless Breast of Chicken pounded
8 slices of pre-cooked but not crispy bacon
All your favorite Kabob veggies
Cherry tomatoes
Red Bell Pepper
Green Bell Pepper
Onion
Mushrooms
– Skewers and toothpicks
– Salt and Pepper to flavor
– ½ cup of Olive Oil
– 1/4 cup lemon juice
– 4 garlic cloves, minced
– 1 1/2 teaspoon of Thyme
– 2 tesapoons of honey
– 1 teaspoon of Deadly Dash – Classic
– 1 teaspoon pepper
– 1 teaspoon salt
Directions:
1. Marinate chicken in lemon juice, olive oil, garlic, honey, Deadly Dash, salt, pepper and thyme for 20 minutes for tenderness and flavor.
2. Skewer all veggies
3. Put skewer with veggies in the middle of chicken and wrap chicken around veggies and use toothpicks to secure the chicken around the veggies.
4. Pin slices of bacon to 2 sides of the chicken. (Whoops omitted this step!)
5. Cook all four sides on grill for ten minutes with skewer ends resting on 2 bricks (depending on heat of fire).
6. When done pull skewer and toothpicks out and put chicken wrap on bed of rice.
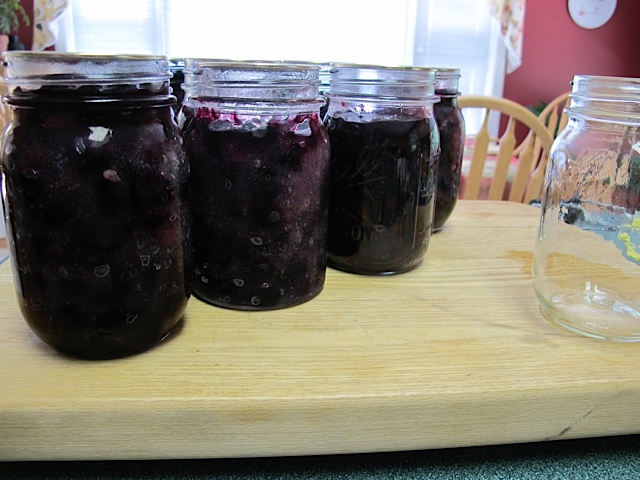
I have found that having blueberry pie filling on hand can be very convenient. In a very short time you can have a fresh blueberry pie baking in the oven. I try to limit what I put in the freezer and by having the pie filling on a shelf in my pantry I don’t have to dig into the freezer looking for my frozen blueberries! This recipe is also a great way to make use of those frozen blueberries in your freezer.
Blueberry Pie Filling
Makes about 6 pint jars or 3 quart jars
Ingredients:
10 cups of fresh or frozen blueberries
2 2/3 cup sugar
2/3 cup Instant Clearjel powder
½ tsp ground cinnamon (optional)
4 cups of warm water
Few drops of red and blue food coloring (optional)
¼ cup strained fresh lemon juice
2 Tbsp unsalted butter
Directions:
Before you start prepare your canner, jars and lids.
Remove stems from blueberries and rinse berries in cool water. Drain well. If using frozen blueberries, do not rinse.
In an 8 quart pan, whisk together the sugar, Clearjel and cinnamon until very well combined. If desired add a few drops of food coloring to the water. Add the warm water to the sugar mixture all at once. Using a spoon, stir gently to thoroughly blend the water into the dry ingredients. Do not use a whisk, as it will cause the pie filling to contain air bubbles.
Over low hear, stirring gently, gradually heat the mixture until it is warm, the Clearjel is completely dissolved and the mixture turns translucent, 1 to 2 minutes. Do not allow the filing to boil or it will contain air bubbles. Stir in the lemon just and butter until well blended. Gently fold in the blueberries and heat 1 minute. Remove the pan from the heat.
Spoon the pie filling into hot jars, removing as many air bubbles as possible and leaving ½ inch headspace. Using a plastic knife, remove any trapped air bubbles. Wipe the jar rims and threads with a clean, damp cloth. Cover with hot lids and apply screw rings. Process both pints and quart jars for 30 minutes in a water bath canner. Removed canner lid. Wait 5 minutes, then remove jars, cool and store.
I would love to have a perfect garden, one that never had weeds or pests! However that is not the case, I have more than enough weeds to keep me busy pulling everyday and many varieties of pests. The most common variety found in my garden right now is the Japanese beetle.
Japanese Beetles have only been in the United States since 1916 when they were found in a nursery near Riverton, NJ. It is thought the beetle larvae entered the US in a shipment of Iris bulbs. I’m sure just about every gardener is familiar with the shiny, metallic green of the Japanese beetle. One little Japanese beetle might not do much damage but if there are a large number of them in your garden they can easily defoliate shrubs and trees, not to mention the plants in your garden.
Japanese Beetle
There are four stages of the Japanese beetle: egg, larvae, pupae and the adult beetle.
Life Cycle
The eggs are laid in the soil and are small, oval and white. The larvae stage is the white grub stage that you often find when you are weeding. They will grow in length as they feed and mature.
Japanese Beetle Larvae
During the pupae stage the grub starts to transform into a beetle. They start out cream colored and age to a reddish brown. The adult beetles are about 3/8 inch long and the shell is shiny, metallic green with copper-brown wing covers. Adults emerge from the ground sometime from May to June, depending on your area and they live for 30 to 50 days. The females eat for a few days and then burrow into the soil to lay their eggs. They then return to feeding and mating and start the cycle all over again. By the end of the season, each female Japanese beetle will have laid about 50 eggs!
During the adult stage they damage plants by skeletonizing the foliage, what you are left with is a lacey looking leaf. The plant eventually withers and dies.
Japanese Beetle Damage
It’s just about impossible to get rid of Japanese beetles totally, as more will fly in. One effective way is to go into your garden with a jar of soapy water and knock the beetles into the jar. Since the beetles feed in groups it is pretty easy to fill a jar with them. You can also use insecticidal soap to help control them by spraying directly on the beetles. There are also traps you can use which are effective at catching a lot of beetles however they also attract beetles and you may be attracting those beetles from your neighbors!
Beetle traps
If you have a large population check your soil in late summer. If you see more than a dozen grubs in a one-foot square of soil you might want to treat your lawn with a grub control. It is at the grub stage that it is susceptible to a fatal disease called milk spore disease, caused by a bacterium called milky spore. The USDA developed this biological control and it is commercially available in a powder form for you to apply to lawn areas.
Milky Spore
I kill every Japanese beetle grub I find when I am weeding, I also collect the beetles and put them in a jar of soap. This year I am also going to try putting down some milky spore and see if that makes a difference. What have you used to combat the Japanese beetle?
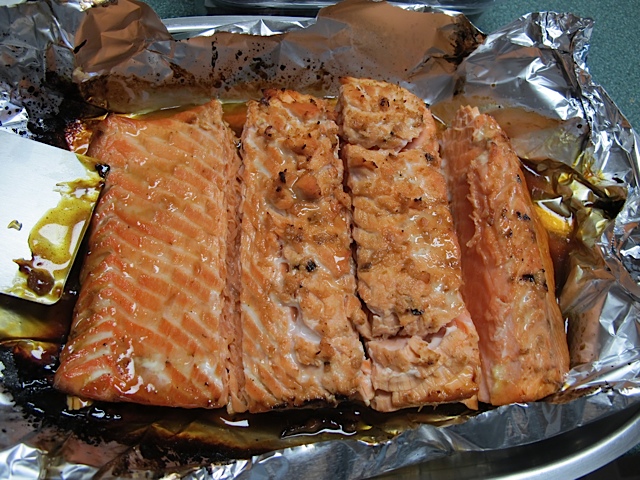
Growing up I don’t remember ever eating salmon. Living on the east coast we enjoyed lots of fish but not salmon. It wasn’t until our daughter moved to Seattle that I enjoyed salmon for the first time. I loved it! Now I search for fresh salmon to enjoy here in Vermont. One of our favorite ways to cook salmon is this wonderful Maple-Glazed Grilled Salmon recipe that coats the fish with a maple glaze. We can enjoy the maple syrup that Vermont has to offer with the wonderful taste of salmon, truly a winning combination.
Maple-Glazed Grilled Salmon
Ingredients:
¾ cup maple syrup
2 Tbsp ketchup
1 Tbsp dark brown sugar
1 Tbsp cider vinegar
1 Tbsp Worcestershire sauce
½ tsp salt
½ tsp ground mustard
1 salmon fillet (2 pounds)
Directions:
In a bowl, combine the first seven ingredients; mix well. Pour ½ cup into a large reseal able plastic bag; add the salmon. Seal the bag and turn to coat the fish. Refrigerate for up to two hours. Cover and refrigerate remaining marinade.
Before you start to grill be sure to spray your grill rack with cooking spray. Drain marinade from the fish. Grill salmon skin side up over medium-hot heat for 2-4 minutes. Transfer to a double thickness of heavy-duty aluminum foil. Spoon some of the reserved marinade over the fish. Fold the foil around the fillet and seal tightly. Grill 5-6 minutes longer or until the fish flakes easily with a fork. Brush with remaining marinade and serve. Serves 4-6
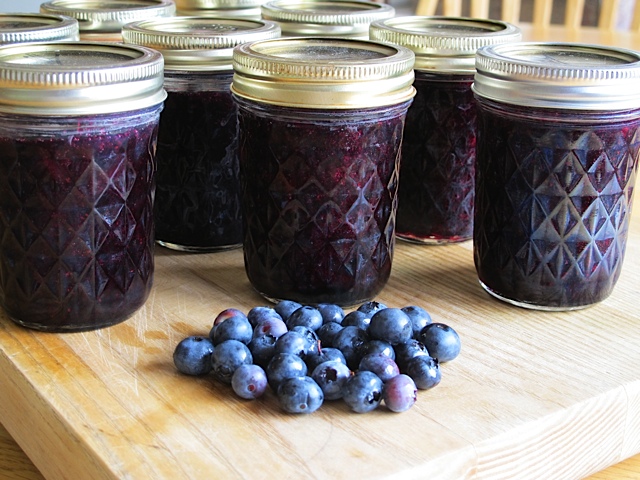
Nothing beats the taste of blueberry lime jam on homemade toast in the middle of winter. Brings back memories of picking those very same blueberries on a sunny, warm summer day. This recipe has a hint of lime in it, which makes it taste ever so refreshing. The recipe makes about six 8-ounce jars. Perfect for stocking your pantry or for gift giving.
Blueberry Lime Jam
Ingredients:
4 ½ cups crushed blueberries
Grated zest and juice of 1 large lime
1 package of regular powdered fruit pectin (1.75oz)
5 cups of granulated sugar
Directions:
Before you start prepare your canner, jars and lids.
In a large, deep stainless steel saucepan, combine berries, lime zest and lime juice.
Whisk in pectin until dissolved. Bring to a boil over high heat, stirring frequently. Add sugar all at once and return to a rolling boil, stirring constantly. Boil hard, stirring constantly for 1 minute. Remove from heat and skim off foam.
Ladle hot jam into hot jars, leaving ¼ inch headspace. Remove air bubbles and adjust headspace, if necessary by adding hot jam. Wipe rim. Center the lid on jar. Screw band down until resistance is met, then increase to fingertip-tight.
Place jars in canner, ensuring they are completely covered with water. Bring to a boil and process for 10 minutes. Removed canner lid. Wait 5 minutes, then remove jars, cool and store.